How to Create a Voice Flow
Learn how to configure, build, and test a voice flow end to end — from initial setup to deployment.
Overview
A Voice Flow defines the complete experience for phone-based interactions. It controls how the system answers calls, speaks to callers, understands their responses, applies logic, and routes them to the right destination.
Creating a voice flow involves three stages:
- Configure — Set up the flow name, language, voice, and AI settings
- Build — Design the call logic in the Flow Playground using nodes
- Test — Validate the flow before going live
Step 1: Configure the Voice Flow
Navigate to Settings → Flow and click + Add to open the new flow dialog.
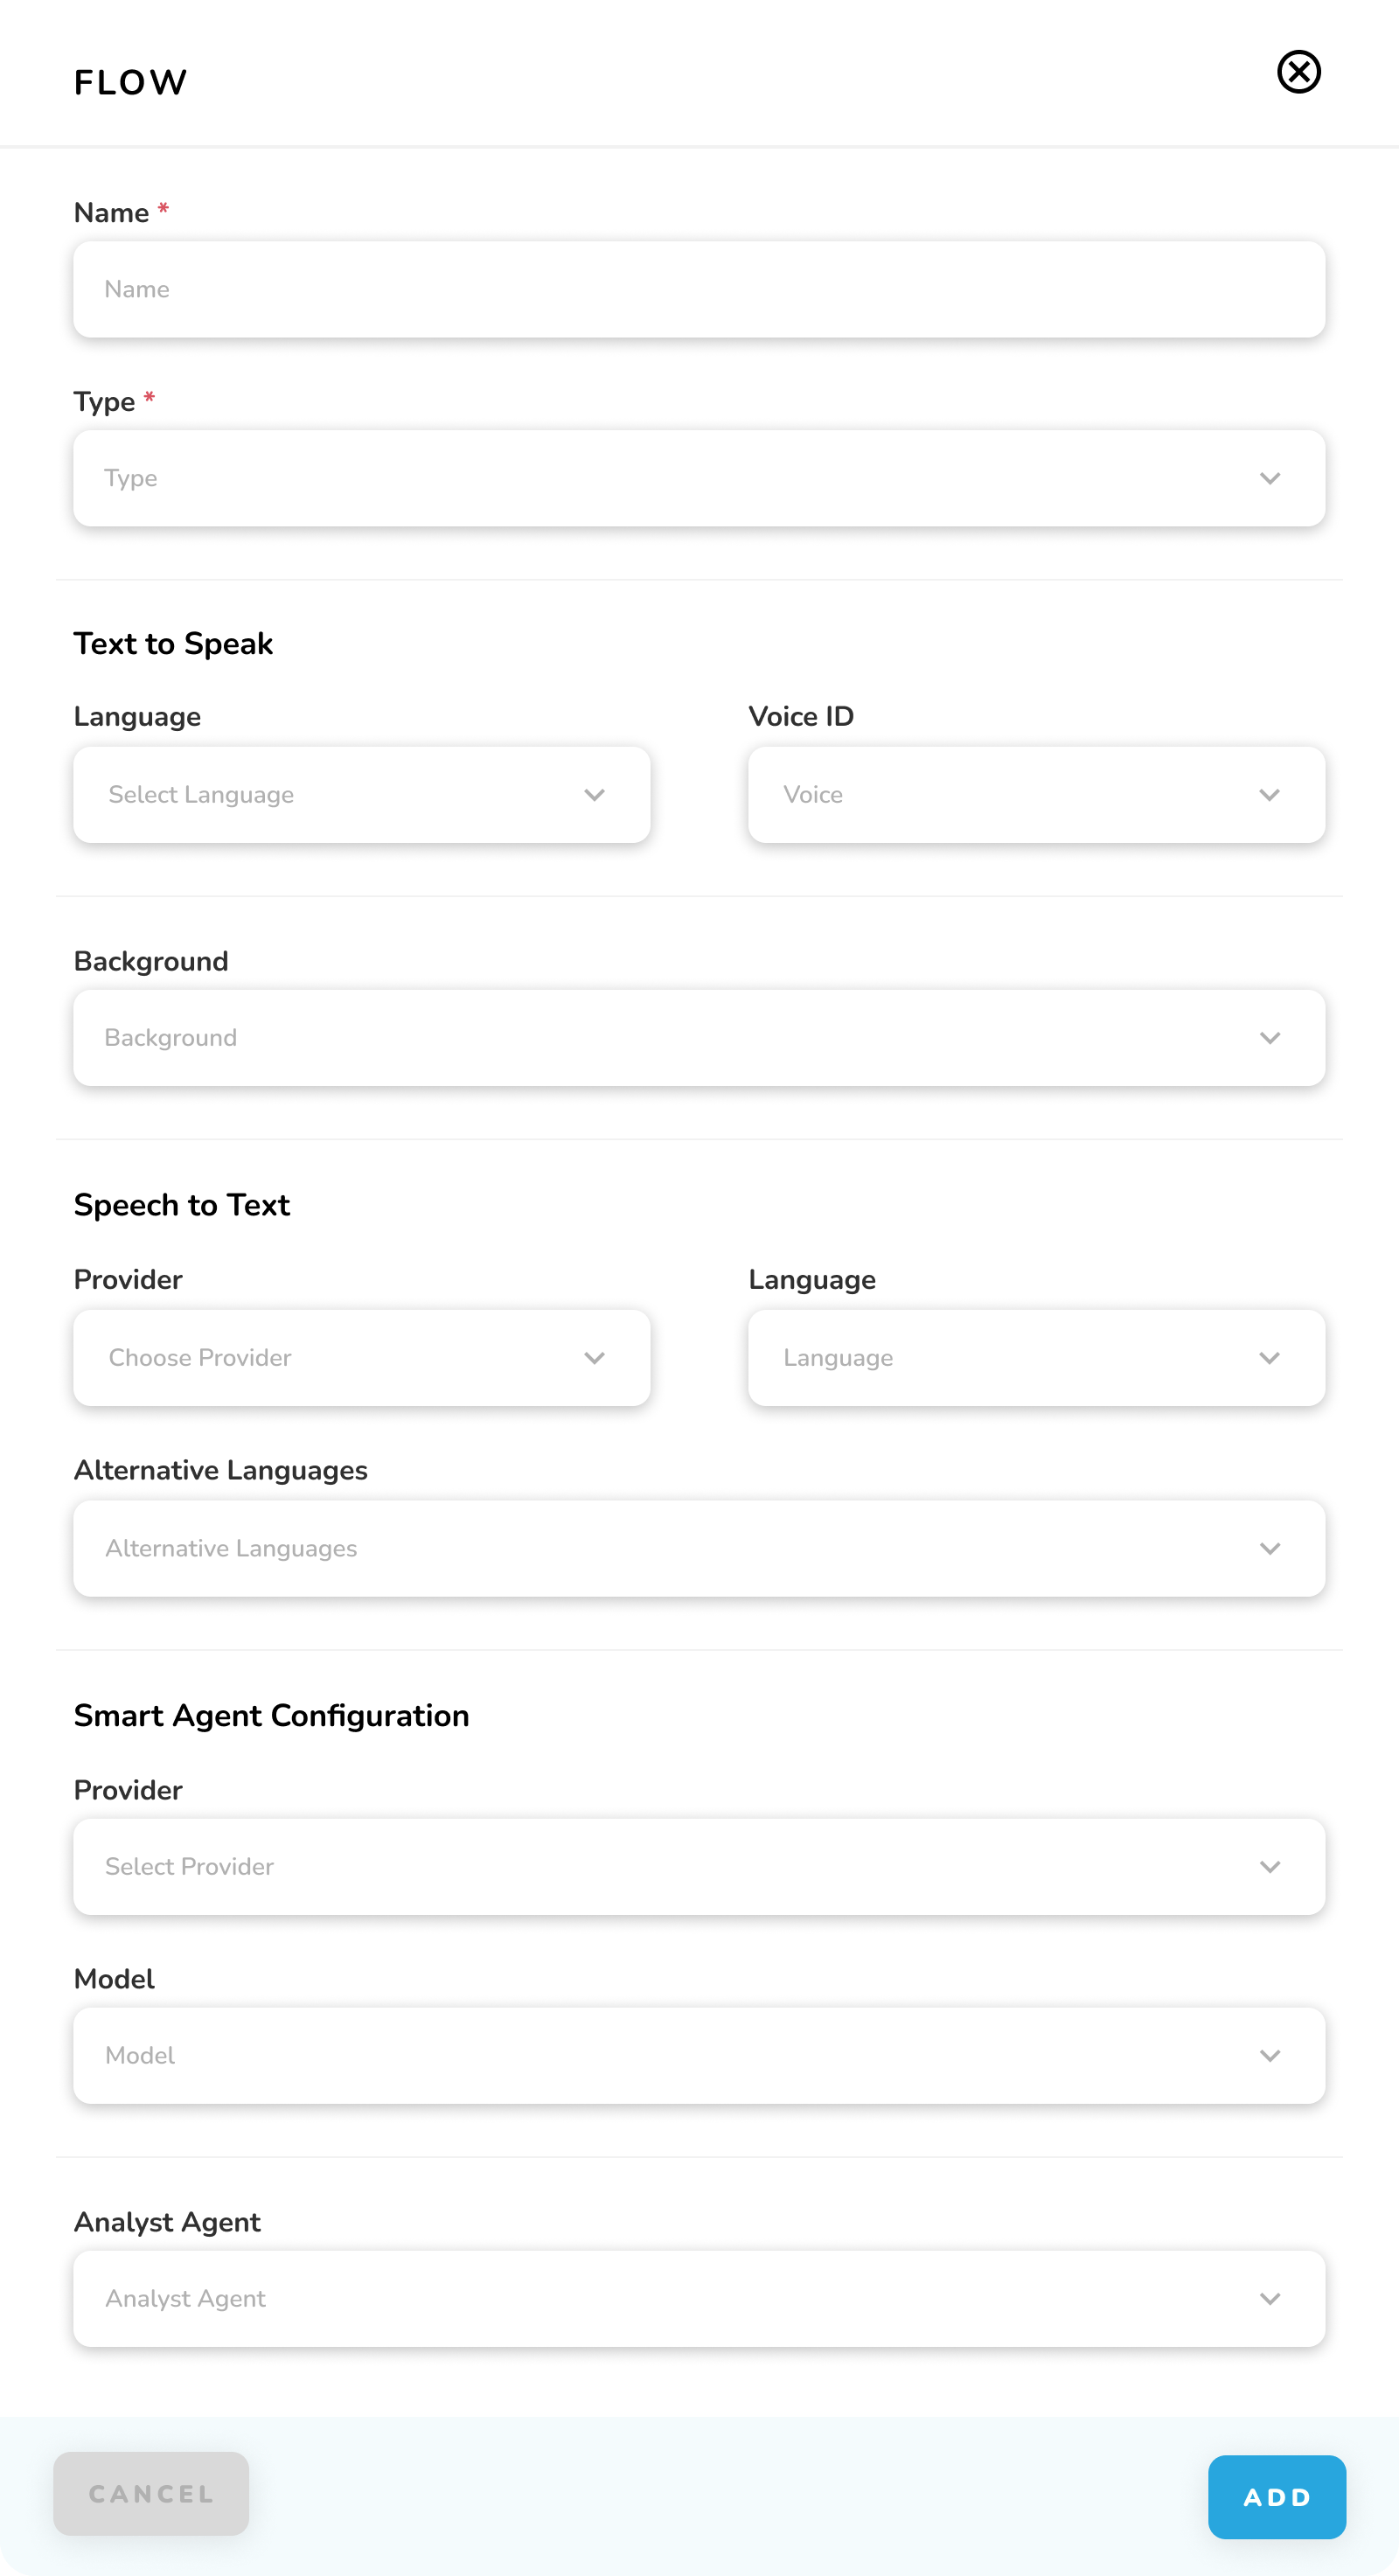
Basic Information
| Field | Description | Required |
|---|---|---|
| Name | Unique flow name | Yes |
| Type | Select Voice | Yes |
Text to Speak Settings
Configure how the system speaks to callers:
- Language — Select the primary language for voice output
- Voice ID — Choose the voice type (tone and gender) for spoken responses
- Background — Optionally add background audio to play during the call
Speech to Text Configuration
Set up how the system captures and understands caller speech:
- Provider — Select your preferred speech recognition service provider
- Language — Set the primary language for recognizing caller input
- Alternative Languages — Add additional languages to support multilingual callers
Smart Agent Configuration
Connect an AI model to power intelligent responses within the flow:
- Provider — Select the AI service provider
- Model — Choose the specific AI model
- Analyst Agent — Optionally assign an analysis agent for post-call insights
Once all settings are configured, click ADD to create the flow and open it in the Flow Playground.
Text to Speak and Speech to Text settings are required for voice flows. Ensure both are fully configured before building your flow logic.
Step 2: Build the Flow in the Playground
The Flow Playground is the visual canvas where you design the call logic by connecting nodes.
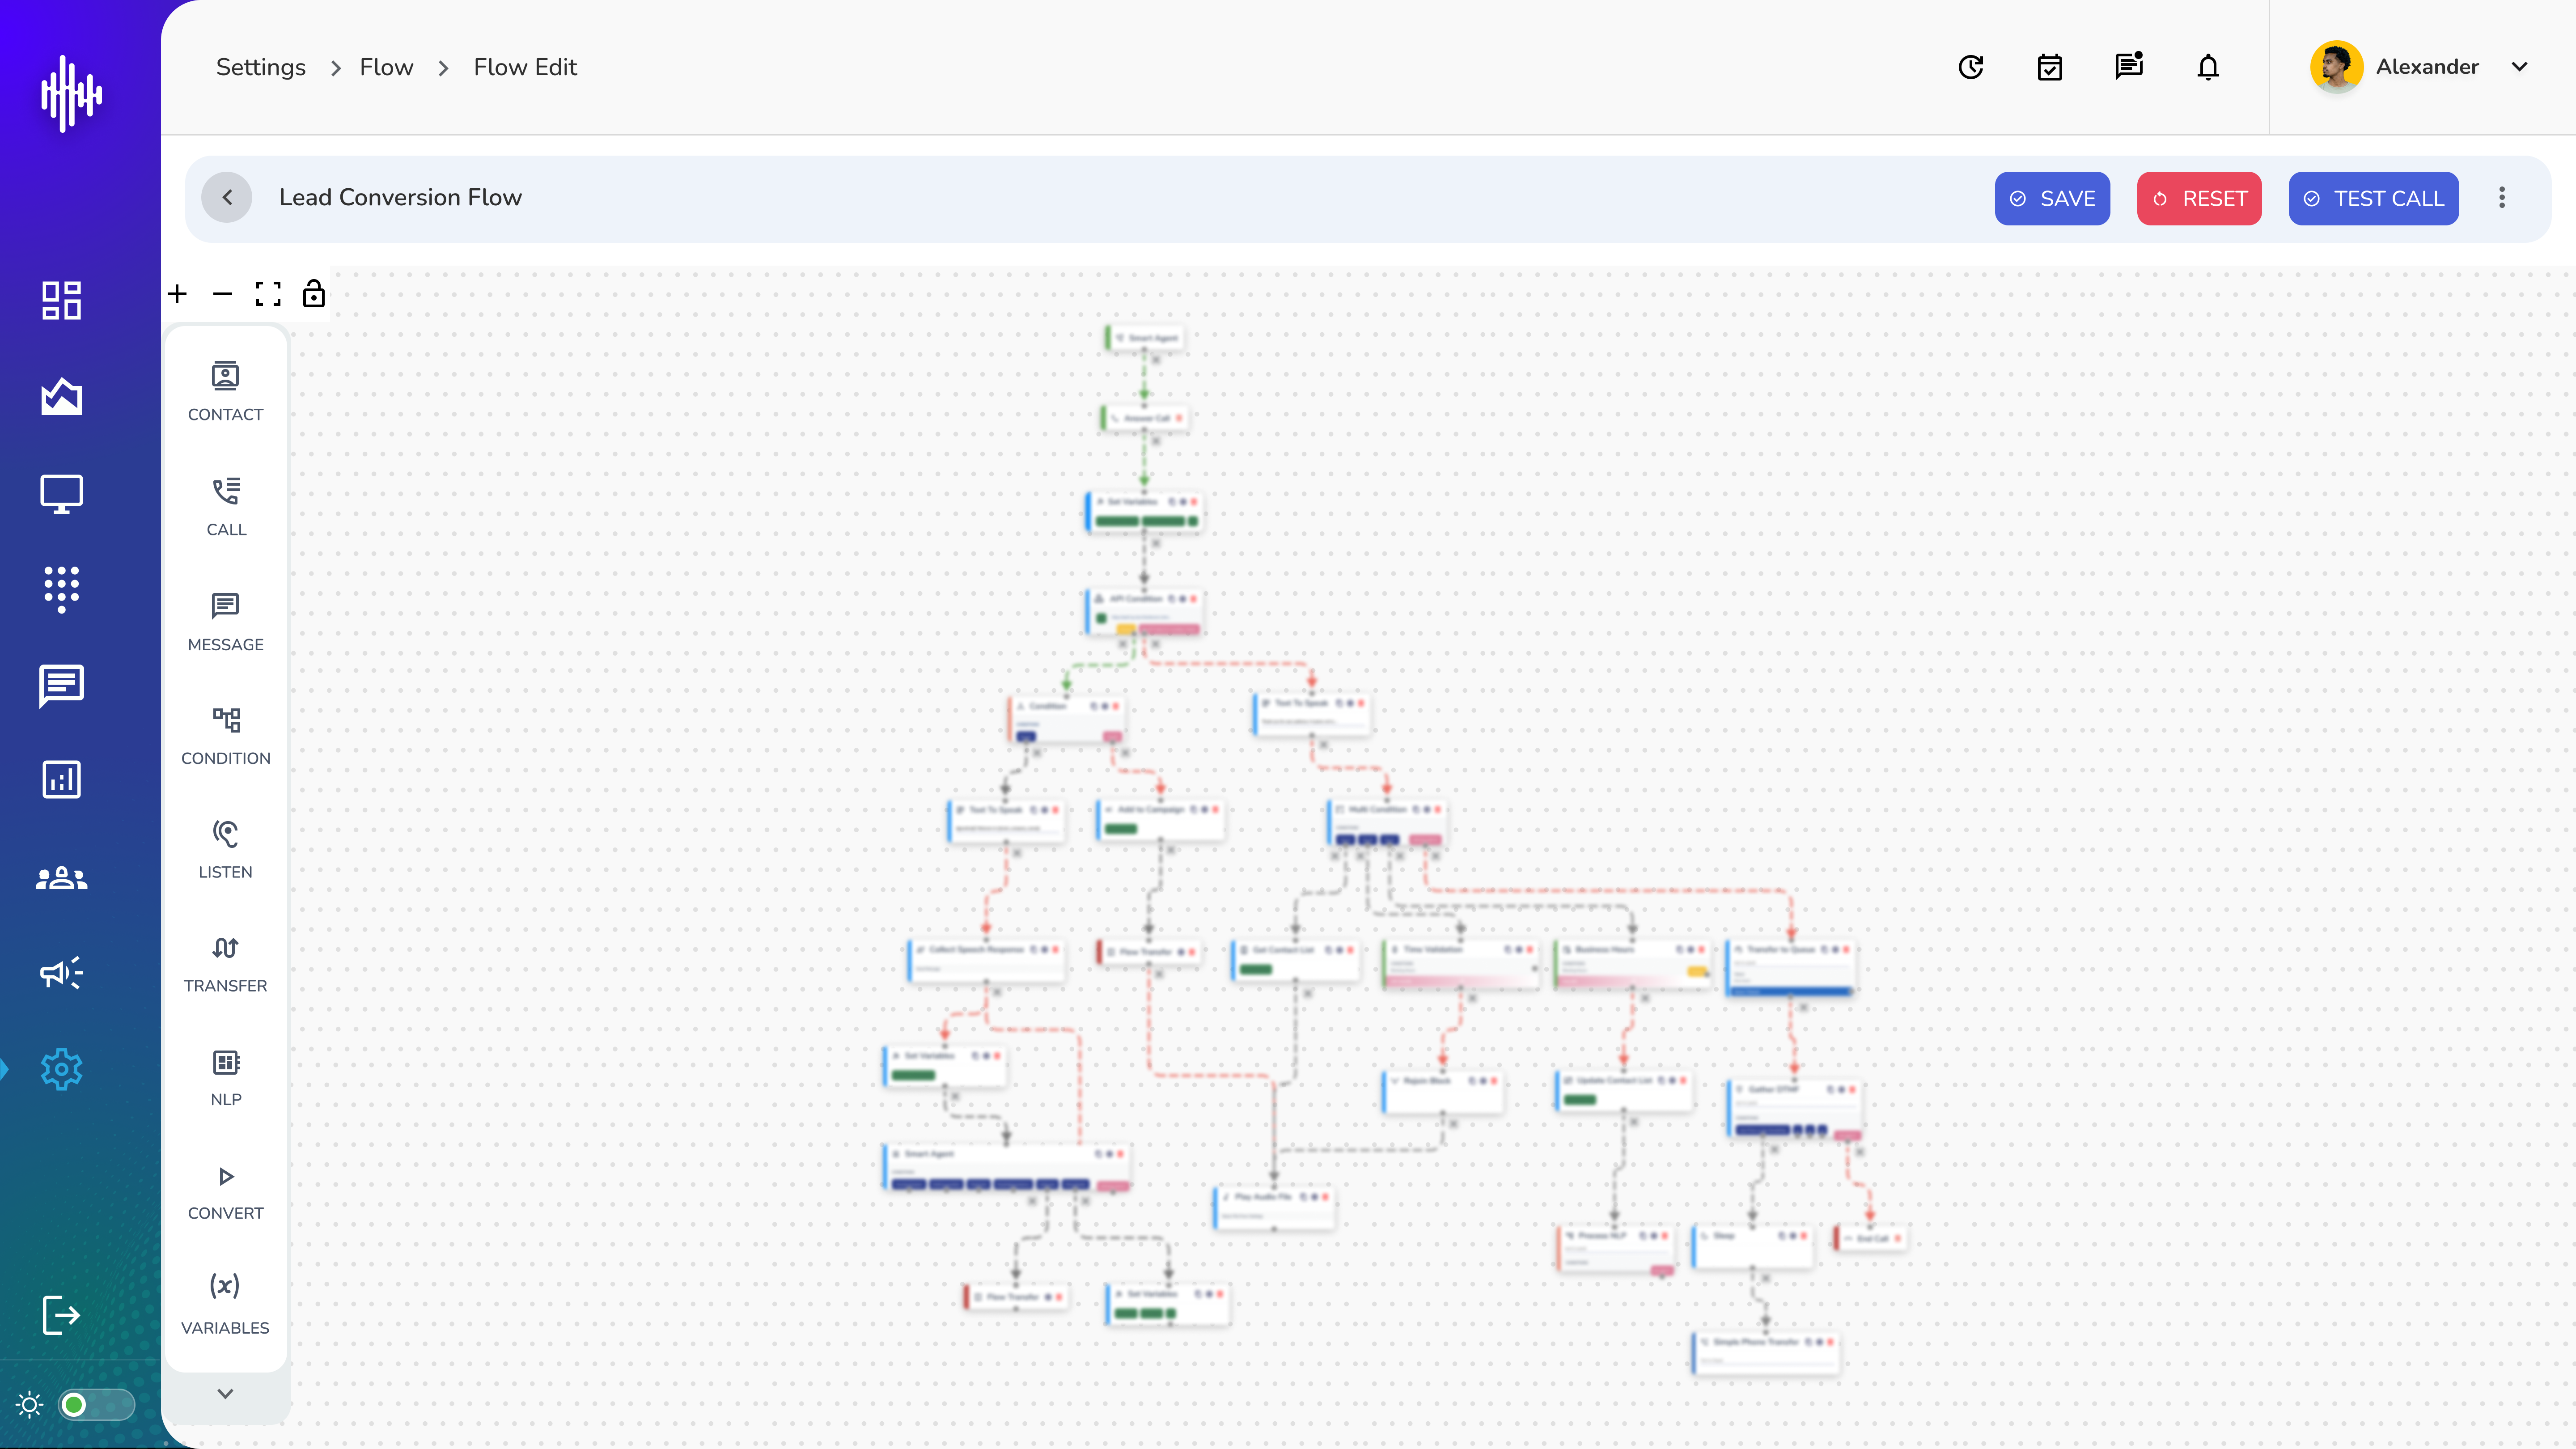
When the Playground opens, you will see:
- Left sidebar — All available node types to drag onto the canvas
- Canvas — The working area where you connect and configure nodes
- Top bar — SAVE, RESET, TEST CALL, and additional options
Understanding Voice Flow Nodes
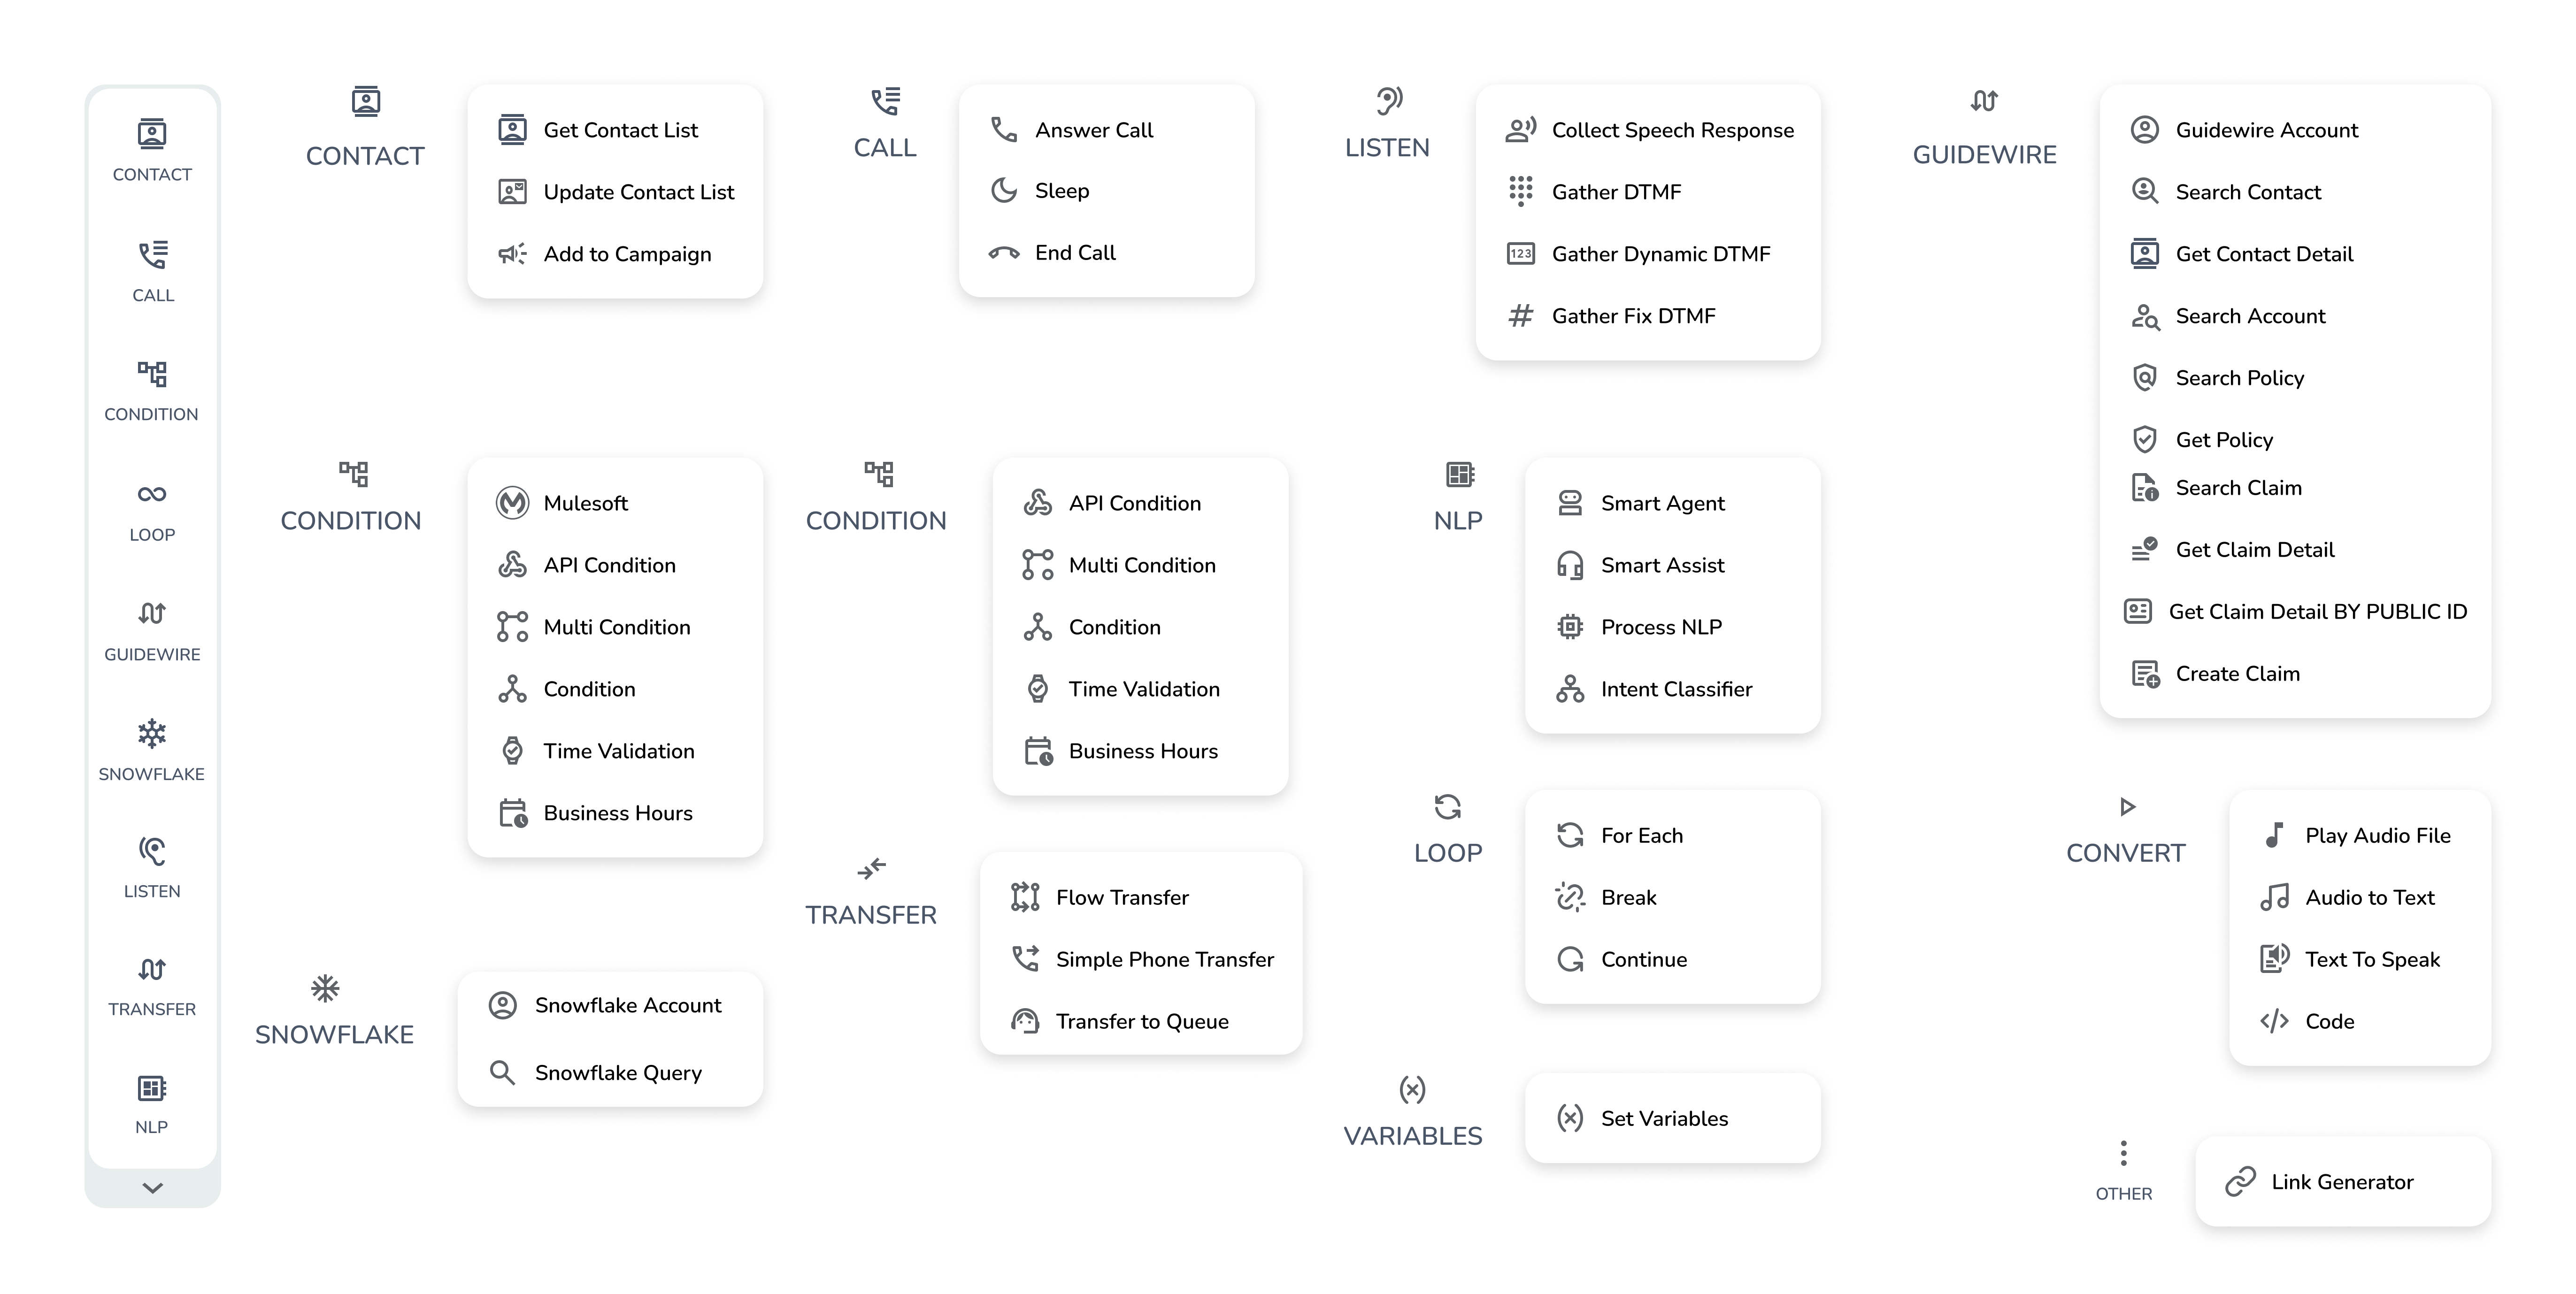
The following nodes are used to build voice flows. Each node serves a specific purpose in the call journey.
CALL
The entry point for any voice flow. Handles how the call is initiated and managed at the system level.
| Sub-node | Description |
|---|---|
| Answer Call | Answers an incoming call and begins the flow |
| Rejoin Block | Returns the caller to a previous point in the flow |
| Sleep | Introduces a timed pause before the next step executes |
| End Call | Terminates the call and closes the flow |
Always start your voice flow with an Answer Call node and end every path with an End Call node.
LISTEN
Captures input from the caller. Use after playing a prompt to collect what the caller says or presses.
| Sub-node | Description |
|---|---|
| Collect Speech Response | Captures free-form spoken input from the caller |
| Gather DTMF | Collects keypad input (e.g., "Press 1 for Sales") |
| Gather Dynamic DTMF | Collects keypad input where options are determined dynamically |
| Gather Fix DTMF | Collects a fixed-length keypad entry (e.g., a 4-digit PIN) |
Always pair a CONVERT → Text To Speak node before a LISTEN node to first play a prompt, then capture the caller's response.
CONVERT
Handles audio output to the caller. Use to play messages or convert text into spoken audio.
| Sub-node | Description |
|---|---|
| Text To Speak | Converts a text message into spoken audio played to the caller |
| Play Audio File | Plays a pre-recorded audio file to the caller |
Use Text To Speak for dynamic messages such as personalised greetings, and Play Audio File for fixed recordings like hold music or legal disclaimers.
NLP
Processes and interprets caller speech to understand intent and drive the flow logic.
| Sub-node | Description |
|---|---|
| Smart Agent | Uses an AI agent to understand intent and generate a response |
| Smart Assist | Provides AI-assisted suggestions to support the flow or a live agent |
| Process NLP | Runs NLP processing on captured speech to extract meaning and intent |
Use Smart Agent for fully automated AI-driven conversations and Smart Assist when a live agent is involved and needs real-time support.
CONDITION
Controls the branching logic of your flow. Routes the caller down different paths based on their input, data, or time-based rules.
| Sub-node | Description |
|---|---|
| API Condition | Branches based on the response returned from an API call |
| Multi Condition | Evaluates multiple conditions simultaneously and routes accordingly |
| Condition | Standard if/else branching based on a variable or caller input value |
| Time Validation | Routes the flow based on the current time (e.g., peak vs. off-peak) |
| Business Hours | Checks if the current time falls within configured business hours |
Use Business Hours to play a different message or route differently when your team is offline.
TRANSFER
Routes the call to an agent, queue, or external destination.
Use the TRANSFER node when the flow needs to hand off the caller to a live agent or another system. Configure the destination, transfer type, and fallback behaviour if the transfer fails.
CONTACT
Manages caller contact data within the flow.
| Sub-node | Description |
|---|---|
| Get Contact List | Retrieves a list of contacts matching defined criteria |
| Update Contact List | Updates a contact's details based on caller interaction |
| Add to Campaign | Adds the caller's contact to a specific campaign |
VARIABLES
Stores and passes data between nodes throughout the flow. Use variables to capture caller input, API responses, or any dynamic values that need to be referenced later in the flow.
Common uses:
- Store the caller's name or account number
- Pass data between a LISTEN node and a CONDITION node
- Carry values through to a TRANSFER or GUIDEWIRE node
GUIDEWIRE
Connects the flow directly to Guidewire for insurance-related data operations.
| Sub-node | Description |
|---|---|
| Guidewire Account | Retrieves account information from Guidewire |
| Search Contact | Searches for a contact record in Guidewire |
| Get Contact Detail | Fetches full details of a specific contact |
| Search Account | Searches for an account in Guidewire |
| Get Contact List | Retrieves a contact list from Guidewire |
| Get Policy | Fetches policy details for a given contact |
| Search Claim | Searches for an existing claim in Guidewire |
| Get Claim Detail | Retrieves full details of a specific claim |
| Create Claim | Creates a new claim record directly from the flow |
Building Your Voice Flow
How to Add and Connect Nodes
- Drag a node from the left sidebar onto the canvas
- Connect nodes by drawing a line from one node's output to the next node's input
- Click any node to open its configuration panel and fill in the required fields
- Save frequently as you build using the SAVE button in the top bar
Every flow path must begin with a CALL → Answer Call node and end with a CALL → End Call node. Paths without an end point will cause the flow to fail.
Recommended Voice Flow Structure
Here is a typical end-to-end voice flow pattern:
Answer Call
  └── CONVERT: Text To Speak (Welcome greeting)
        └── LISTEN: Collect Speech Response (Capture caller intent)
              └── NLP: Process NLP (Interpret intent)
                    └── CONDITION: Multi Condition
                          ├── Intent = Claim
                          │     └── GUIDEWIRE: Search Claim
                          │           └── CONVERT: Text To Speak (Claim details)
                          │                 └── End Call
                          ├── Intent = Policy
                          │     └── GUIDEWIRE: Get Policy
                          │           └── CONVERT: Text To Speak (Policy details)
                          │                 └── End Call
                          └── Intent = Agent
                                └── CONDITION: Business Hours
                                      ├── Open → TRANSFER (Route to live agent)
                                      └── Closed → CONVERT: Text To Speak (Closed message)
                                                        └── End Call
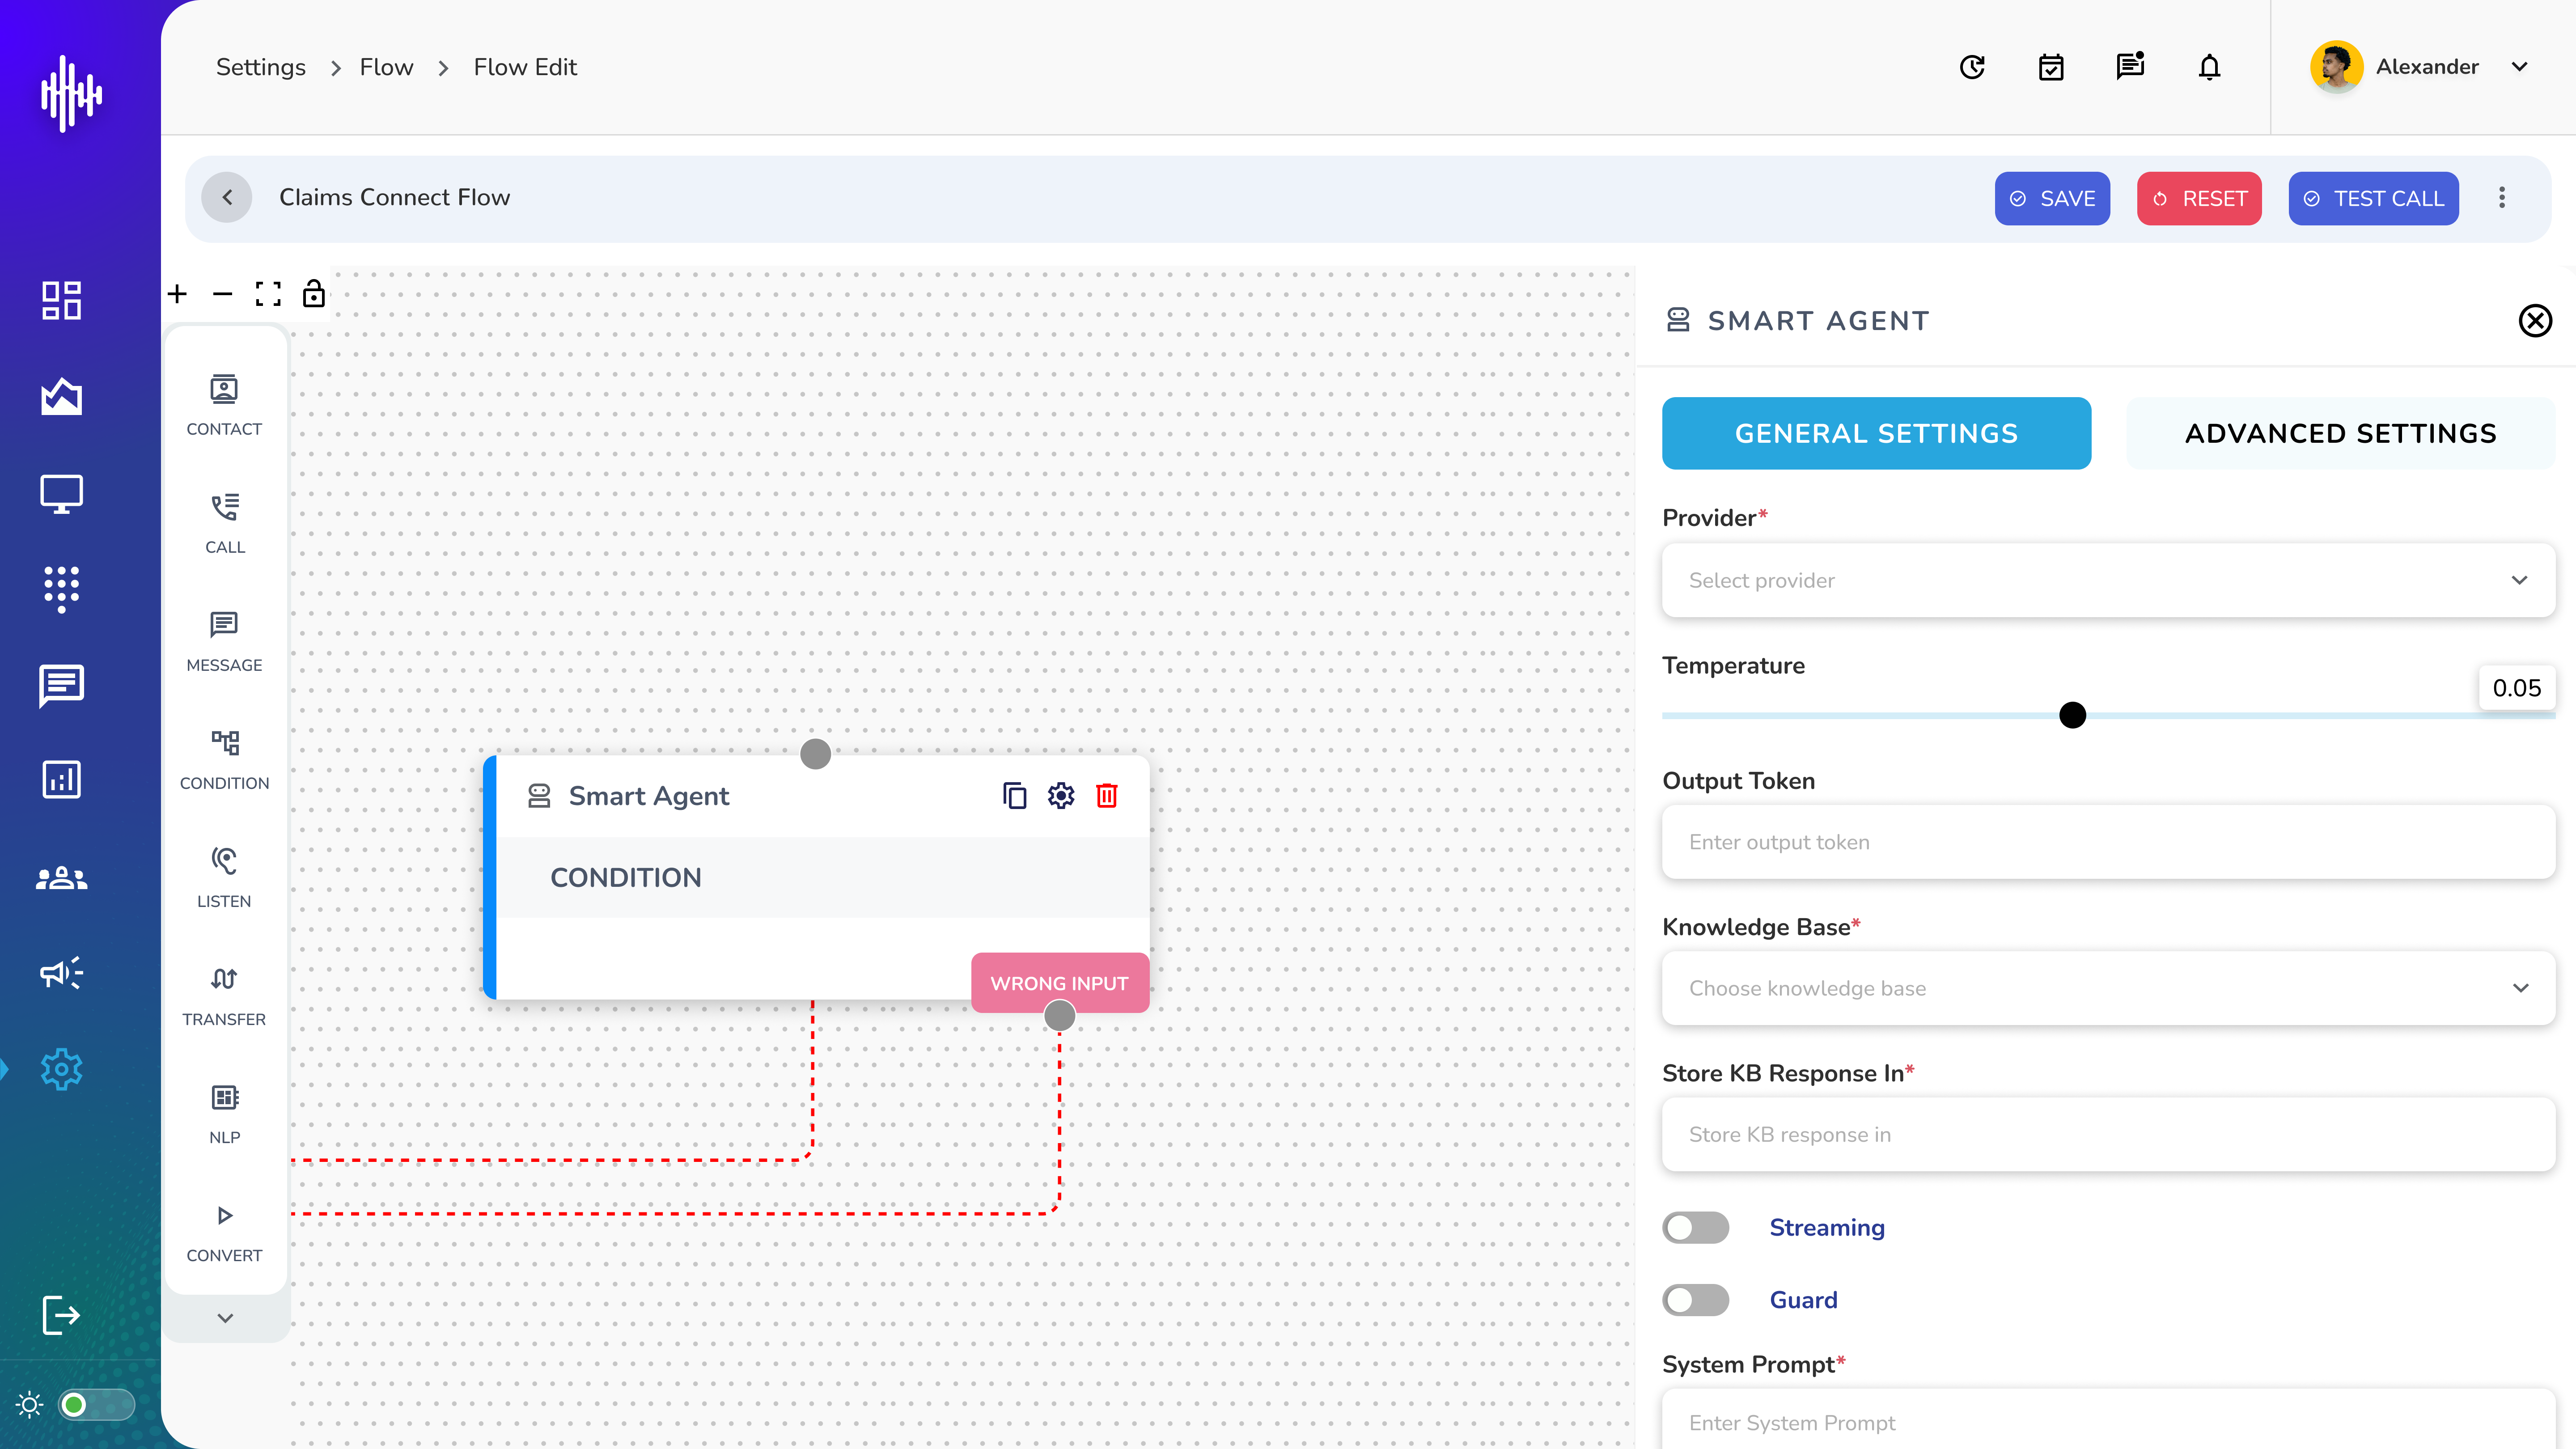
Step 3: Test the Voice Flow
Before deploying, always run a full test to validate the logic and audio experience.
Running a Test Call
- Click TEST CALL in the top bar of the Playground
- The system simulates an incoming call through your flow
- Interact as a caller would — speak responses or enter keypad input
- Verify the flow routes correctly at each step and through every branch
What to Verify
- Welcome prompt plays correctly and is clearly worded
- LISTEN nodes capture speech and DTMF input accurately
- NLP correctly interprets caller intent
- CONDITION branches route to the correct paths
- GUIDEWIRE nodes return the expected data
- TRANSFER routes to the intended destination
- Every path in the flow ends with an End Call node
- No broken connections or dead ends exist
Save and Deploy
Once testing is complete:
- Click SAVE to store the final version of the flow
- Assign the flow to the relevant channel from your channel settings
Always test with multiple scenarios — including unexpected or unclear caller inputs — before going live.