Knowledge Base
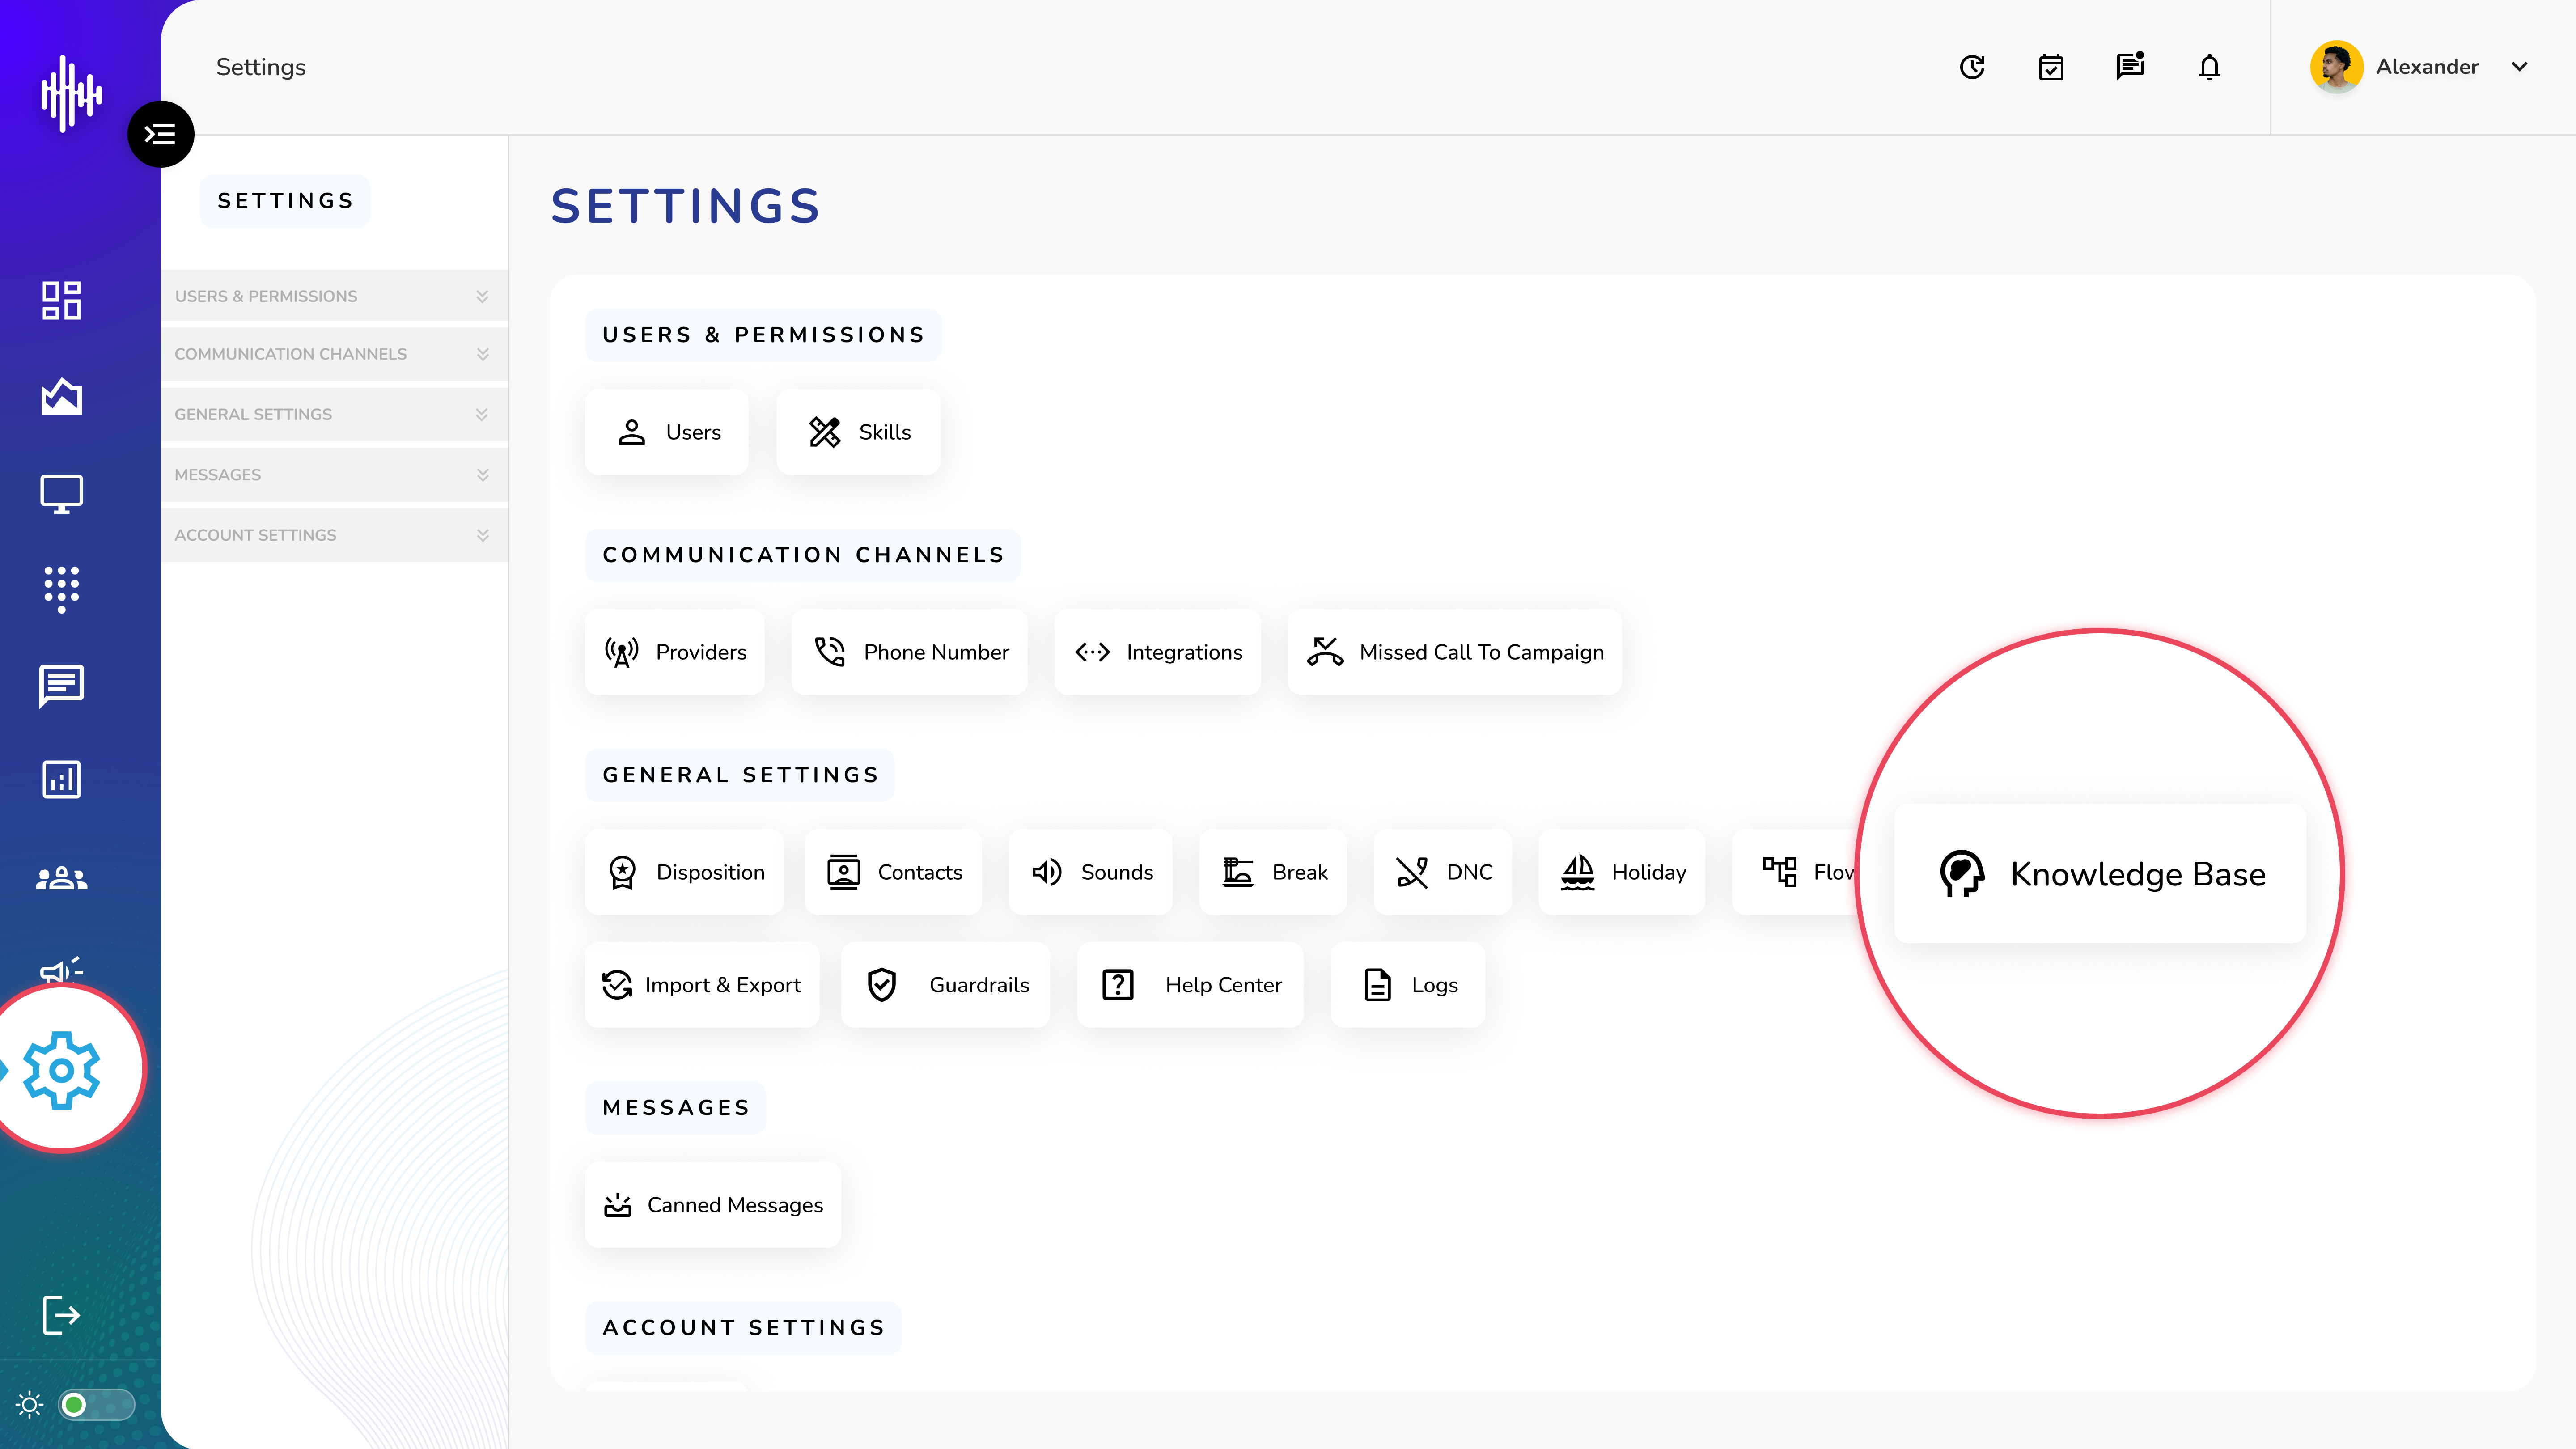
1. Login to your admin account
2. Click "Settings" from the left side menu
3. Click “Knowledge Base” to access the Knowledge Base's details.
Knowledge Base Management
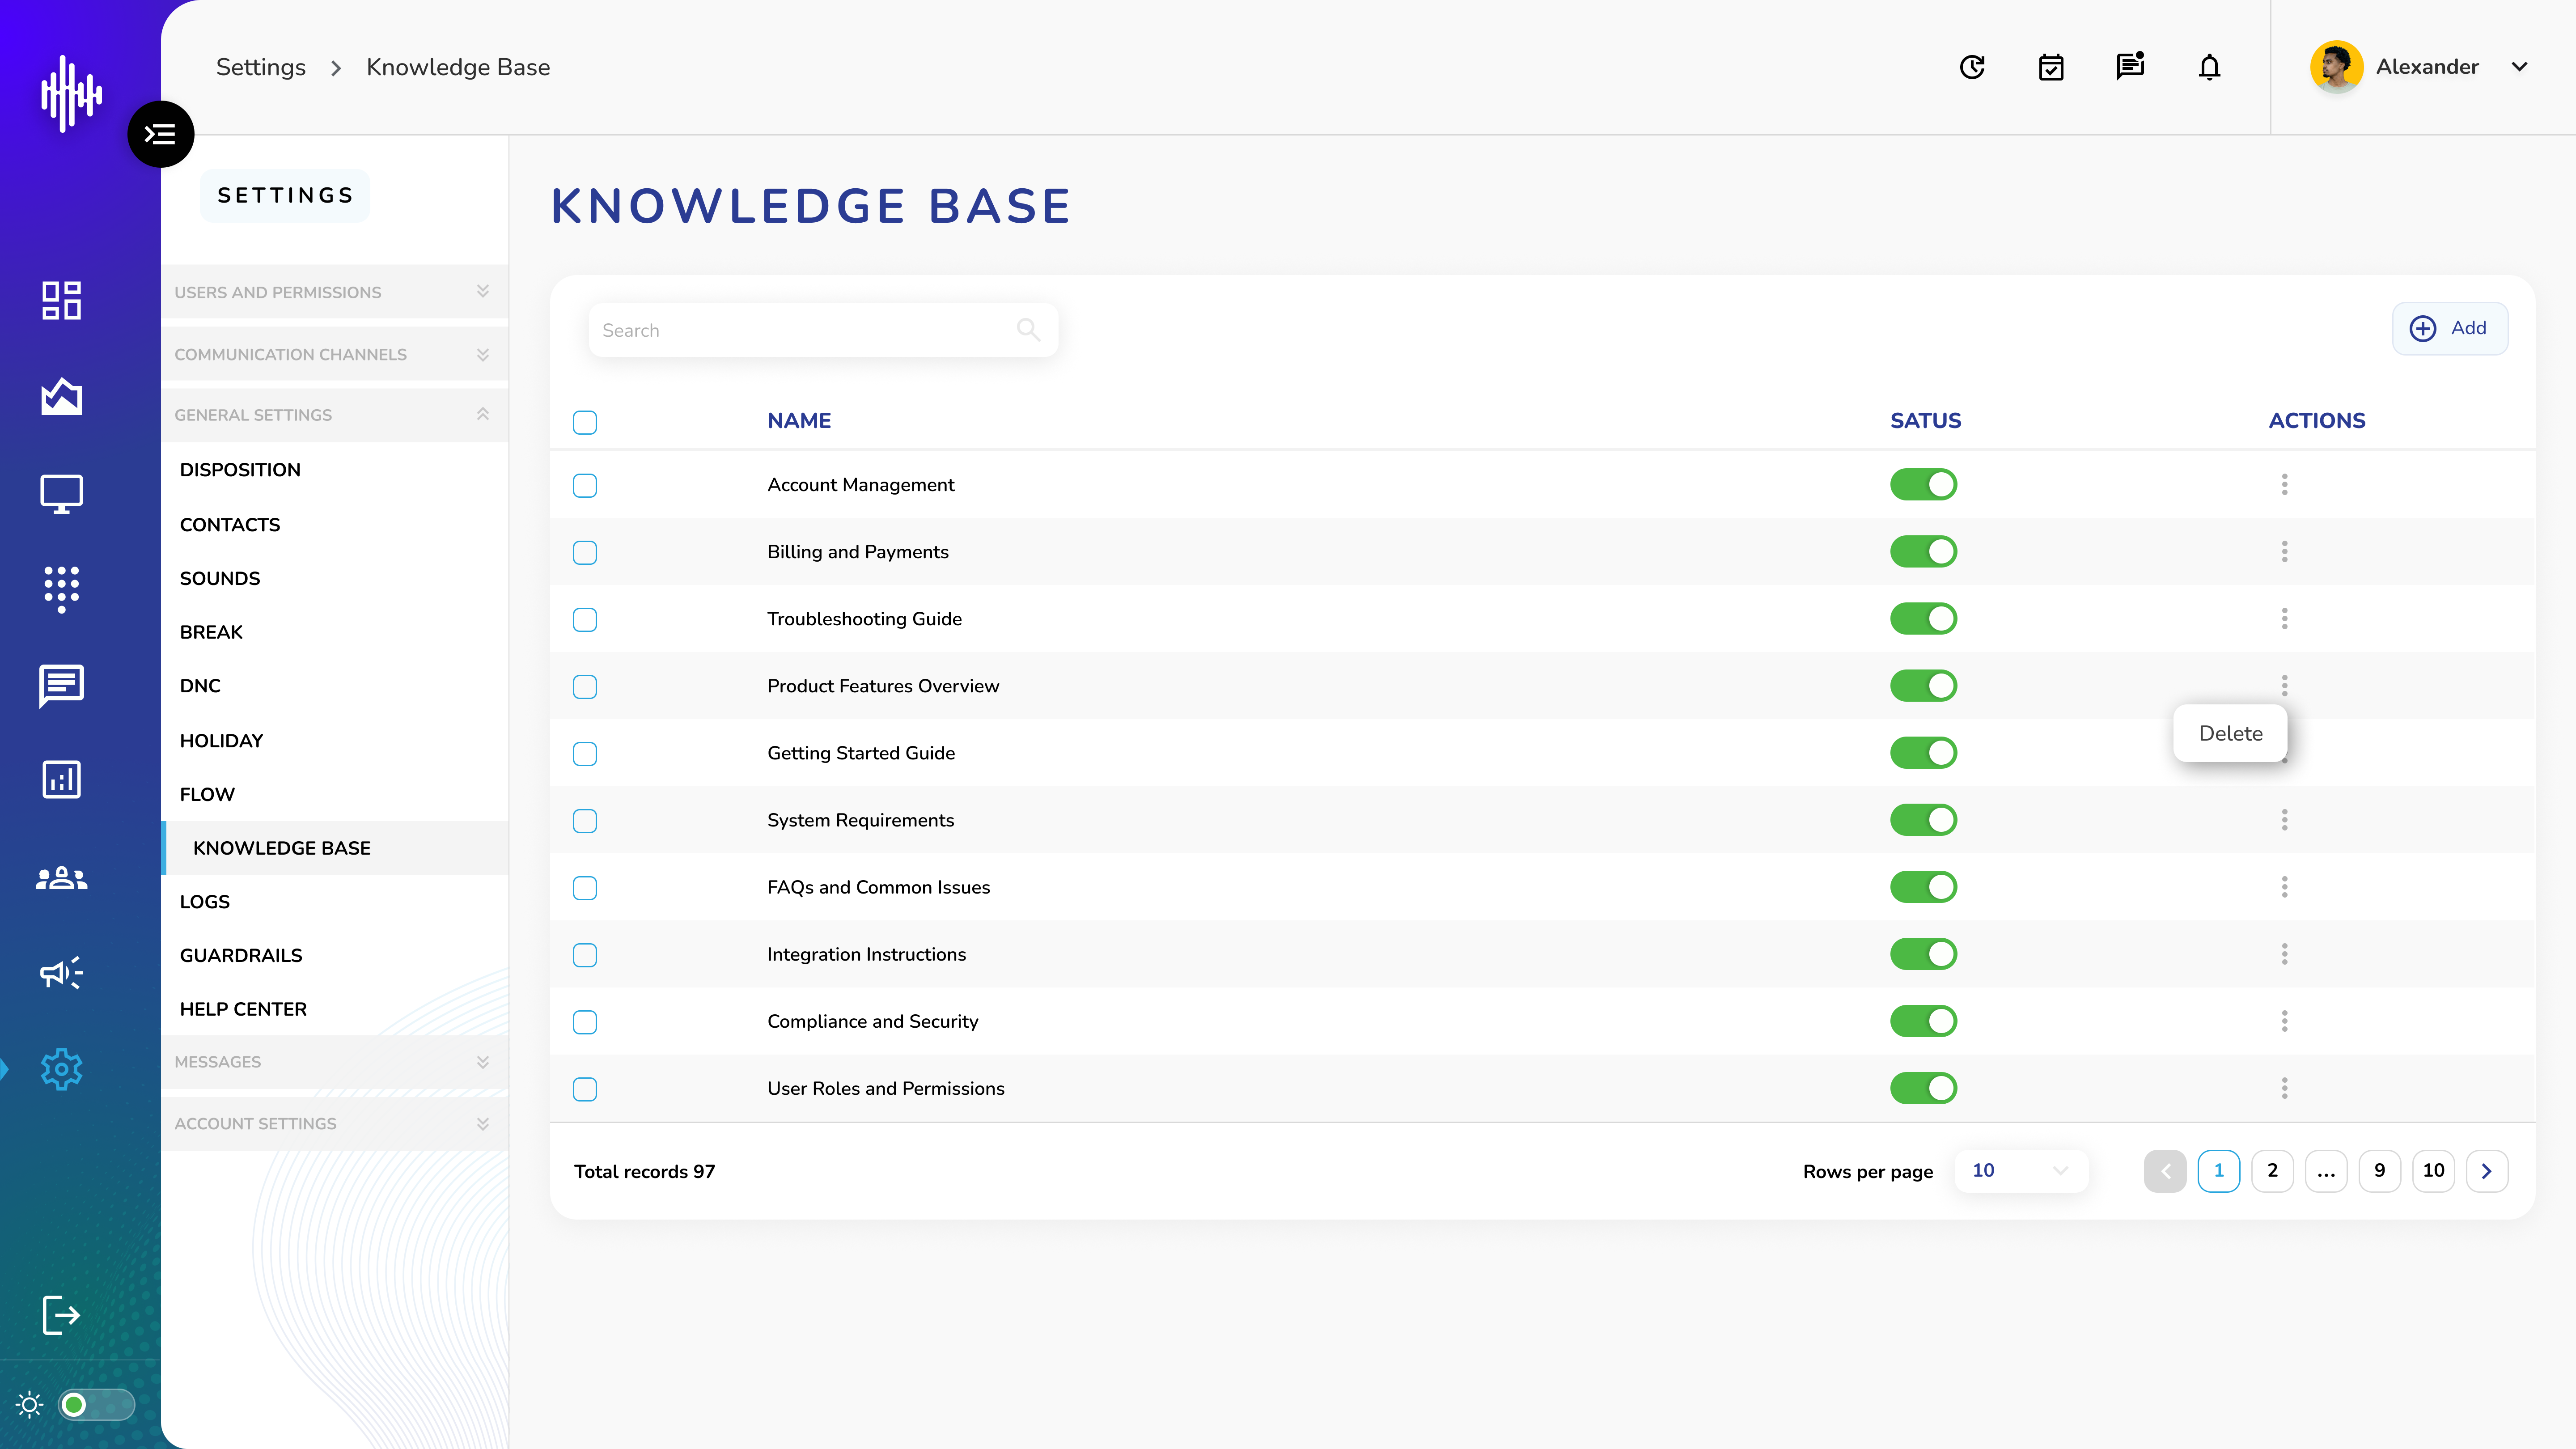
1. Screen Elements
a. Search Bar (Left side)
b. Filter knowledge base articles by name
2. Knowledge Base Display
| Column | Description |
|---|---|
| Name | Article title |
| Status | Enable/Disable toggle |
| Actions | Delete option |
3. Features
a. Toggle switch to enable/disable articles
b. "+Add" button to create new articles
c. Delete option via three-dot menu
d. Pagination controls at bottom
Important Notes:
-
Disabled articles aren't visible to users
-
Verify before deleting articles
-
Changes take effect immediately
-
Articles can be reactivated if needed
Create a new Knowledge Base Guide
Step 1: Choose Data Source
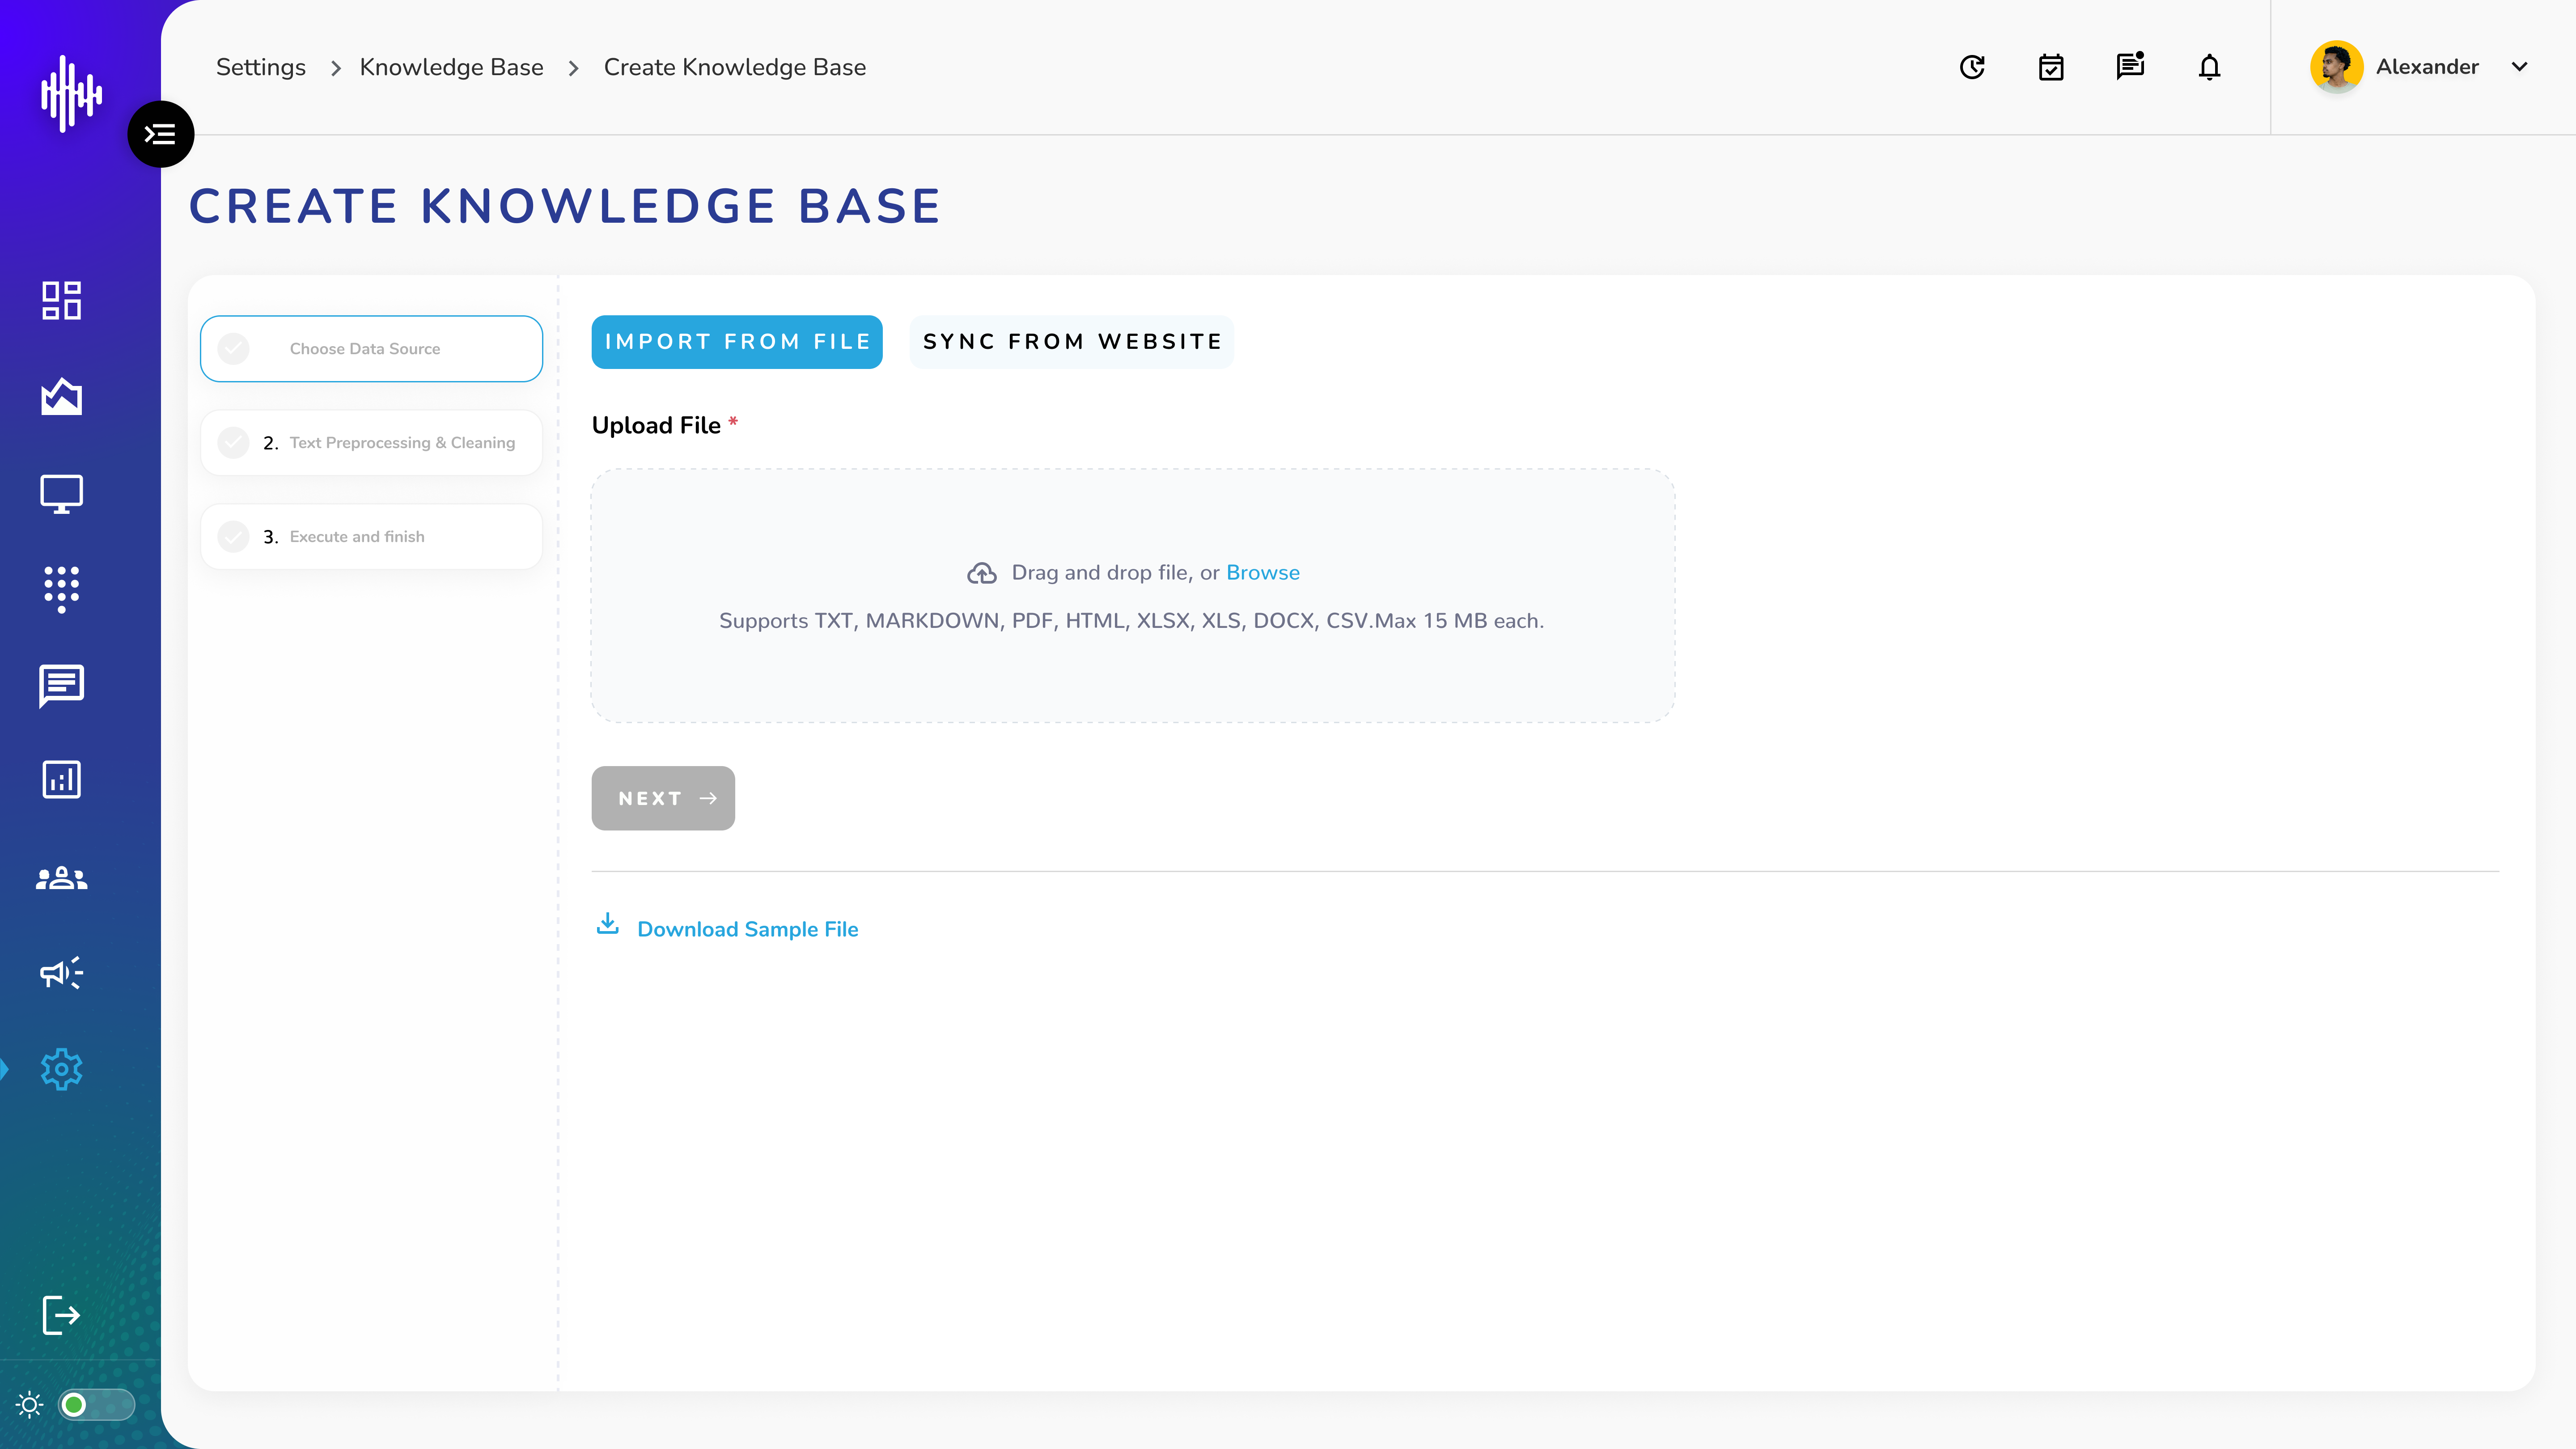
a. Option A: Import from File
i. Select "Import from File" tab
ii. Upload file by either:
1. Dragging and dropping file into upload area
2. Clicking upload area to browse files
3. Supported File Formats:
| Format | Description |
|---|---|
| TXT | Text files |
| MARKDOWN | MD files |
| Adobe PDF | |
| HTML | Web pages |
| XLSX/XLS | Excel files |
| DOCX | Word documents |
| CSV | Comma-separated values |
File Size Limit: 15 MB per file
b. Option B: Sync from Website
i. Select "Sync from Website" tab
ii. Enter valid URL in the input field
iii. System will fetch content from provided URL
c. Navigation
i. Progress steps shown at top
ii. Download sample file available
iii. Next button to proceed to Step 2
Important Notes:
-
Verify file format before upload
-
Check file size meets requirements
-
Ensure website URLs are accessible
-
Files must contain valid content
Step 2: Text Processing and Cleaning
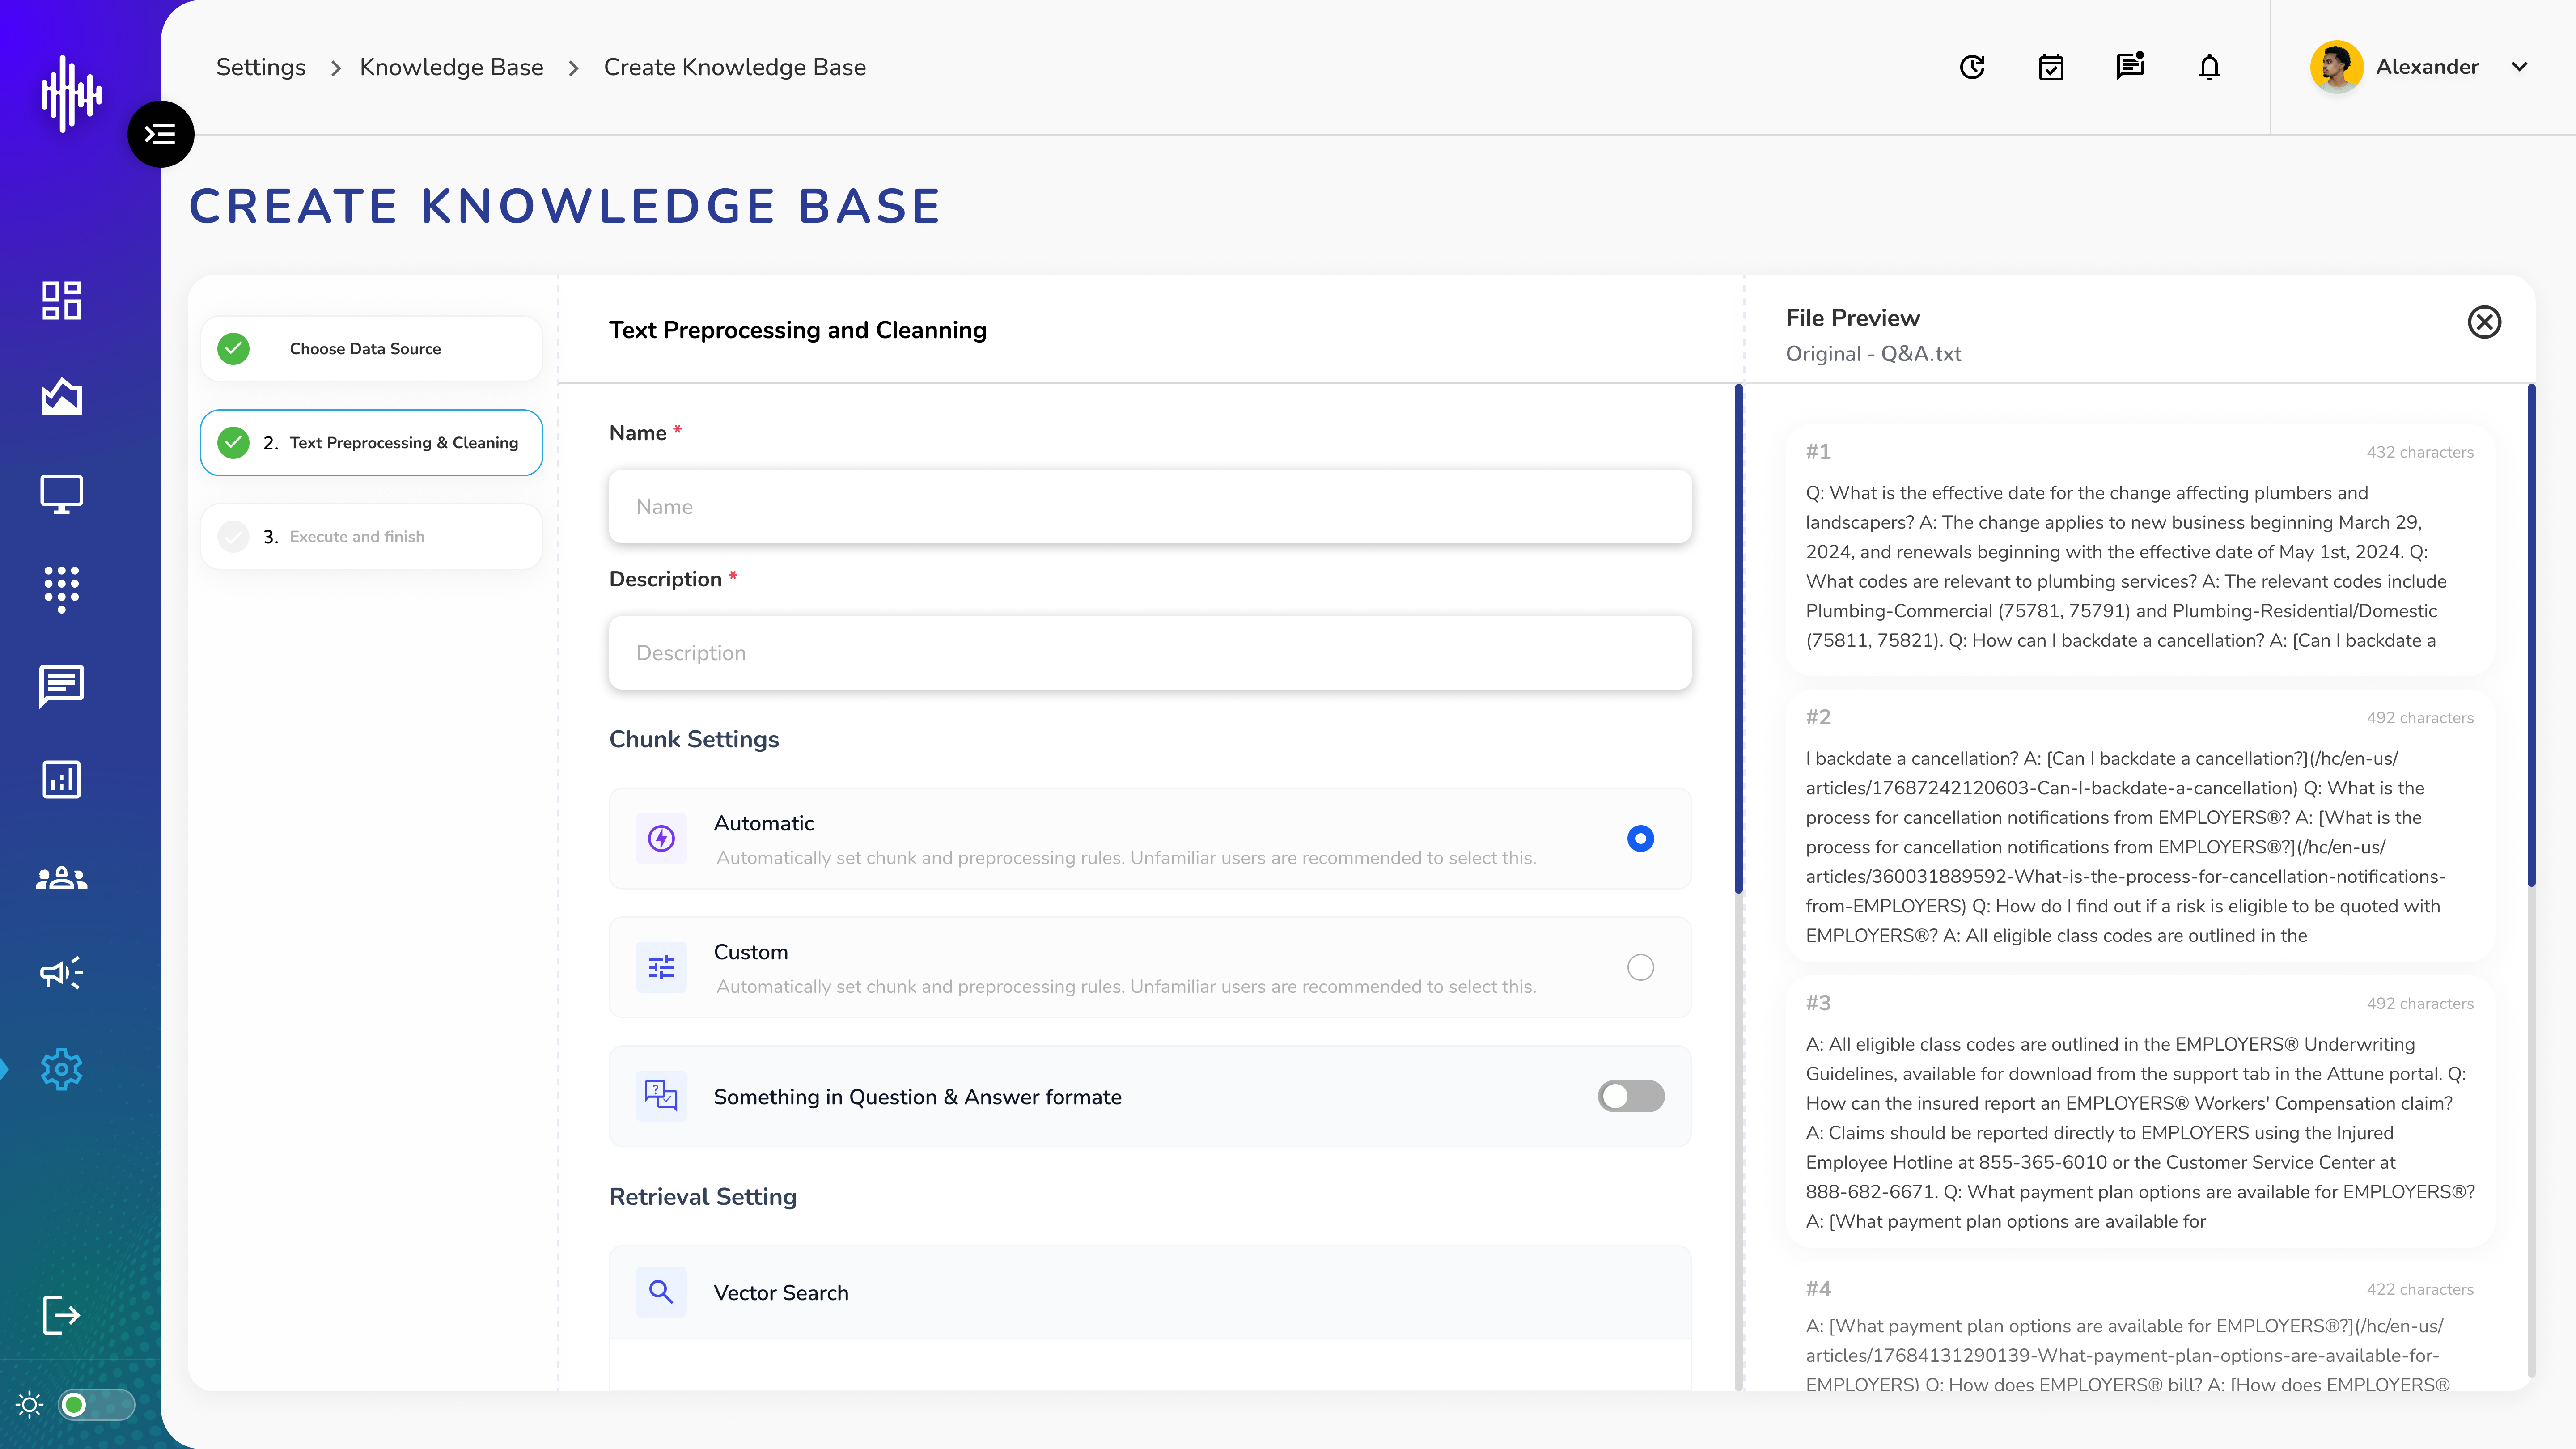
1. Required Fields
| Field | Description | Required |
|---|---|---|
| Name* | Title of knowledge base | Yes |
| Description* | Knowledge base overview | Yes |
2. Chunk Settings
a. Automatic Mode
i. System-managed text processing
ii. Recommended for most users
iii. Default preprocessing rules applied
b. Custom Mode
i. Manual control options:
1. Segment format
2. Minimum chunk length
3. Chunk overlap
ii. Text preprocessing rules selection
iii. Learning & Memory settings
3. Additional Settings
a. Question & Answer Format
i. Toggle for Q&A segmentation
4. Retrieval Settings [Vector Search (Default)]
a. Reranked Model toggle
i. If enabled – drop down to select a model
b. Adjust Top K (Value can set between 0-10)
c. Set Score Threshold (Value can set between 0.0 - 1.0)
5. Display info
a. Document name
b. Total number of estimated chunks
6. Preview Panel
a. Shows processed chunks
b. Displays character count
c. Real-time preview updates
d. Total chunks estimate
e. Individual chunk review
7. Navigation Controls
a. BACK: Return to previous step
b. NEXT: Proceed to final step
Important Notes:
-
Custom mode requires technical understanding
-
Preview helps validate settings
-
Adjust based on content type
-
Character count helps optimize chunks
Step 3: Execute and Finish
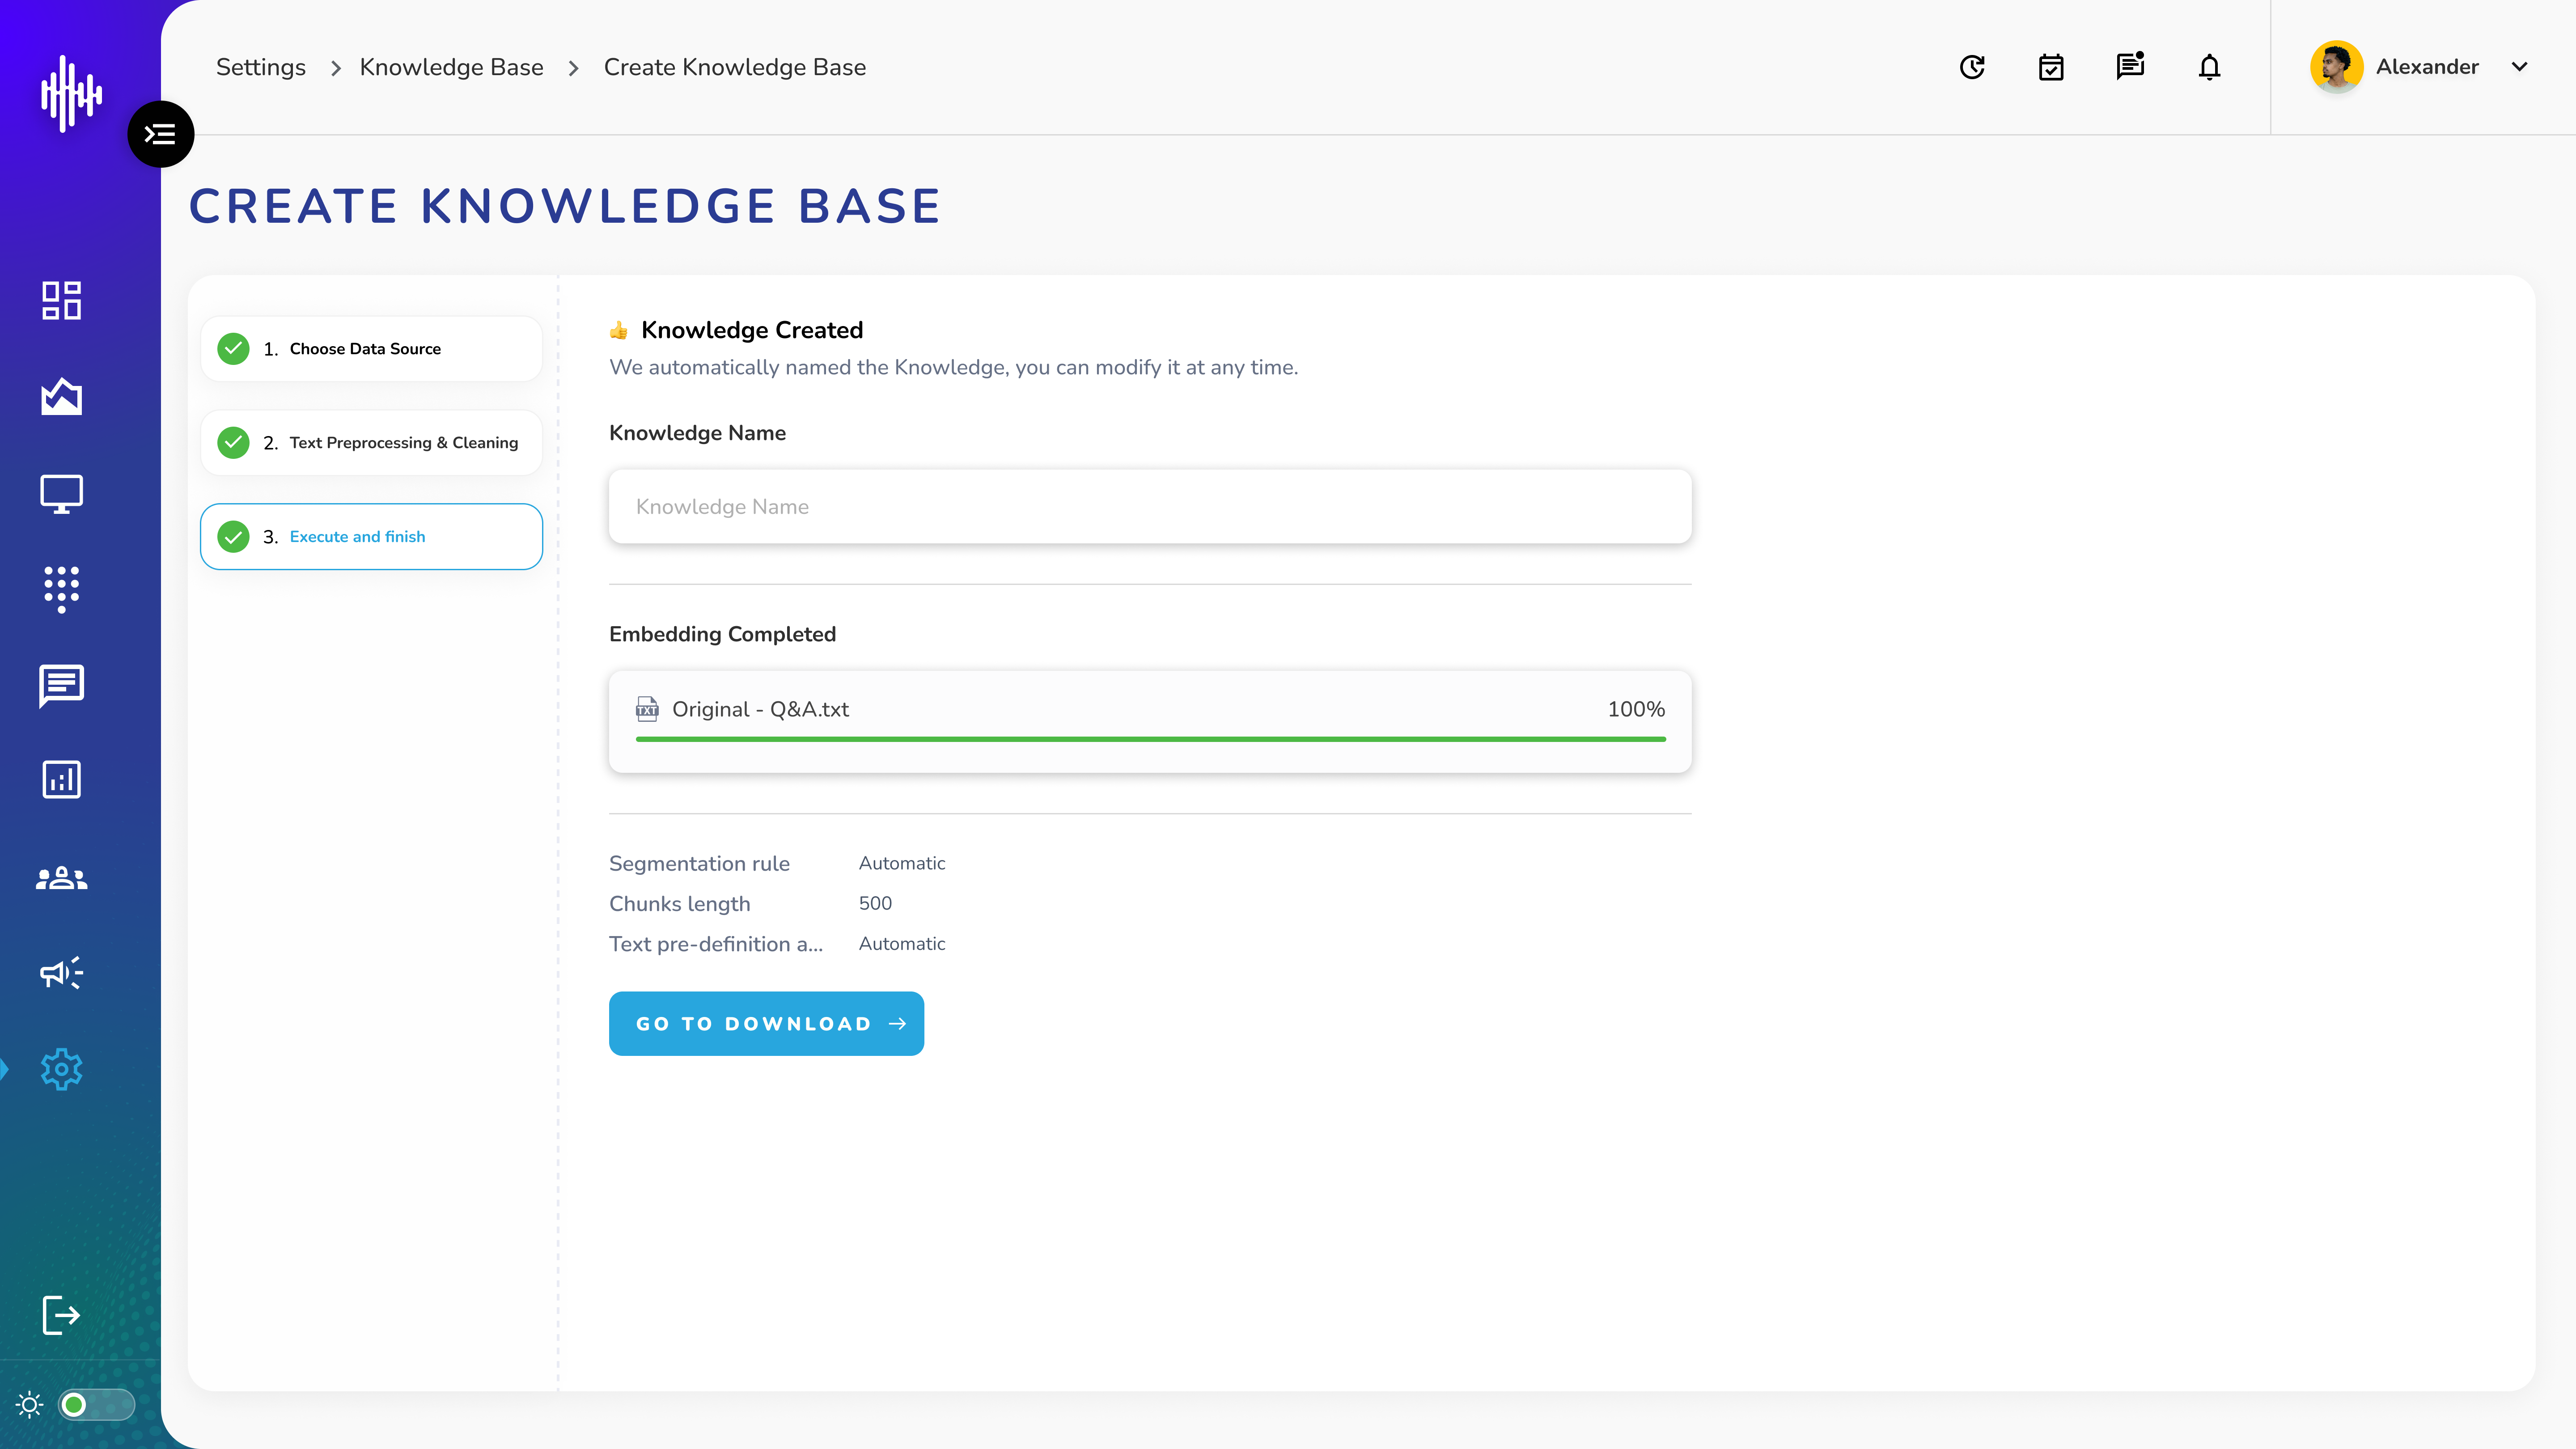
1. Final Review Screen
a. Knowledge Base Status
i. Confirmation of creation
ii. Auto-generated knowledge name
iii. Option to modify name
b. Embedding Information
i. Status: Completed
ii. Quality mode: High-quality
iii. Token consumption displayed
iv. Processing progress bar (100%)
c. Configuration Summary
| Setting | Value |
|---|---|
| Segmentation Rule | Automatic |
| Chunks Length | 500 |
| Text Pre-definition | Automatic |
| File Name | [Your uploaded file] |
d. Completion Actions
i. "GO TO DOCUMENT" button: Returns to Knowledge Base Management screen
ii. "BACK" option: Return to previous steps if changes needed
Important Notes:
-
Review all settings before completing
-
Token consumption affects system usage
-
Settings can be modified later
-
Progress must reach 100% before proceeding
Knowledge Base Document Management Guide
1. Document List View Columns
| Column | Description |
|---|---|
| Name | Document/file name |
| Doc Status | Processing/Completed/Failed |
| Memory Usage | Storage space used (MB) |
| Status Toggle | Enable/Disable document |
| Actions | Three-dot menu options |
2. Document Status Types
a. Processing
i. Initial state after upload
ii. Document being analyzed
iii. Wait for completion
b. Completed
i. Successfully processed
ii. Ready for use
iii. Can be tested
c. Failed
i. Error in processing
ii. May need re-upload
iii. Check file format
3. Top Bar Features
a. Search Bar (Left)
i. Filter documents by name
b. Action Buttons (Right)
i. "+Add": Upload new document
ii. "Retrieval Testing": Test processed documents
iii. "Settings": Modify document configuration
4. Document Actions (Three Dots)
a. Delete: Remove document from system
5. Document Controls
a. Toggle switch: Enable/Disable document usage
b. Memory usage monitoring
c. Pagination controls at bottom
Important Notes:
-
Wait for "Completed" status before testing
-
Monitor memory usage for system performance
-
Disabled documents won't appear in searches
-
Processing time varies by document size
Retrieval Testing Guide
1. Initial Testing Screen
a. Source Text Input
i. Enter text in search box
ii. Recommended: Use short, declarative sentences
iii. Character limit: 200 characters
iv. Click "TESTING" button to search
2. Search Result Display
a. Result Layout
i. Multiple tiles showing relevant results
ii. Each tile contains:
1. Question and Answer pairs
2. Source document name
3. Hover option for "View Vector Chart"
b. Tile Information
i. Question format
ii. Detailed answer
iii. Document source reference
iv. Interactive elements on hover
3. Vector Chart Popup
a. When clicking "View Vector Chart":
i. Document Statistics
1. Character count
2. Retrieval count
b. Content Details
i. Full question text
ii. Complete answer
iii. Source context
c. Keywords Section
i. Relevant search terms
ii. Topic categorization
Important Notes:
-
Results based on Top K and Score threshold settings
-
Higher relevance results appear first
-
Multiple results may come from same document
-
Hover for additional information