Teams
Teams List View and Controls
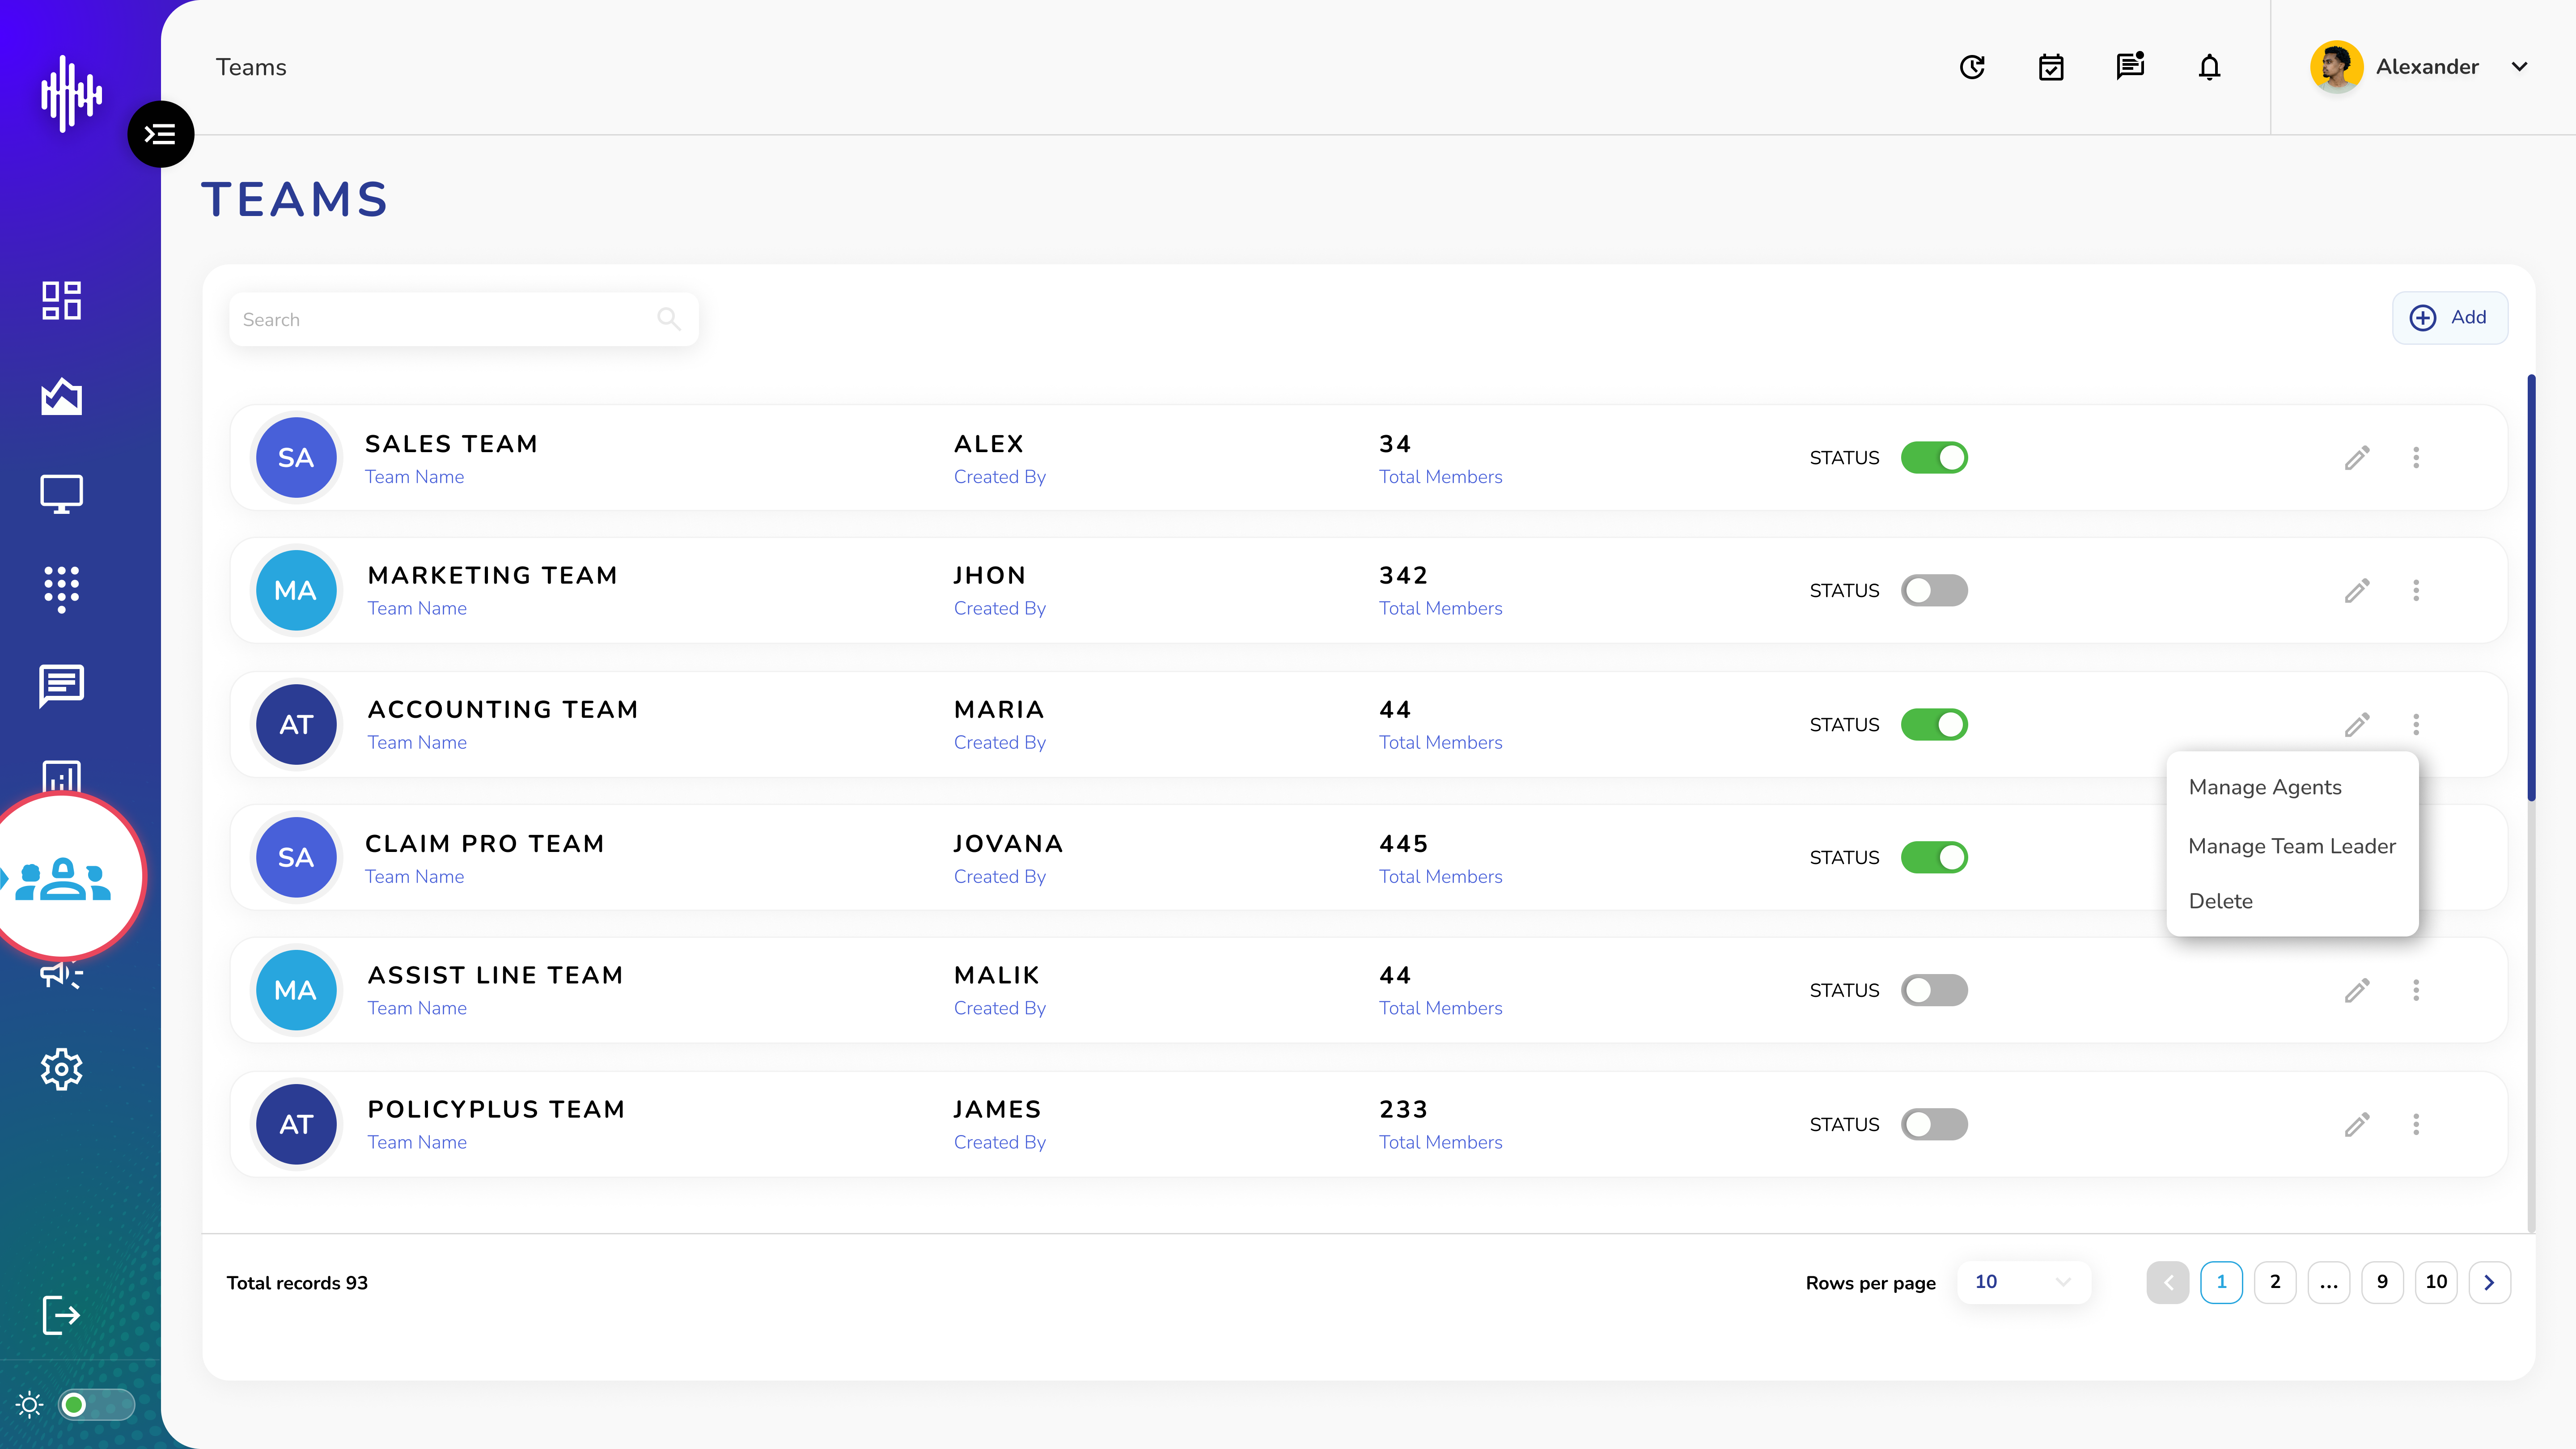
1. Accessing Teams
a. Login to system
b. Click Teams icon from left menu
c. View team's dashboard
2. Teams List View
| Column | Description |
|---|---|
| Team Name | Name of the team |
| Created By | Admin who created team |
| Total Members | Number of team members |
| Status | Enable/Disable toggle |
| Actions | Edit and Options menu |
3. Team Controls
a. Edit Team (Pencil Icon)
i. Click pencil icon
ii. Modify team details
iii. Save changes
b. Options Menu (Three Dots ⋮)
i. Manage Agents
1. Add/Remove agents
ii. Manage Team Leader
1. Assign team leader
iii. Delete Team
1. Remove Team
1. Cannot be undone
4. Team Status
a. Toggle Switch
i. Green: Team Active
i. Grey: Team Disabled
5. Additional Features
a. Search items
b. View members count
c. Check team creator
d. Rows per page sections
e. Pagination control
Important Notes:
-
Team status affects agent operations
-
Team deletion requires confirmation
-
Team modifications logged by system
-
Multiple teams can share admins
Creating and Configuring New Teams Guide
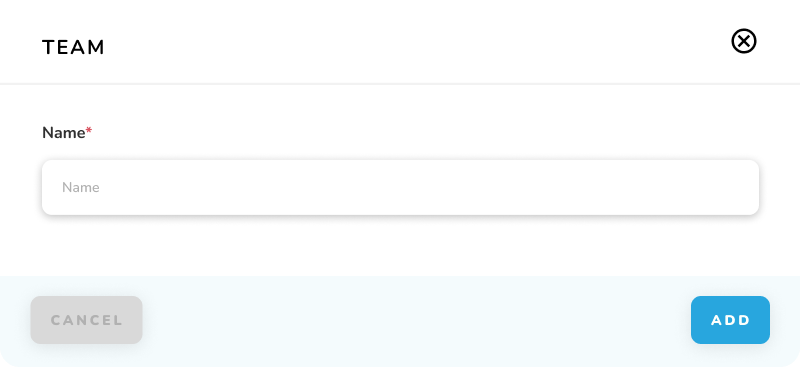
1. Create New Team
a. Click "+ Add" button at top right
b. Enter team name in popup
c. Click "Add" to create team
2. Initial Team Status
a. New team appears in list view
b. Status: Disabled (grey toggle)
c. Default settings not configured
3. Access Team Configuration
a. Locate newly created team in list
b. Click pencil (edit) icon
c. Opens configuration wizard
4. Configuration Wizard Steps
a. Team Details
b. Outbound Settings
c. Inbound Settings
d. Config Info
Team Creation Process Flow:
Add Button → Name Team → Create → Configure
| Step | Action |
|---|---|
| Create | Click "+ Add" & enter name |
| Verify | Check team in list view |
| Configure | Click pencil icon |
| Setup | Complete 4-step wizard |
Important Notes:
-
Team remains disabled until configured
-
All four configuration steps required
-
Save changes at each step
-
Enable team after configuration
Step 1: Team Details Guide
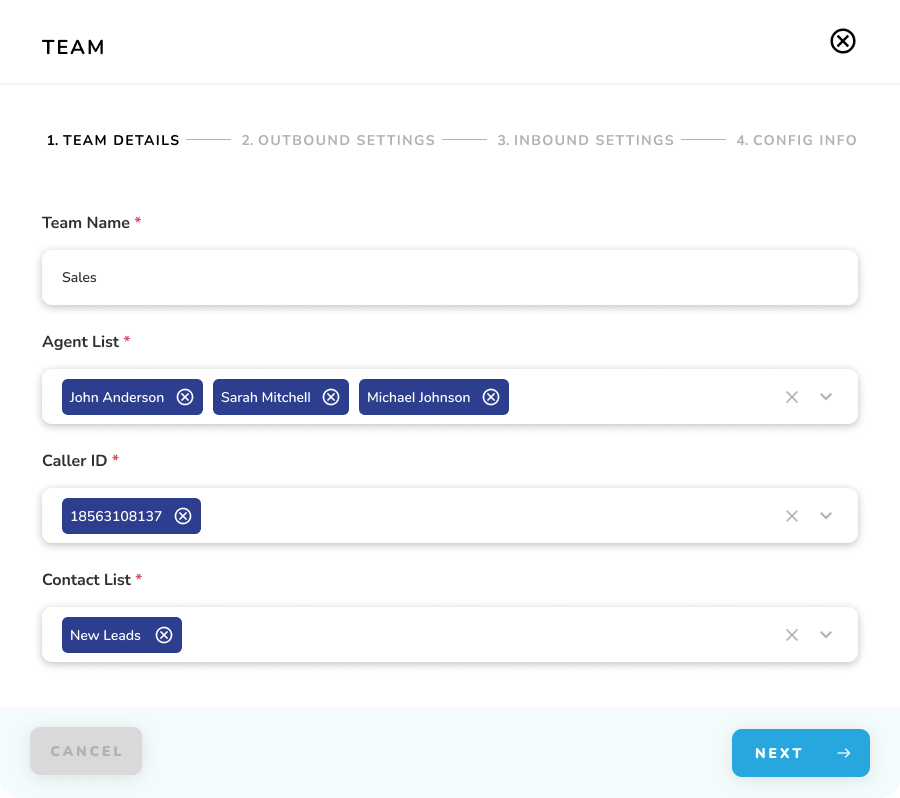
1. Team Configuration Fields
| Field | Description | Type |
|---|---|---|
| Team Name* | Edit or update team name | Text input |
| Agent List* | Select multiple team agents | Multi-select dropdown |
| Caller ID* | Choose outbound numbers | Multi-select dropdown |
| Contact List* | Select customer contact lists | Multi-select dropdown |
Fields marked with * are mandatory
2. Field Operations
a. Team Name
i. Edit existing name
ii. Must be unique
iii. Cannot be left blank
b. Agent List
i. Select multiple agents
ii. Choose from existing agents
iii. Remove agents using (X)
iv. Cannot add new agents here
b. Caller ID
i. Select phone numbers for outbound calls
ii. Choose multiple numbers
iii. Remove numbers using (X)
iv. Cannot add new numbers here
b. Contact List
i. Choose customer contact lists
ii. Select multiple lists
iii. Remove lists using (X)
iv. Cannot create new lists here
3. Navigation
a. CANCEL: Exit without saving
b. NEXT: Save and proceed to Outbound Settings
Important Notes:
-
All fields are mandatory
-
Use existing resources only
-
Changes saved on clicking NEXT
-
Multi-select available for lists
Step 2: Outbound Settings Guide
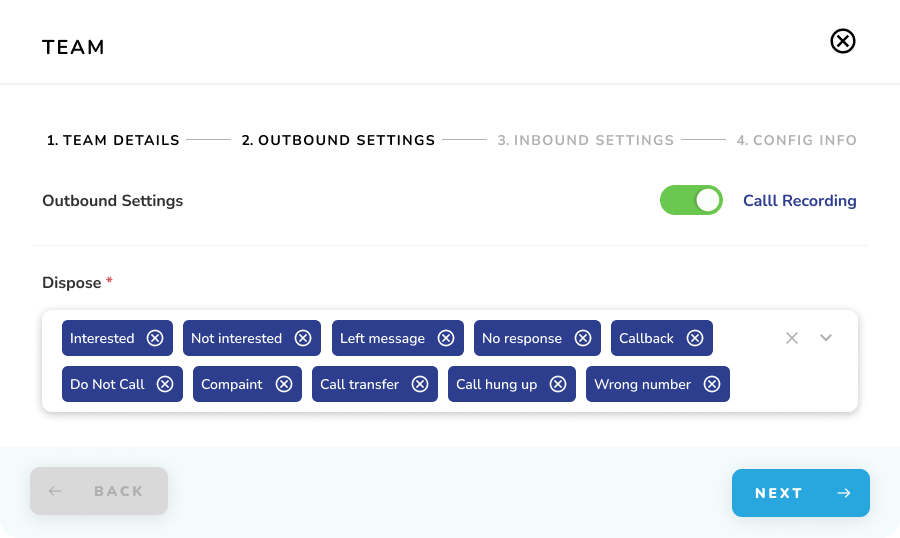
1. Call Recording Settings
a. Located at top right
i. Toggle switch:
1. Green: Recording enabled
2. Grey: Recording disabled
b. Applies to all outbound calls
2. Dispose Tags Selection
| Disposal Options | Usage |
|---|---|
| Interested | Potential customer |
| Not interested | Customer declined |
| Left message | Voicemail/Message left |
| No response | No answer |
| Callback | Schedule follow-up |
| Invalid number | Wrong/non-working number |
| Do not call | Customer requests no contact |
| Complaint | Customer dissatisfied |
| Call transfer | Call forwarded |
| Caller hung up | Customer disconnected |
| Wrong number | Incorrect contact |
3. Navigation
a. BACK: Return to Team Details
b. NEXT: Proceed to Inbound Settings
Important Notes:
-
Call recording setting affects all team calls
-
Multiple dispose tags can be selected
-
Cannot create new dispose tags here
-
Selections are mandatory (*)
-
Remove tags using (X) on each tag
Step 3: Inbound Settings Configuration
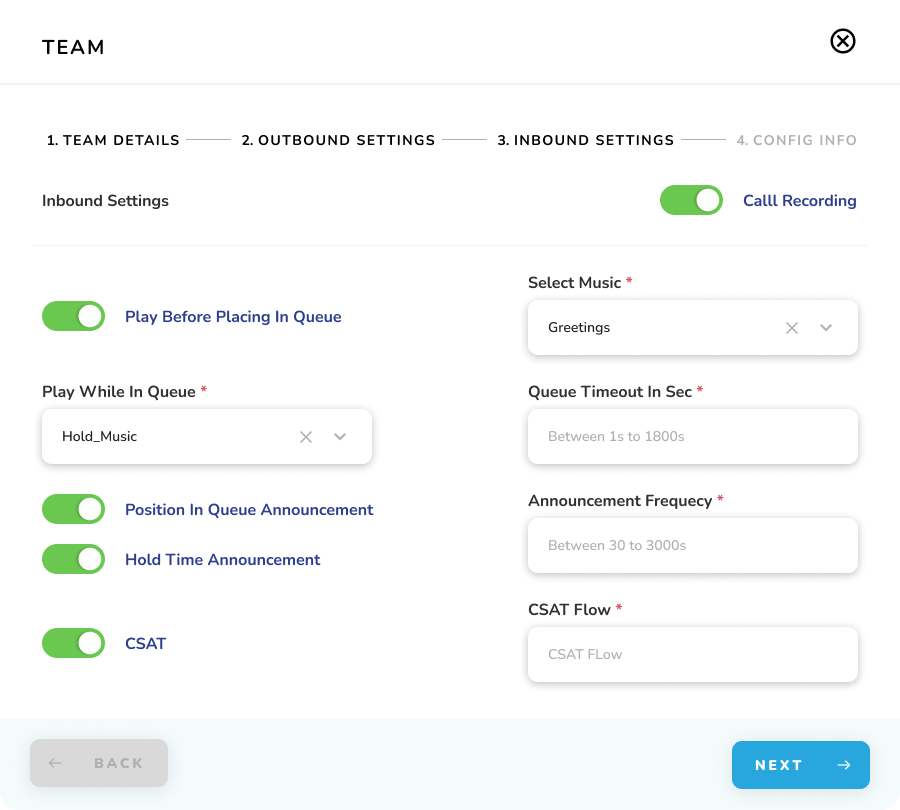
1. Call Management Settings
a. Call Recording Toggle: Enable/disable inbound call recording
b. Play Before Queue Toggle: Enable music before queue placement
c. Select Music: Choose pre-queue music file
d. Play While in Queues: Select hold music
2. Queue Configuration
| Settings | Specification |
|---|---|
| Queue Timeout | 1-1800 seconds |
| Position Announcement | Toggle enable/disable |
| Announcement Frequency | 30-3000 seconds |
| Hold Time Announcement | Toggle enable/disable |
3. CSAT Settings
a. CSAT Toggle: Enable/disable customer satisfaction survey
b. CSAT Flow: Select survey flow type
c. Single flow selection only
4. Field Requirements
a. Fields marked (*) are mandatory
b. Music selections limited to existing files
c. Valid timeout range: 1-1800 seconds
d. Valid announcement range: 30-3000 seconds
5. Navigation
a. BACK: Return to Outbound Settings
b. NEXT: Proceed to Config Info
Important Notes:
-
Cannot upload new music files here
-
Single music selection per category
-
All toggles affect call flow
-
CSAT affects post-call experience
Step 4: Config Info Configuration
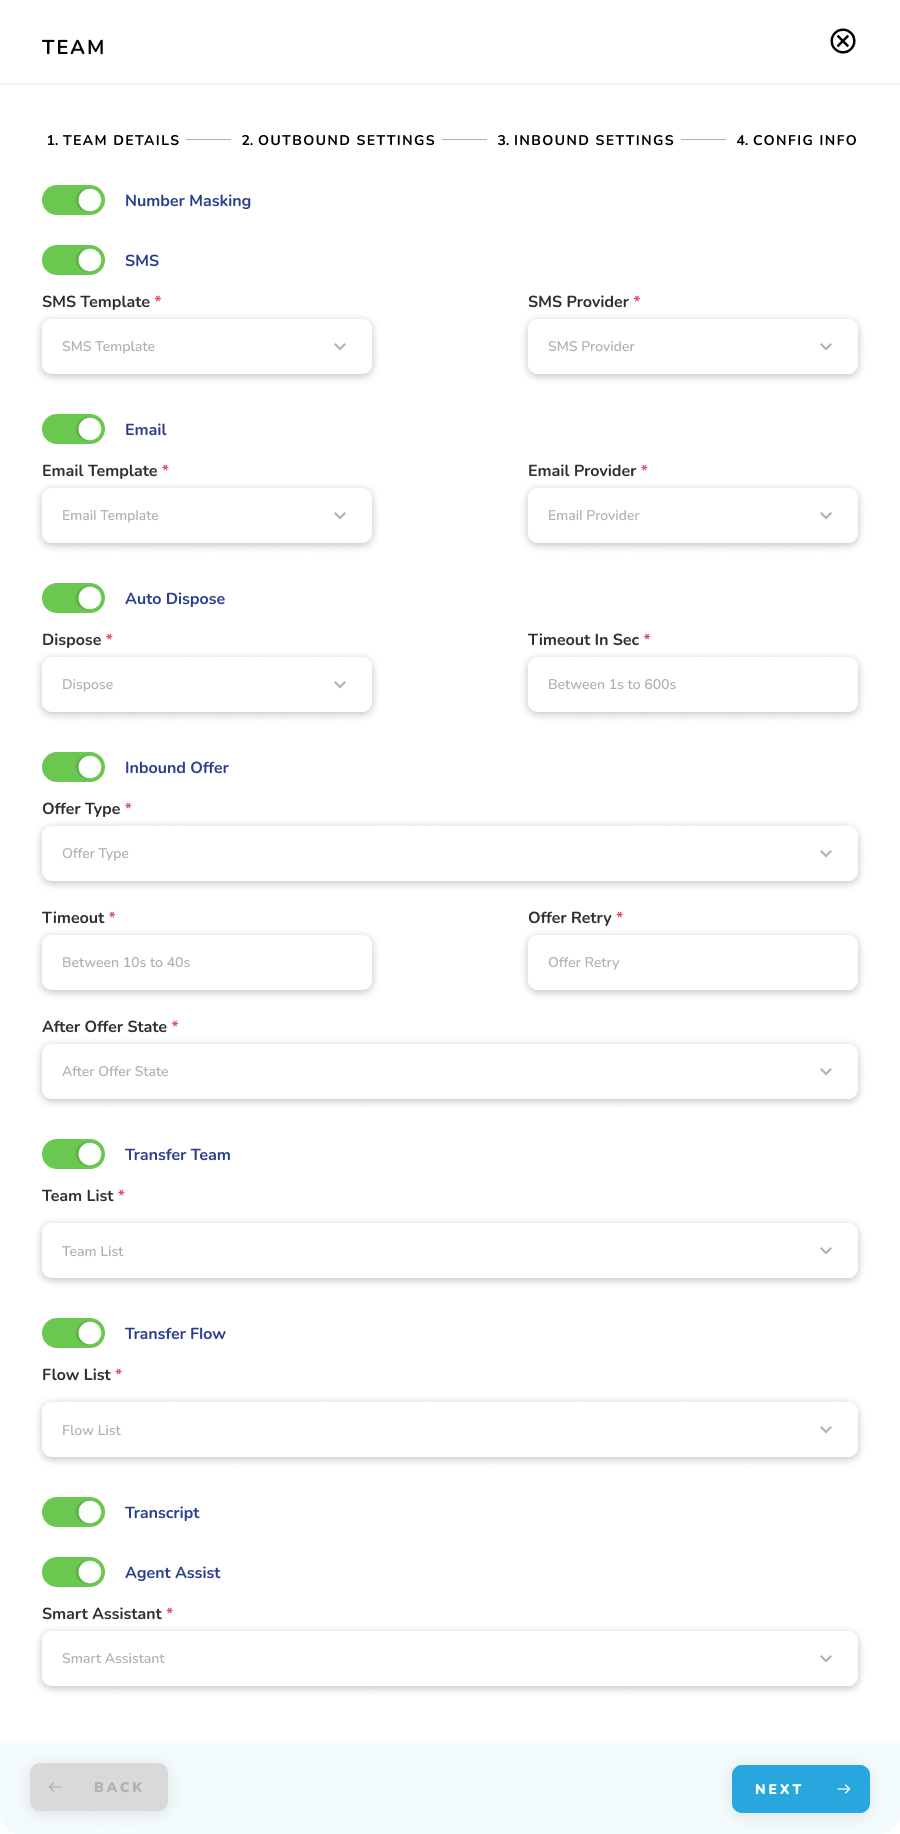
1. Number & Communication Settings
a. Number Masking: Toggle to show/hide numbers
b. SMS Configuration (if enabled):
i. Select SMS templates (multiple)
ii. Choose SMS providers (multiple)
c. Email Configuration (if enabled):
i. Select email templates (multiple)
ii. Choose email providers (multiple)
2. Auto Dispose Settings
a. Enable/disable auto disposition
b. Select dispose tags
c. Set timeout (1-600 seconds)
3. Inbound Offer Configuration
a. Offer Type: Sequential/Parallel
b. Timeout: 10-40 seconds
c. Offer Retry: Set retry count
d. After Offer State:
i. Online
ii. Offline
iii. Break (opens break type selection)
4. Transfer Settings
a. Transfer Team:
i. Enable/disable team transfer
ii. Select multiple teams
b. Transfer Flow:
i. Enable/disable flow transfer
ii. Select multiple flows
5. Additional Features
a. Transcript: Toggle conversation recording
b. Agent Assist:
i. Enable/disable assistance
ii. Select one assistant type
Important Notes:
-
All fields marked (*) are mandatory
-
Multiple selections available where indicated
-
Toggles control field visibility
-
Settings affect team operations
Navigation:
-
BACK: Return to previous step
-
UPDATE: Save all configurations
Config Info Setup Flow
1. Access Settings
a. Navigate to Config Info tab
b. Review all toggle options
2. Number Settings
a. Enable Number Masking if required -> Affects number visibility in system
3. SMS Setup
a. Toggle SMS ON -> Select SMS templates -> Choose SMS providers
4. Email Setup
a. Toggle Email ON -> Select email templates -> Choose email providers
5. Auto Dispose Configuration
a. Toggle Auto Dispose ON -> Select dispose tags -> Set timeout period (1-600s)
6. Inbound Offer Setup
a. Toggle Inbound Offer ON -> Choose offer type (Sequential/Parallel) -> Set timeout (10-40s) -> Enter retry count -> Select after-offer state -> If Break selected: Choose break type
7. Transfer Settings
a. Enable Transfer Team -> Select applicable teams
b. Enable Transfer Flow -> Select applicable flows
8. Support Features
a. Enable Transcript if needed
b. Configure Agent Assist -> Select assistant type
9. Save Configuration
a. Review all settings
b. Click UPDATE to save changes
Sequential Steps Required
-
Complete each section in order
-
Verify selections before proceeding
-
Enable required toggles first
-
Configure dependent fields
-
Save when complete
Team > Manage Agents & Manage Teamlead
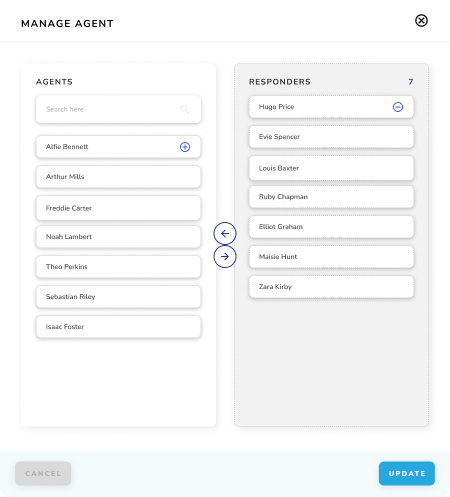
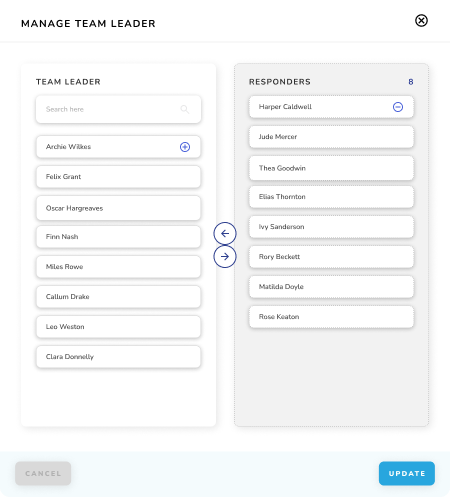
1. Access Management
a. Click three dots (⋮) on Teams screen
b. Select "Manage Agents or Manage Team Leader" option
b. Select "Manage Agents or Manage Team Leader" option
2. Interface Layout
| Section | Features |
|---|---|
| Left Panel (AGENTS/TEAM LEADER) | • Search bar • List of available agents • "+" button for selection |
| Right Panel (RESPONDERS) | • Shows selected agents • Number count of selected agents • Remove option (-) |
| Navigation Arrows | • Left arrow (←) removes agent • Right arrow (→) adds agent |
3. Agent/Team Leader Management Actions
a. Add Agents / Team Leaders
i. User search to find agents / team leaders
ii. Click "+" beside agent / team leader name OR
iii. Select agent / team leader and click right arrow
iv. Agent / Team Leader moves to Responders list
b. Remove Agents / Team Leaders
i. Locate agent / team leader in Responders list
ii. Click "-" beside agent / team leader name OR
iii. Select agent / team leader and click left arrow
iv. Agent / Team Leader returns to Agents / Team Leader list
4. Save Changes
a. CANCEL: Exit without saving
b. UPDATE: Save agent / team leader assignments
Important Notes:
-
Search filters available agents / team leaders
-
Multiple agents / team leaders can be assigned
-
Changes only save when UPDATE clicked
-
Current count shown on Responders panel