Campaigns
Campaign List View and Controls
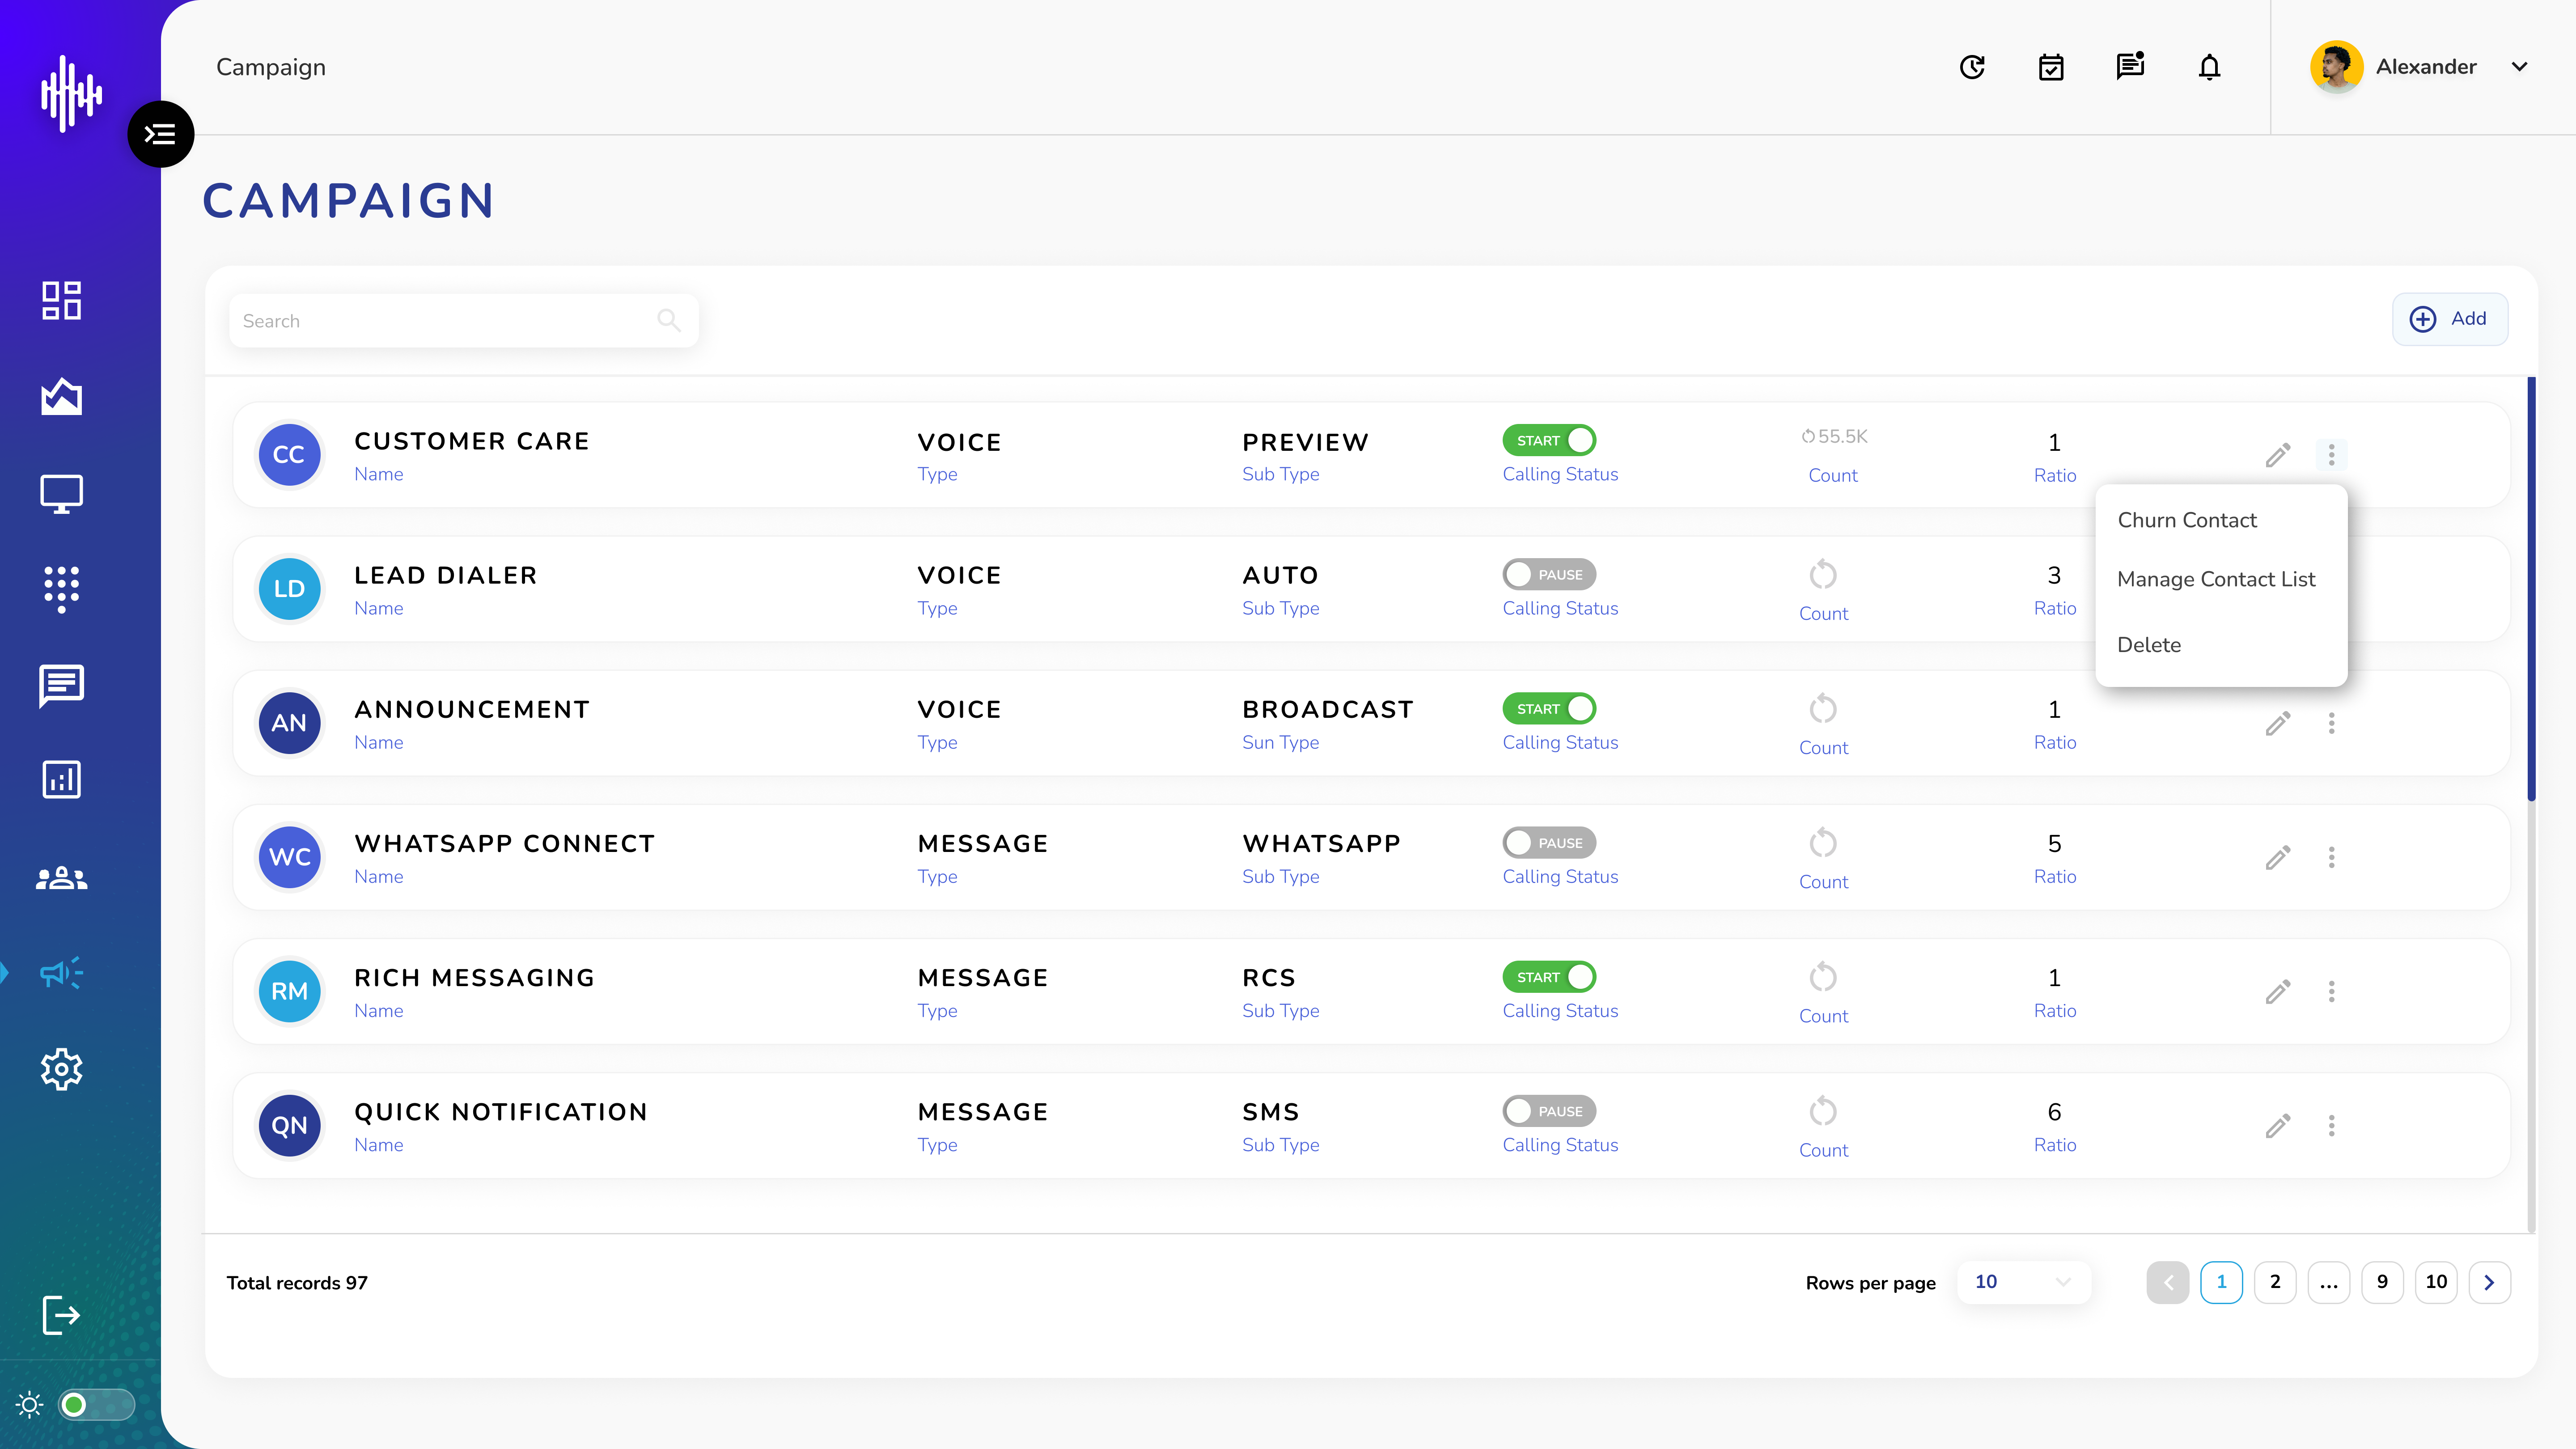
1. Campaign Overview
| Column | Description | Function |
|---|---|---|
| Campaign Name | Shows campaign identifier | Identifies campaign type with icon |
| Type | Voice/Message | Indicates communication method |
| Sub Type | Preview/Auto/Broadcast/WhatsApp/RCS/SMS | Specifies delivery method |
| Status Button | START/PAUSE toggle | Controls campaign activity |
| Count | Remaining leads | Shows pending contacts |
| Ratio | Concurrent execution rate (1-100) | Managing simultaneous actions |
2. Campaign Types
a. Voice Campaigns
i. Customer Care (Preview)
ii. Lead Dialer (Auto)
iii. Announcement (Broadcast)
b. Message Campaigns
i. SMS (Quick Notifications)
ii. WhatsApp
iii. RCS (Rich Messaging)
3. Control Campaigns
a. Status Management:
i. Green START button: Activate campaign
ii. Grey PAUSE button: Suspend campaign
iii. Real-time status monitoring
4. Action Icons
a. Pencil Icon (Edit)
i. Modify campaign settings
ii. Update configurations
iii. Adjust parameters
b. Three Dots (⋮)
i. Churn Contact: Manage contact rotation
ii. Manage Contact List: Update lead lists
iii. Delete: Remove campaign
5. Navigation
a. Search bar for campaign filtering
b. Add button for new campaigns
c. Pagination (10 rows per page)
d. Total records counter
Best Practices:
-
Monitor remaining lead counts
-
Manage ratio for optimal performance
-
Regular status checks
-
Update contact lists as needed
-
Review campaign performance
Churn Contact
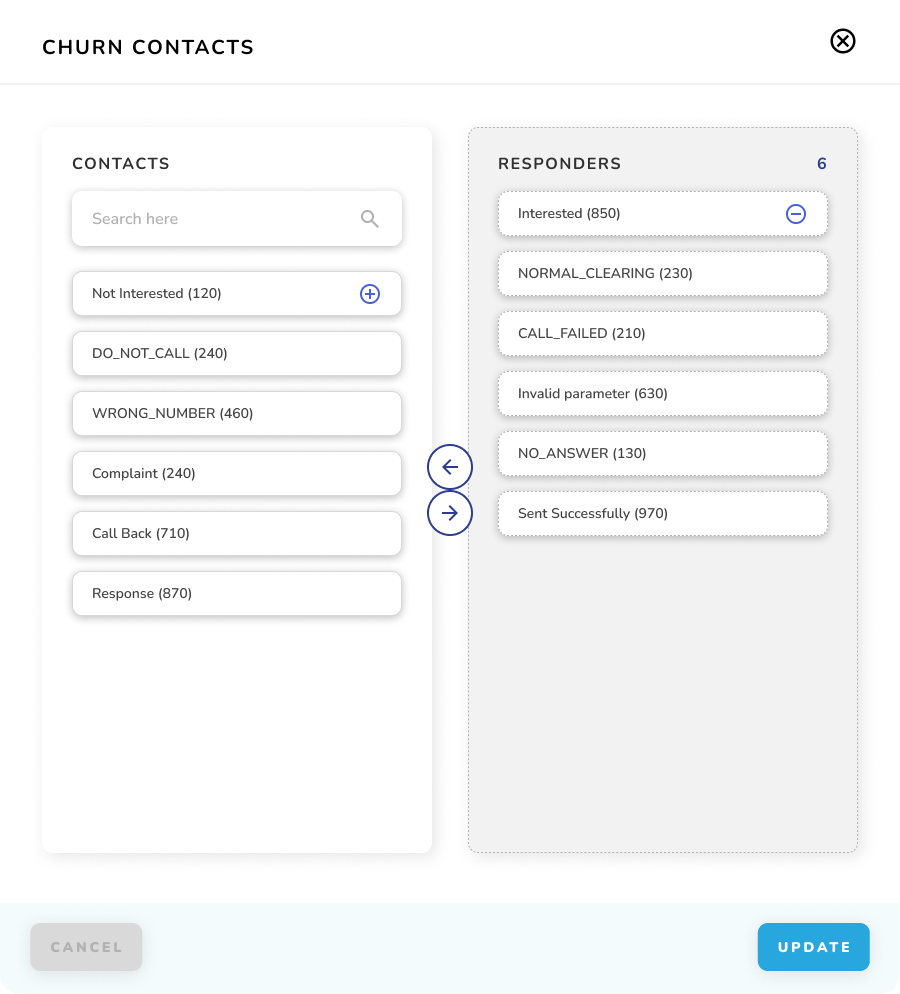
1. Purpose
a. Manage contacts for recontacting
b. Filter by disposition tags
c. Organize callback lists
2. Management Process
a. Select disposition tags to recontact
b. Use arrows to move to Responders
c. Review selected contacts
d. Update to save selection
3. Best Practices
a. Prioritize callbacks
b. Focus on not-connected attempts
c. Exclude DO_NOT_CALL list
d. Review complaint histories
e. Check counts before updating
Important Notes:
-
Numbers in brackets show contact count
-
Use search to filter dispositions
-
Verify selections before saving
-
Consider compliance requirements
-
Monitor total responder count
Manage Contact List
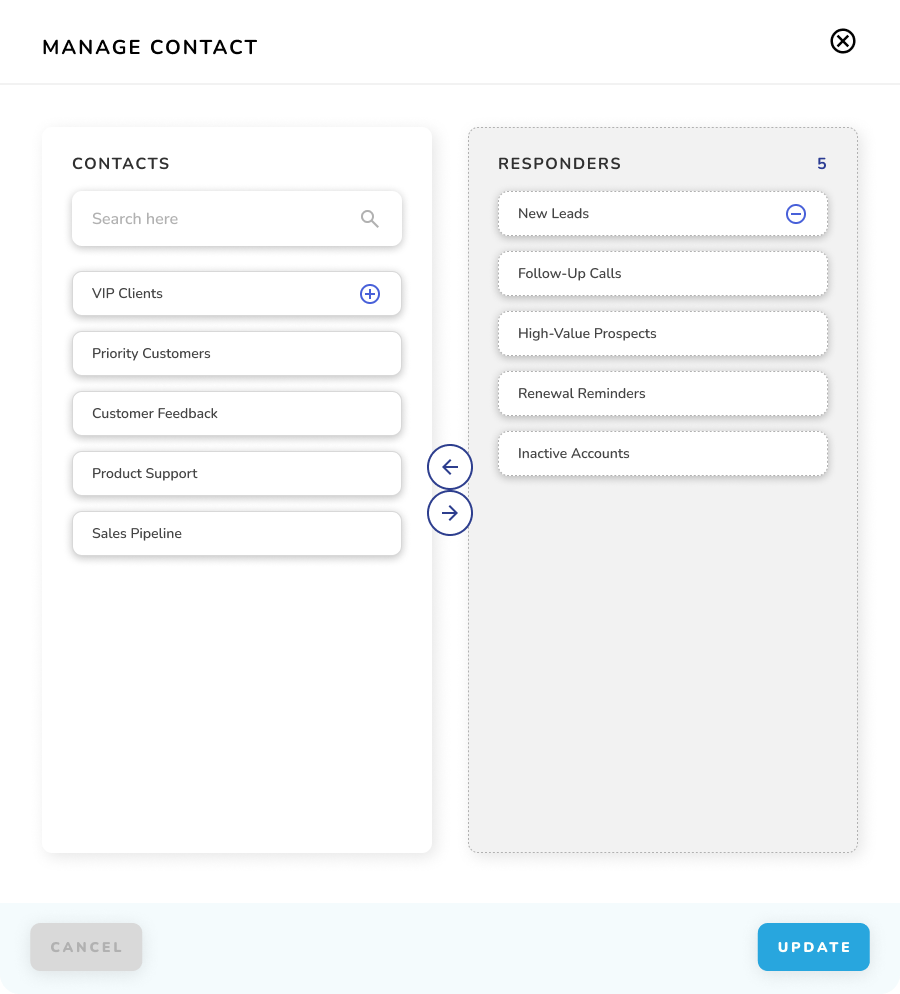
1. Access Contact Management
a. Open Campaign Dashboard
b. Click three dots (⋮) menu
c. Select "Manage Contact List"
2. Interface Layout
| Panel | Purpose |
|---|---|
| Contacts (Left) | Available contact lists |
| Responders (Right) | Selected contact lists |
| Counter | Shows number of selected lists |
3. Management Actions
a. Use search bar to filter lists
b. Click arrow buttons to move lists:
i. → Add to Responders
ii. ← Remove from Responder
4. Navigation
a. CANCEL: Exit without saving
b. UPDATE: Save changes
Best Practices:
-
Organize lists by priority
-
Group similar contacts
-
Review list selections
-
Verify contact counts
-
Use appropriate lists for campaign type
Important Notes:
-
Search filters both panels
-
Multiple lists can be selected
-
Changes apply after UPDATE
-
Counter shows total selected lists
Creating New Campaign
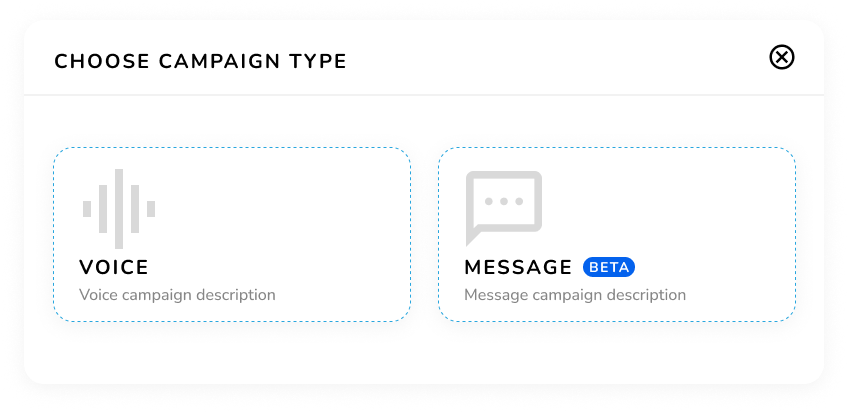
1. Access Create Campaign
a. Click "+Add" button
b. Select campaign type popup appears
2. Voice Campaign Options
a. Customer Care (Preview Mode)
b. Lead Dialer (Auto Mode)
c. Announcement (Broadcast)
3. Message Campaign Options
a. WhatsApp Connect
b. Rich Messaging (RCS)
c. Quick Notification (SMS)
4. Selection Process
a. Click "+Add"
b. Choose campaign type (Voice/Message)
c. Select specific campaign sub-type
d. Continue to campaign configuration
Important Notes:
-
Each type has different setup requirements
-
Configuration options vary by campaign type
-
Review requirements before selection
-
Cannot change type after creation
Voice
Step 1: Choose Medium
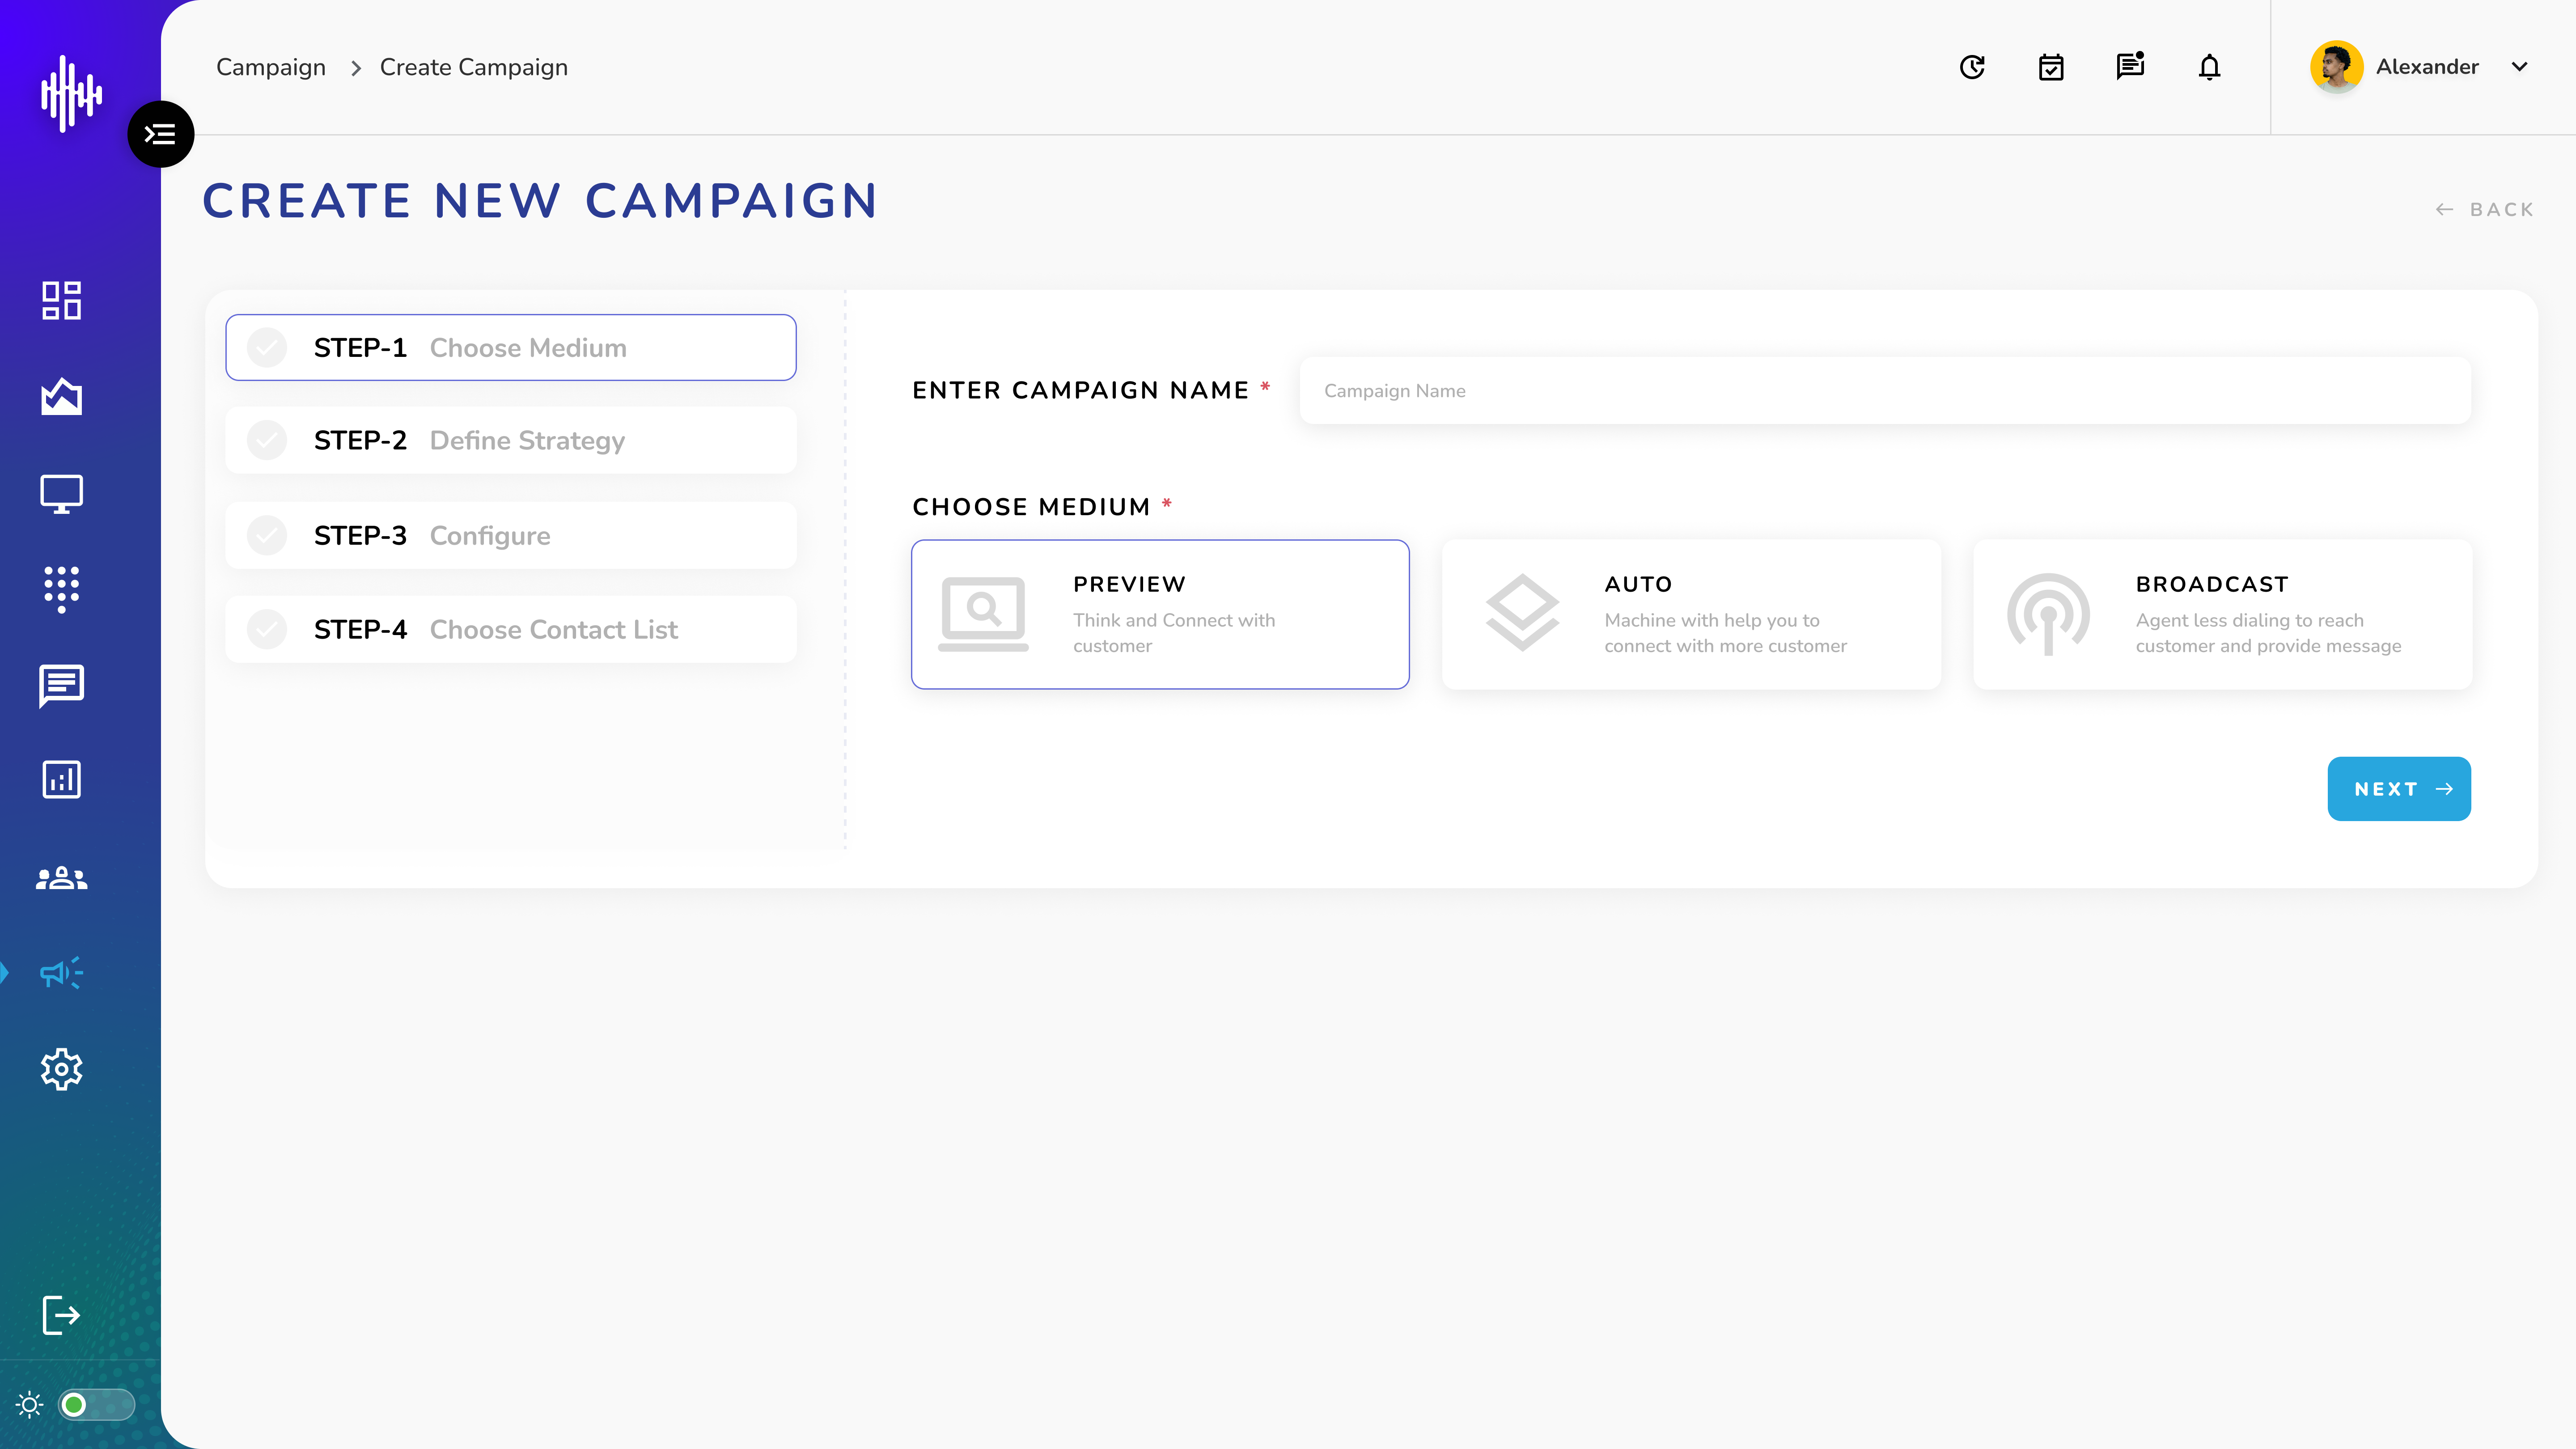
Required Fields:
| Field | Description |
|---|---|
| Campaign Name * | Enter unique campaign identifier |
| Choose Medium * | Select one campaign type |
1. Available Campaign Types:
a. Preview
i. Think and connect with customer
ii. Manual agent calling
b. Auto
i. Machine-assisted dialing
ii. Higher connection rates
c. Broadcast
i. Agent-less dialing
ii. Mass message delivery
2. Navigation:
a. BACK: Return to campaign list
b. NEXT: Proceed to Define Strategy
Fields marked with * are mandatory
3. Process Flow:
a. Enter campaign name
b. Select medium type
c. Click NEXT to proceed
Step 2: Define Strategy
1. Preview Campaign Settings
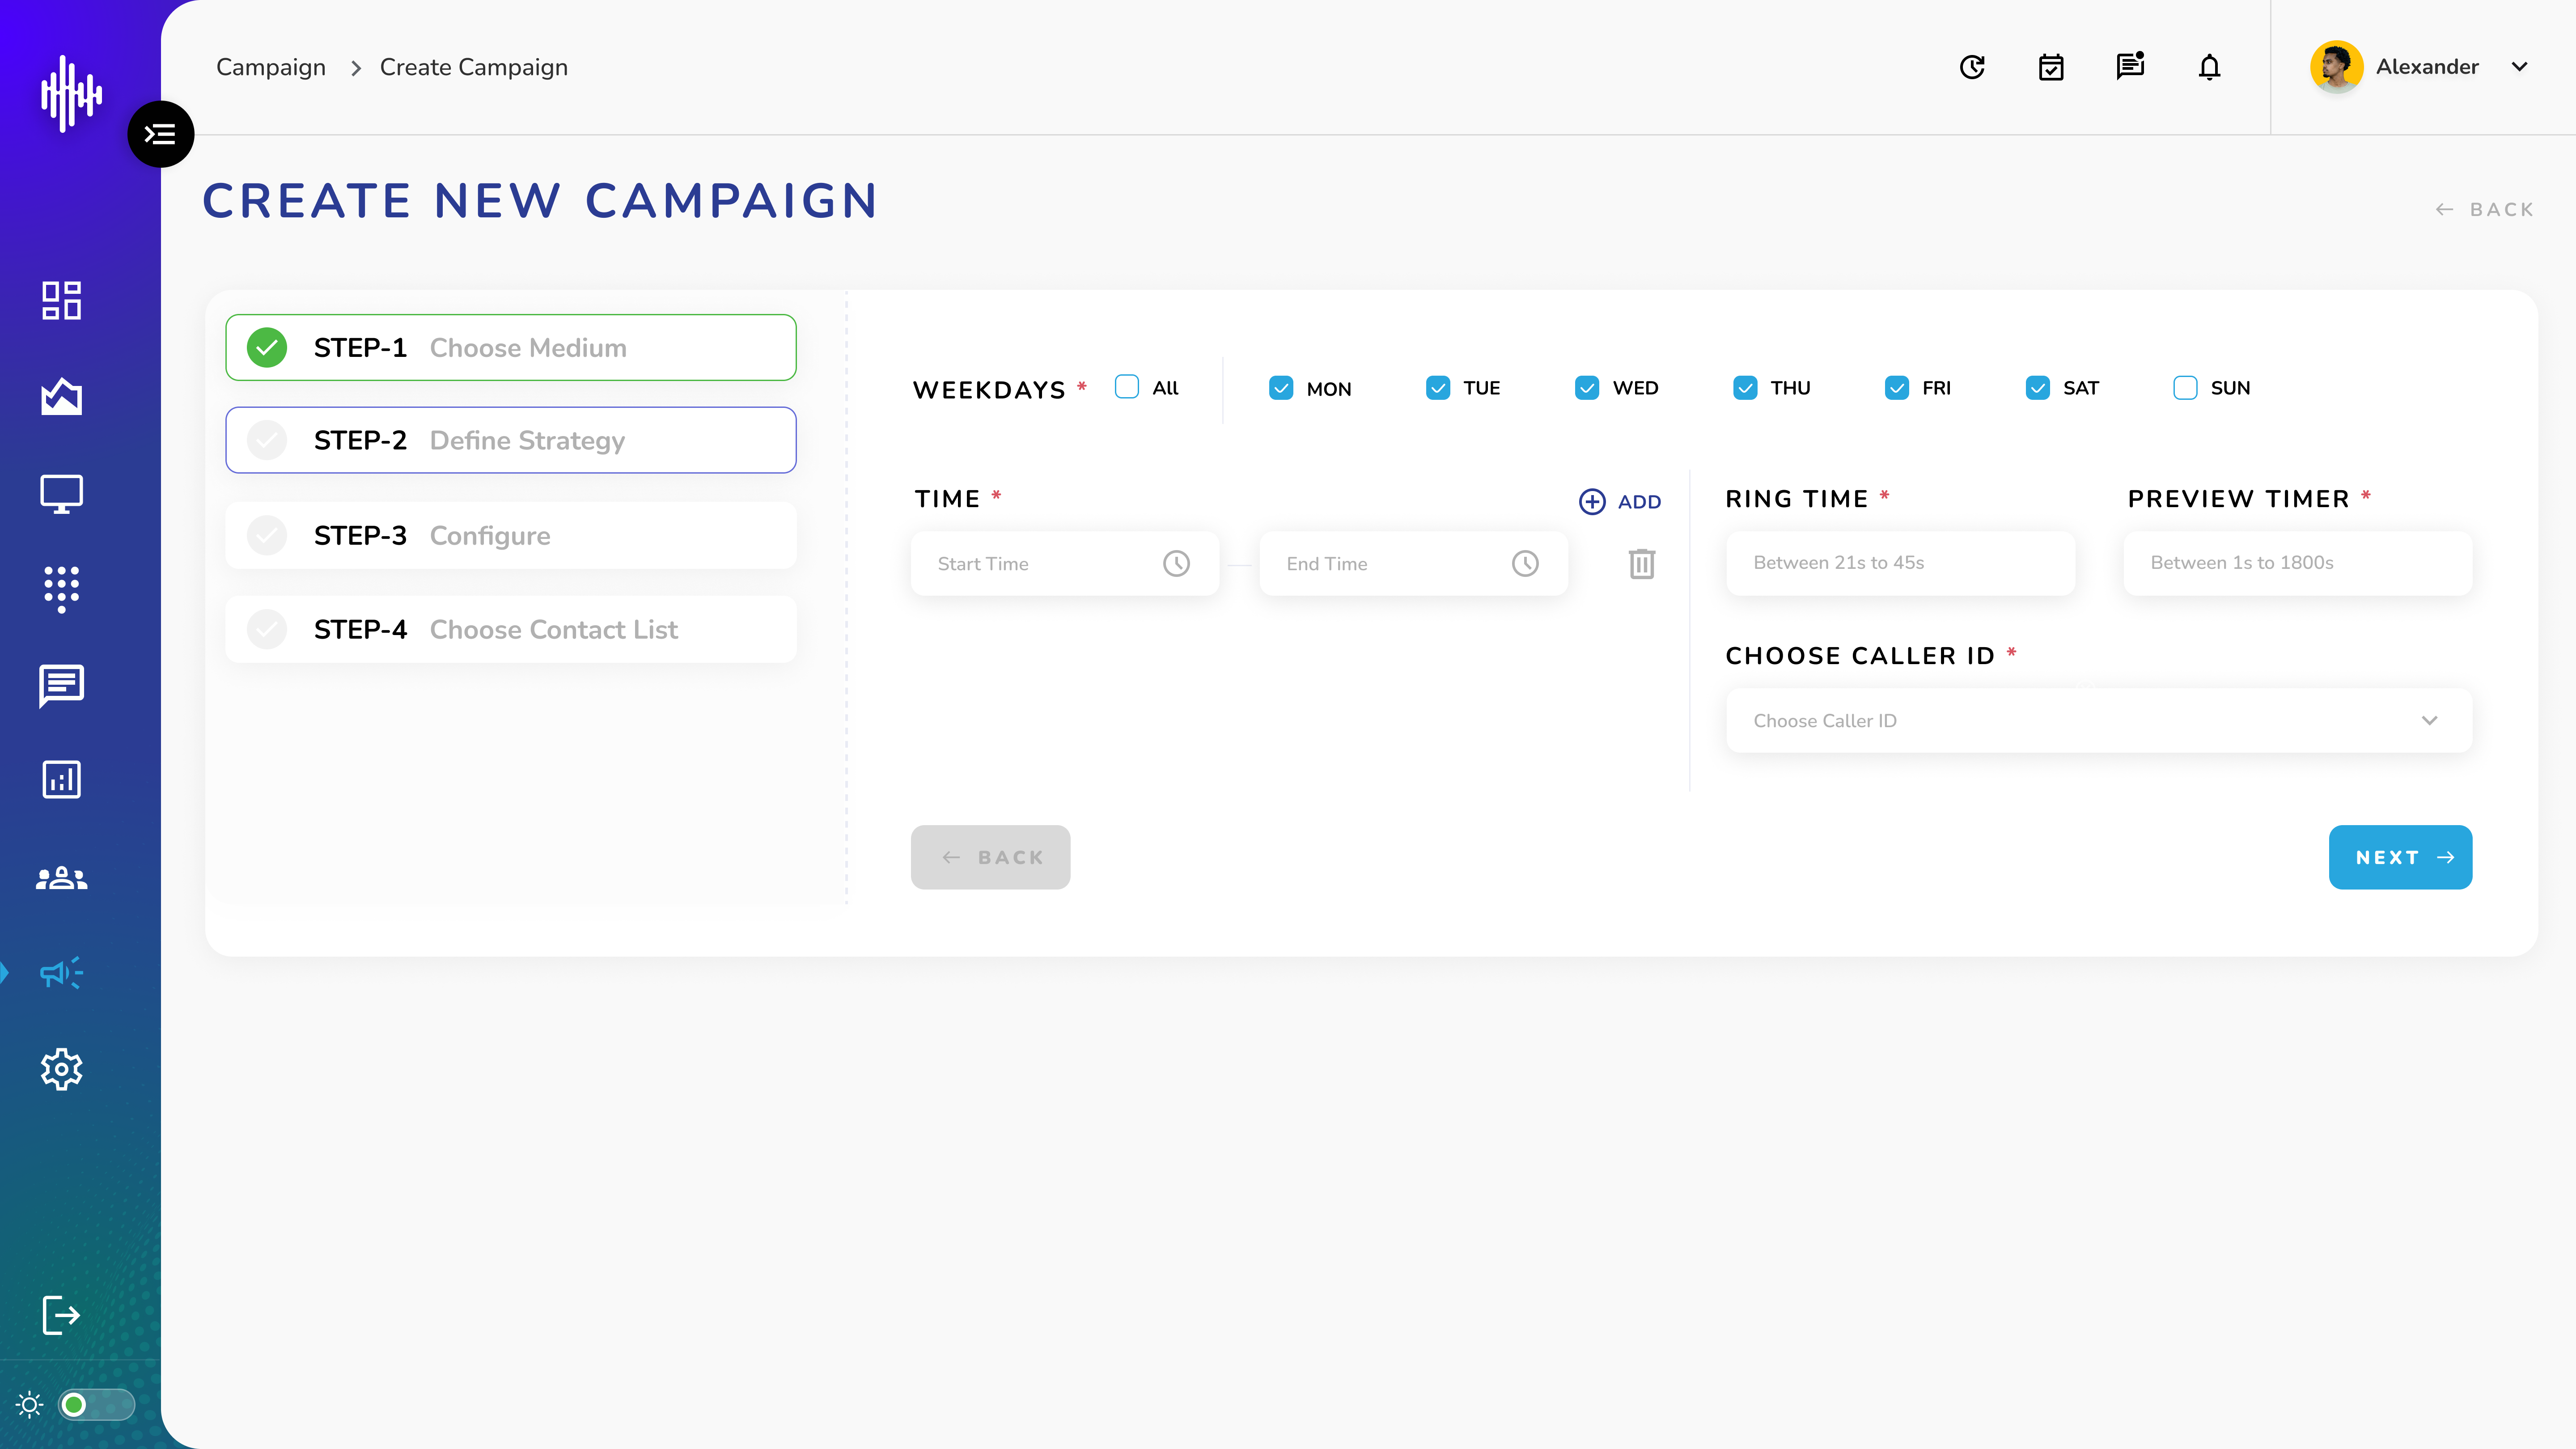
| Setting | Configuration |
|---|---|
| Schedule | • Select days (multiple/all) |
| • Set custom time slots | |
| Ring Time | 21-45 seconds |
| Preview Timer | 1-1800 seconds |
| Caller ID | Select multiple numbers |
2. Auto / Broadcast Campaign Settings
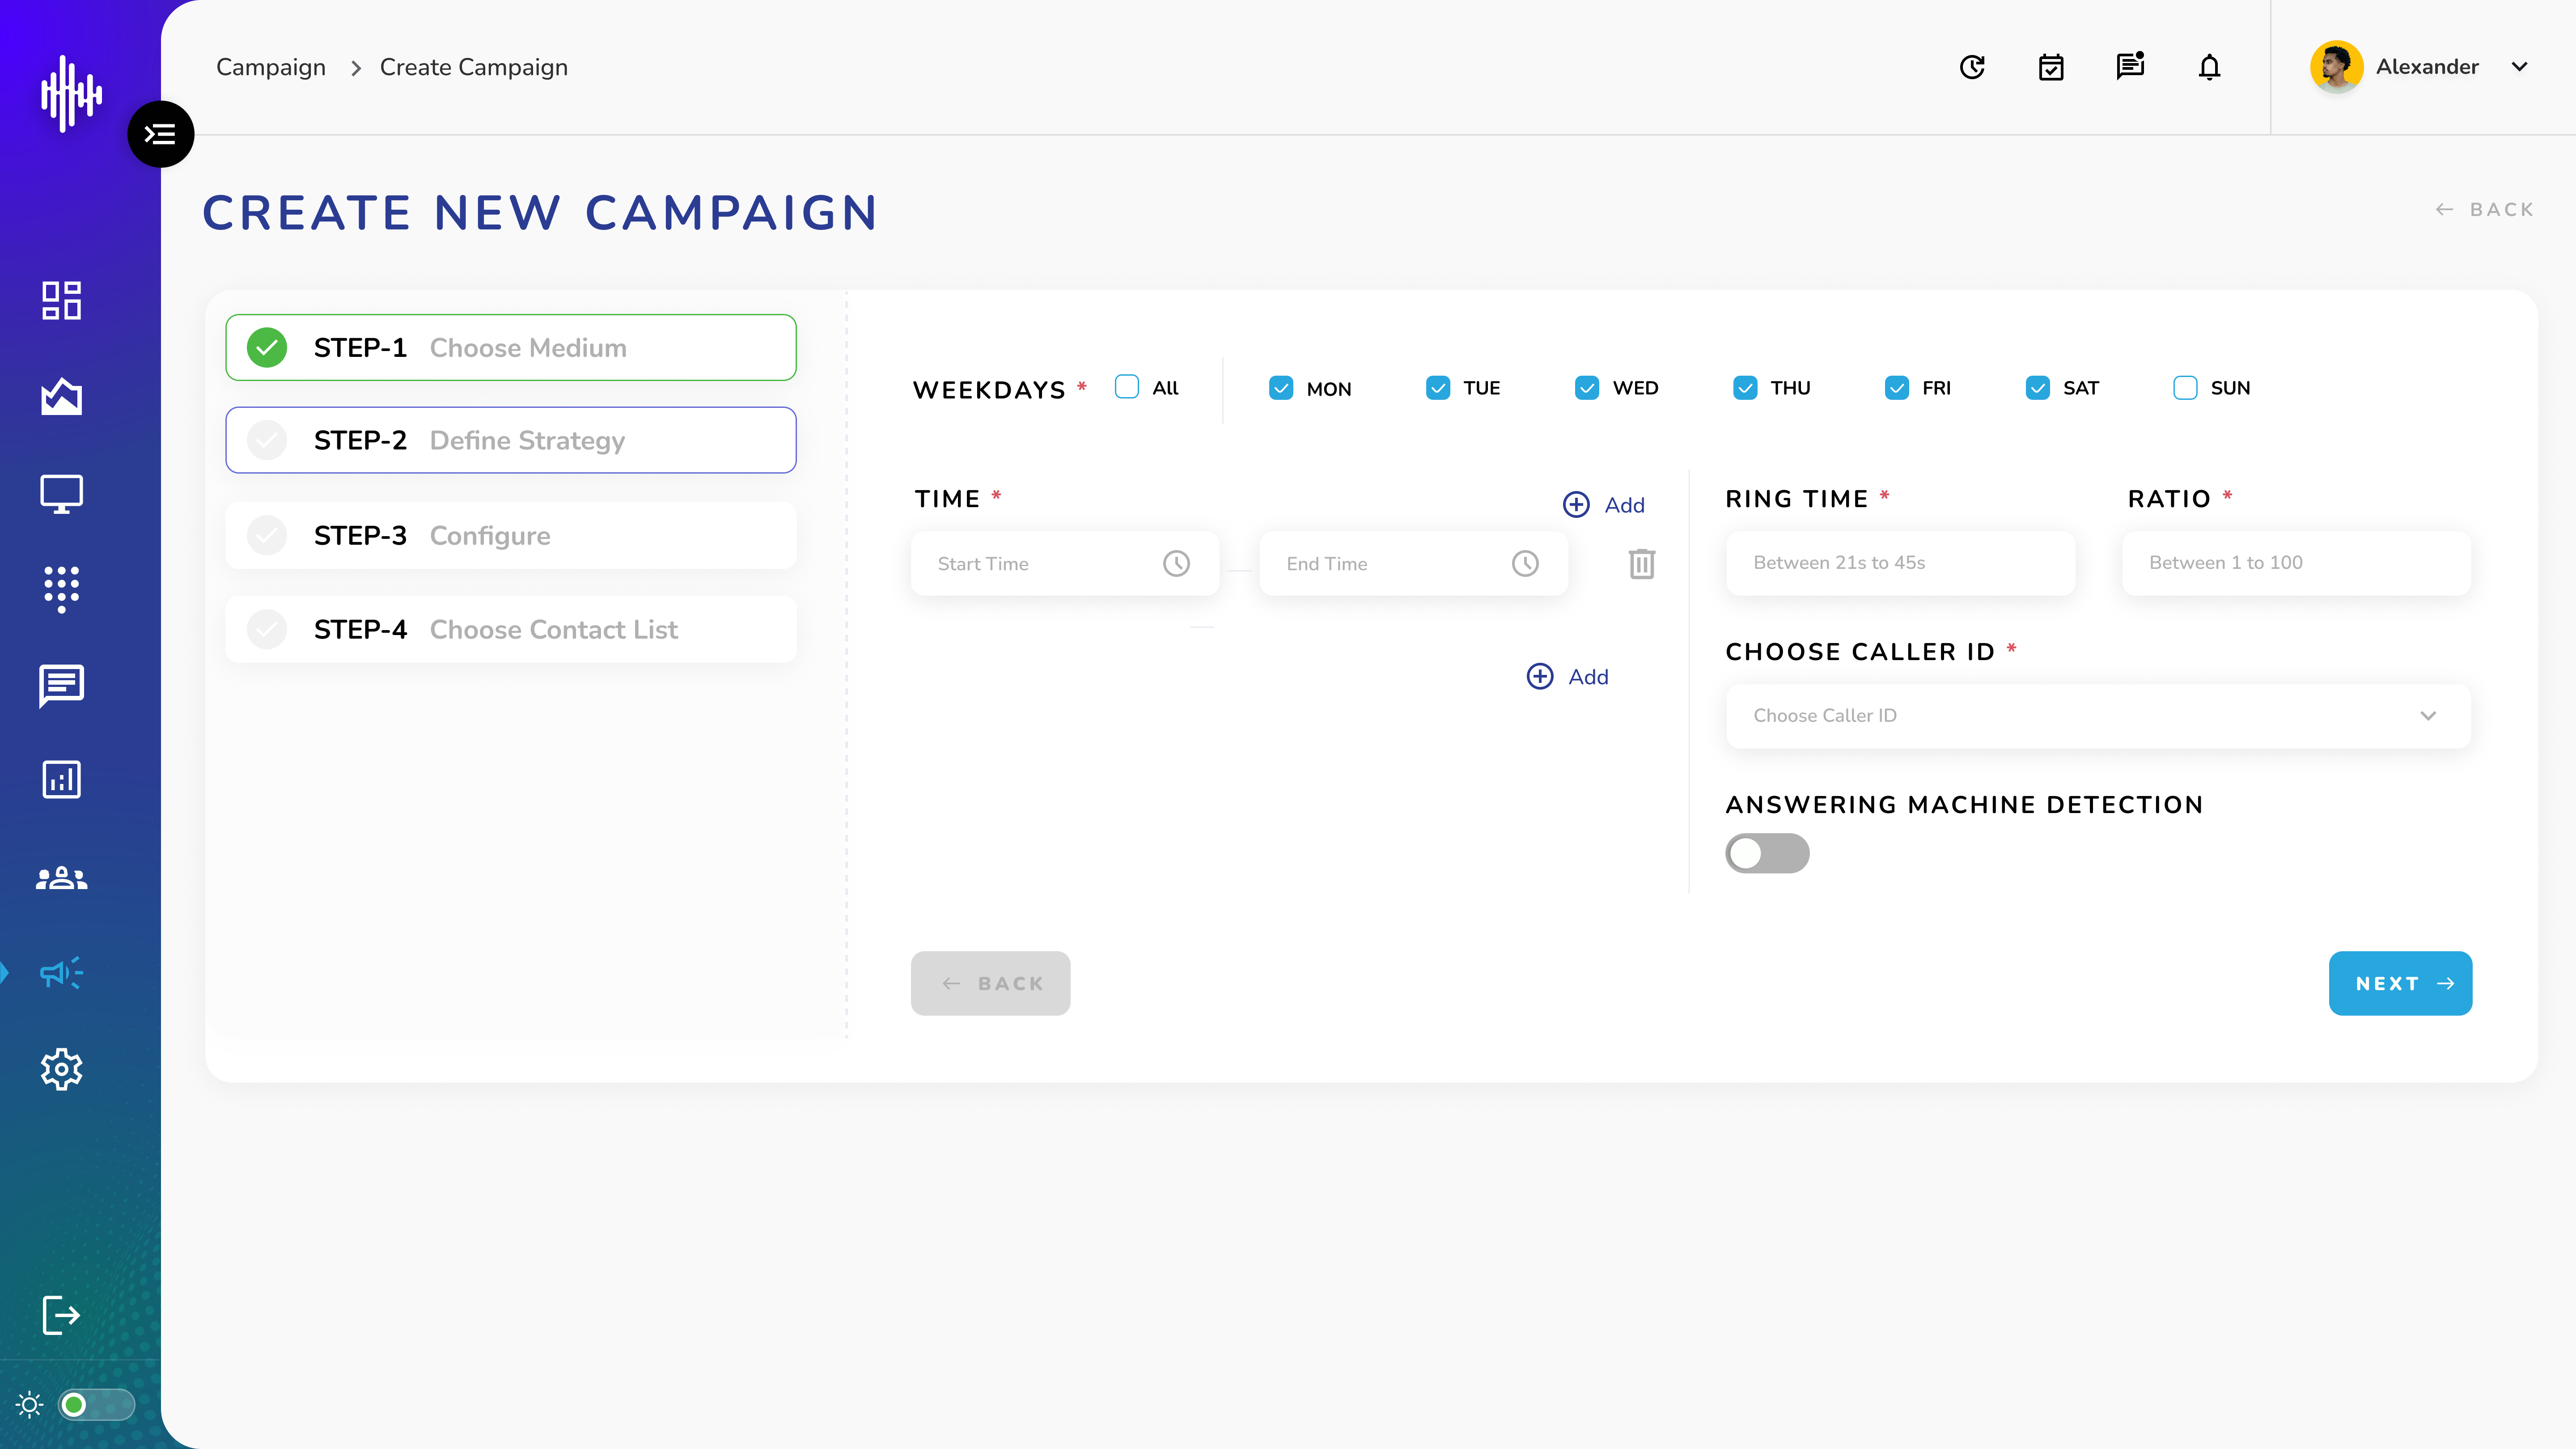
| Setting | Configuration |
|---|---|
| Schedule | • Select days (multiple/all) |
| • Set custom time slots | |
| Ring Time | 21-45 seconds |
| Ratio | 1-100 concurrent calls |
| Caller ID | Select multiple numbers |
| Automatic Machine Detection (AMD) | Toggle ON/OFF |
Common Features:
-
Custom time slot creation
-
Multiple Caller ID selection
-
Flexible scheduling
Navigation:
-
BACK: Return to Step 1
-
NEXT: Proceed to Configure
Step 3: Configure
1. Preview & Auto Campaigns
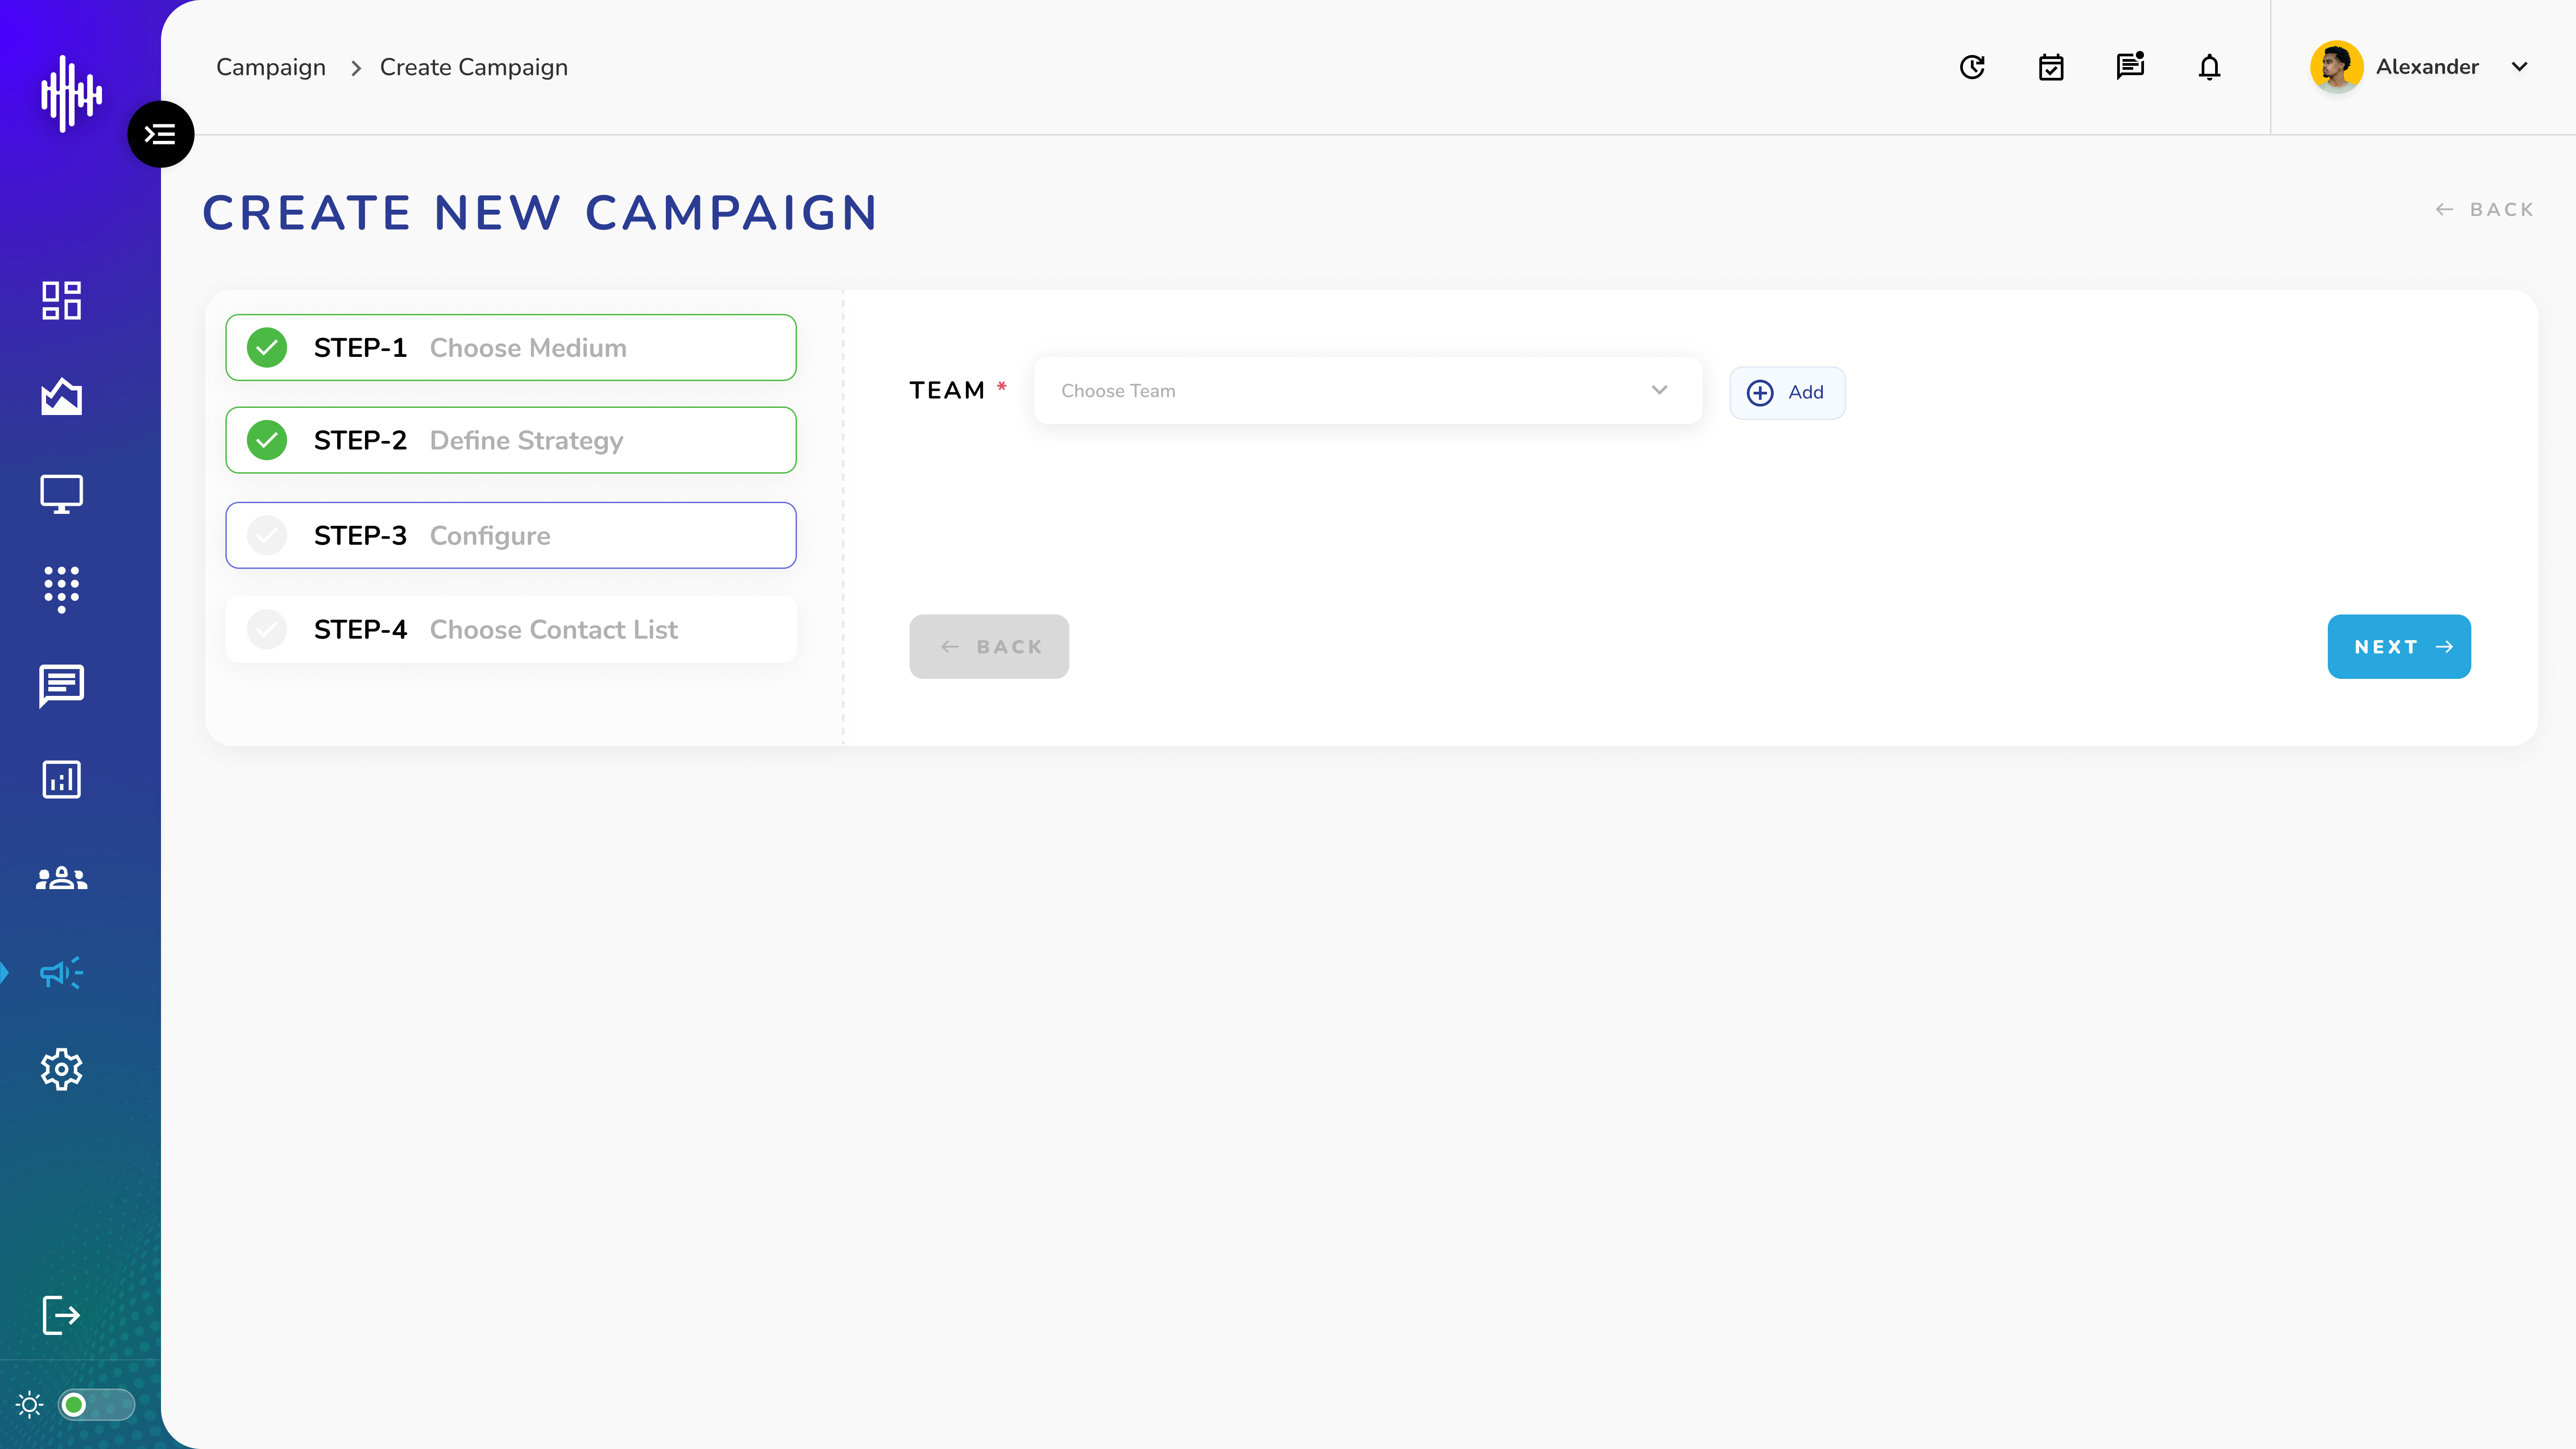
a. Team Setup
i. Select existing team OR
ii. Create new team:
1. Click "+Add"
2. Enter team name
3. Save team
4. Select from list
2. Broadcast Campaign
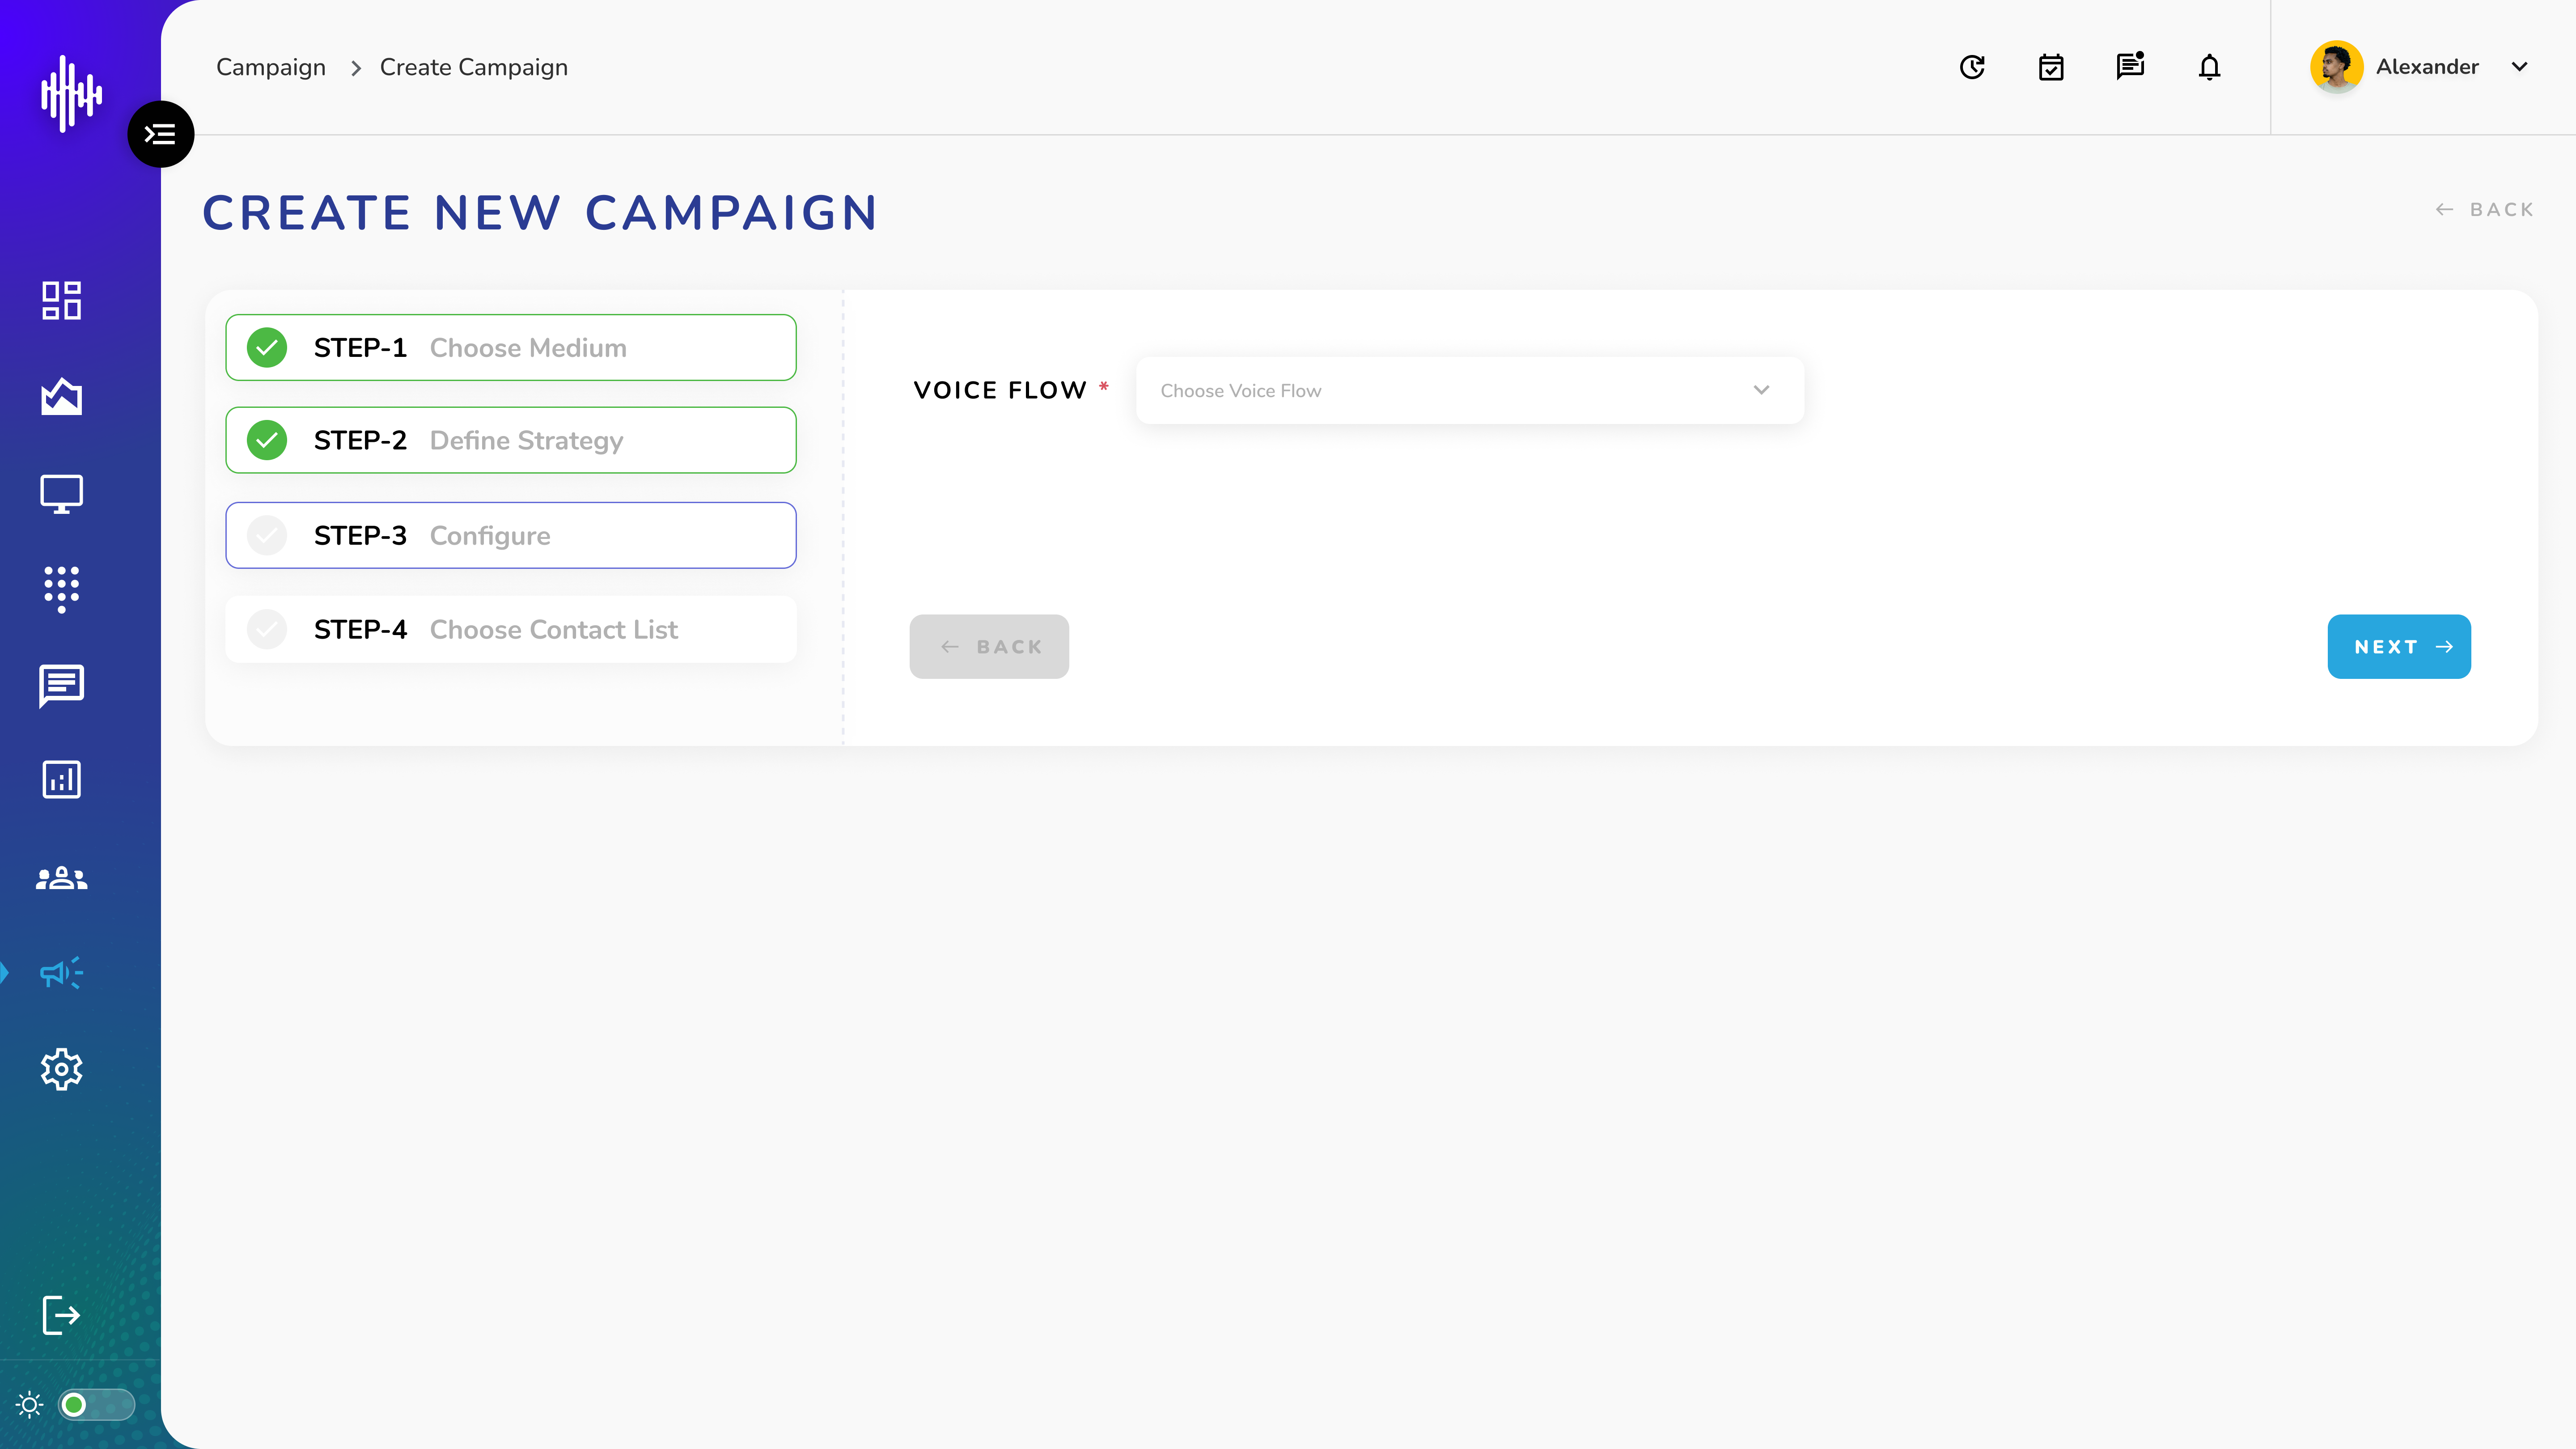
a. Voice Flow
i. Select voice flow from list
ii. Choose appropriate flow for message
Configuration Requirement:
| Campaign Type | Required Setup |
|---|---|
| Preview | Team Selection |
| Auto | Team Selection |
| Broadcast | Voice Flow |
Navigation:
-
BACK: Return to Strategy
-
NEXT: Choose Contact List
Step 4: Choose Contact List
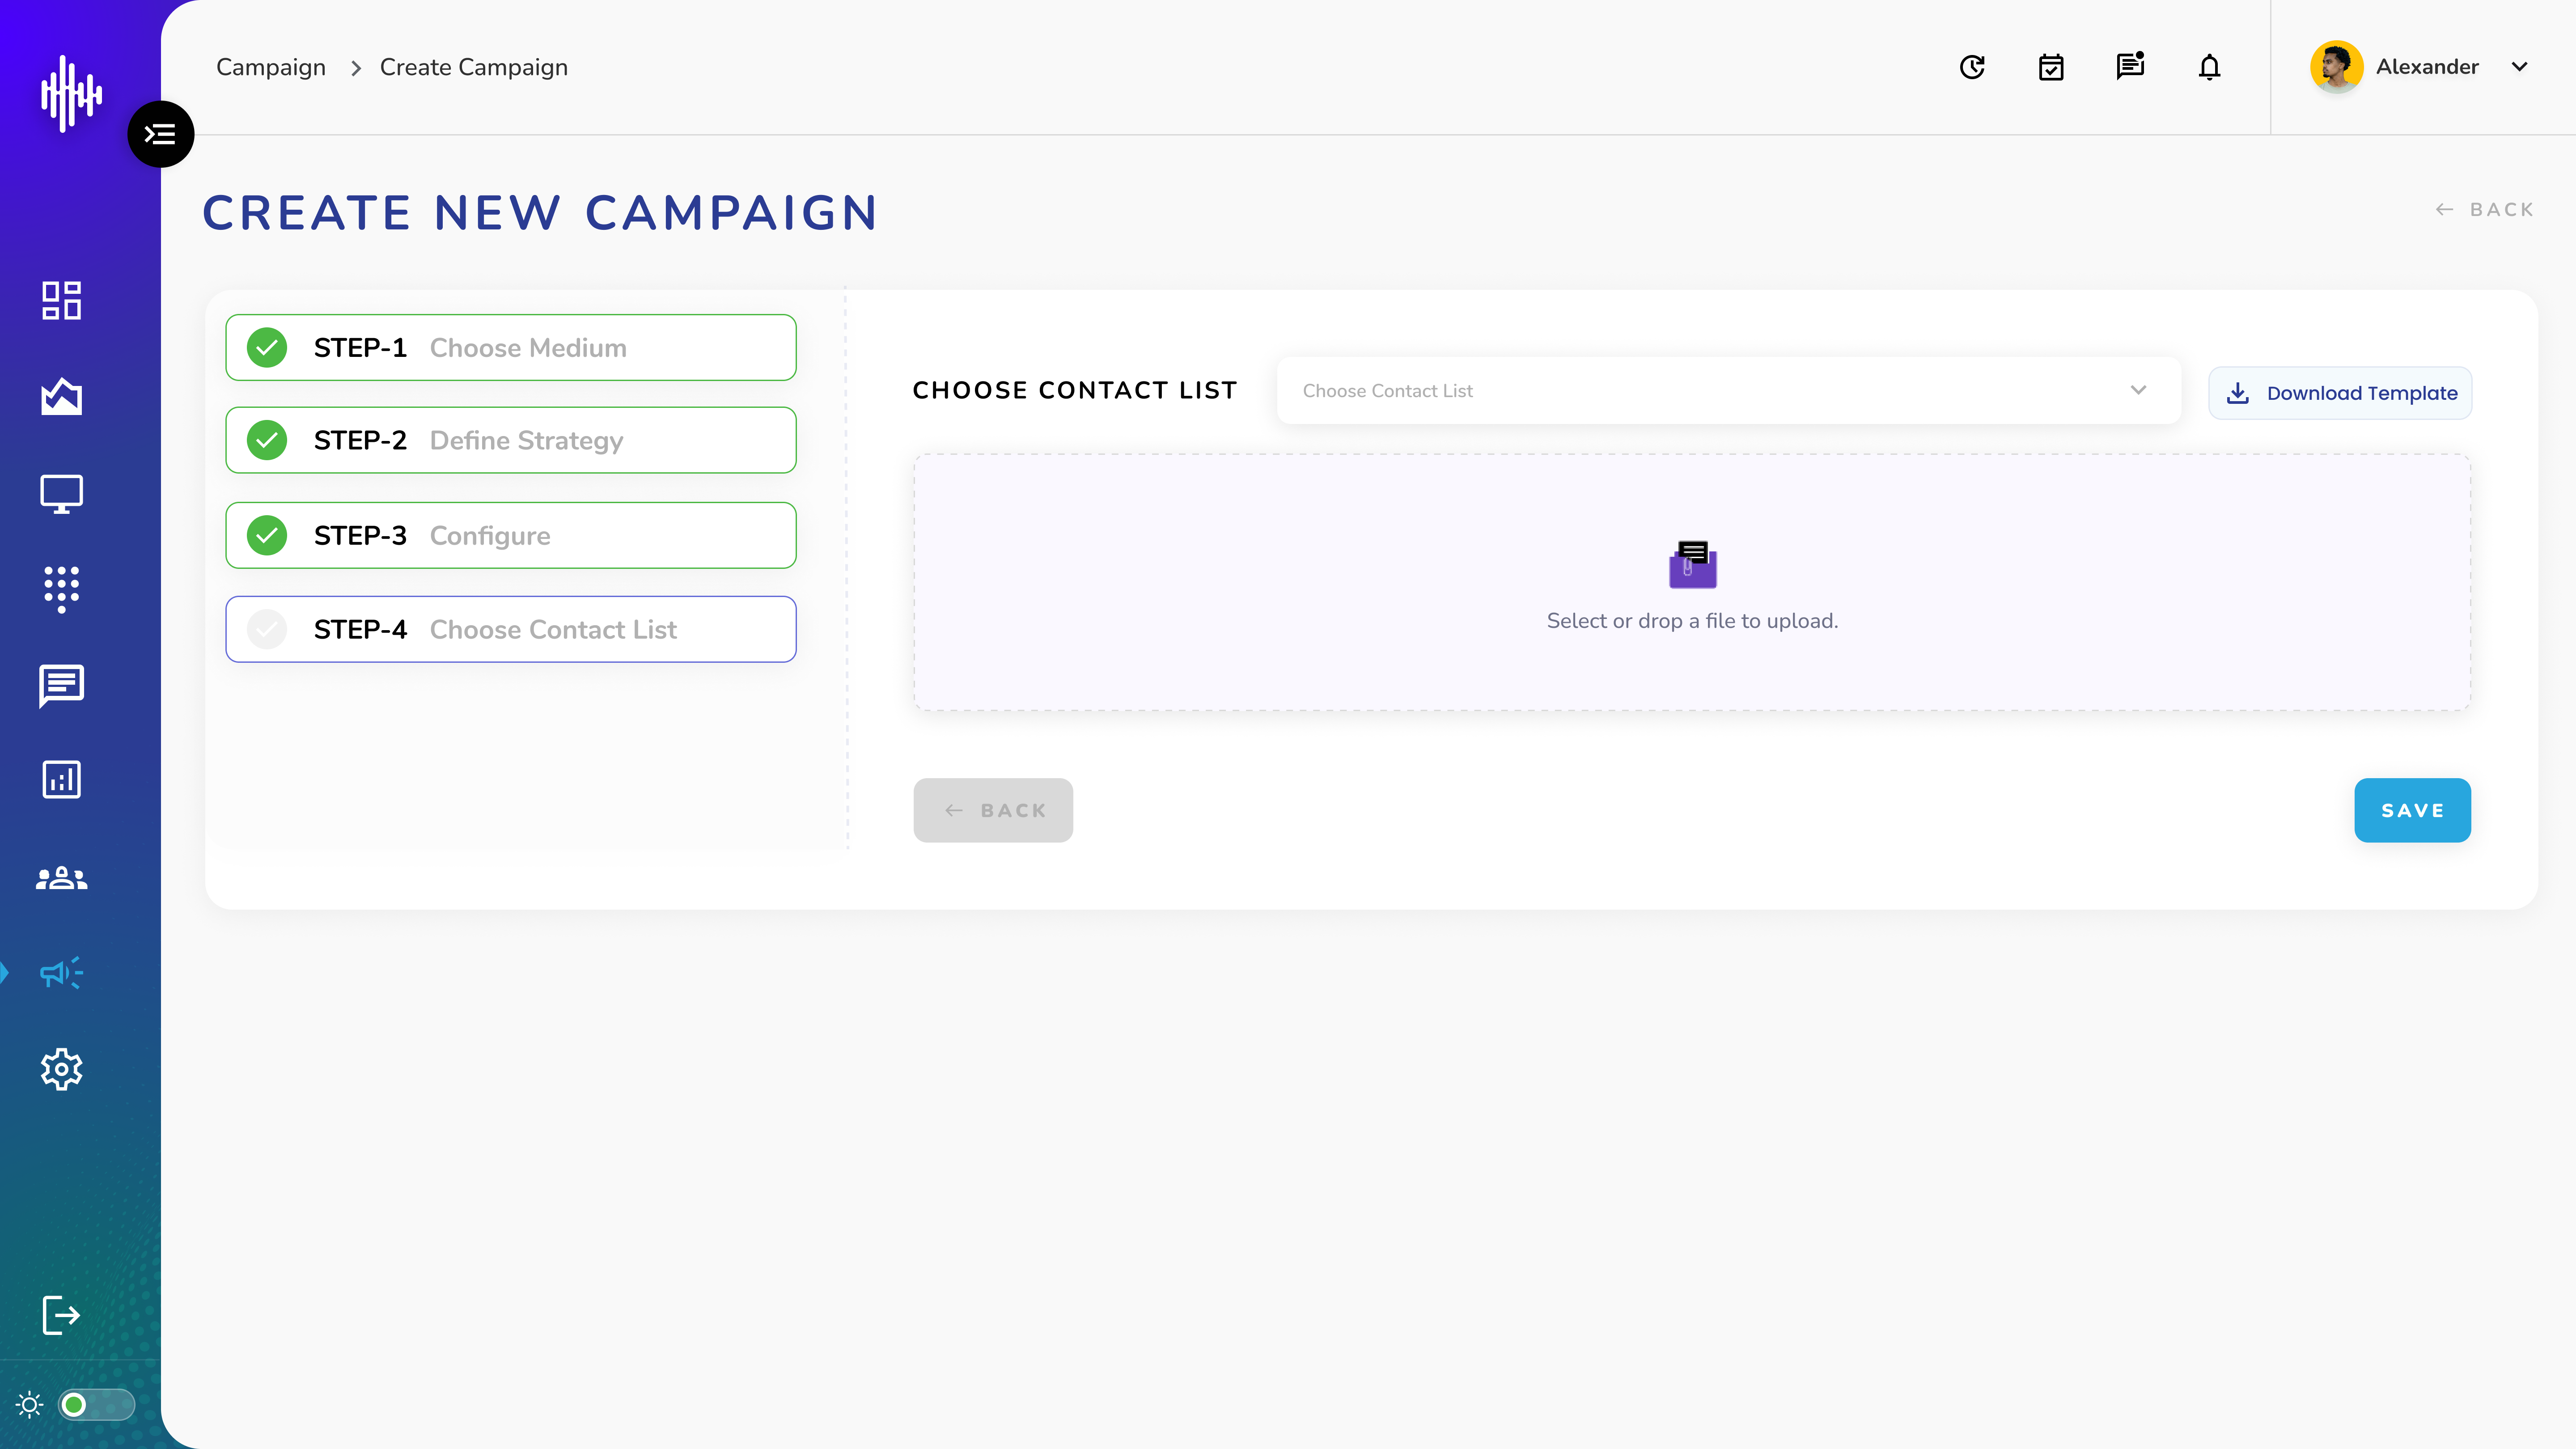
1. Choose Contact List
a. Select existing list OR
b. Upload new list:
i. Click upload area
ii. Drag & drop .CSV file
iii. Browse to select file
2. Template Usage
a. Download Template button
b. Follow CSV format
b. Required columns per campaign
File Requirements:
| Item | Specification |
|---|---|
| Format | CSV only |
| Headers | Match Template |
| Numbers | Valid format |
| File Size | System limit |
Navigation:
-
BACK: Return to Configure
-
SAVE: Complete campaign setup
Message
Step 1: Choose Medium
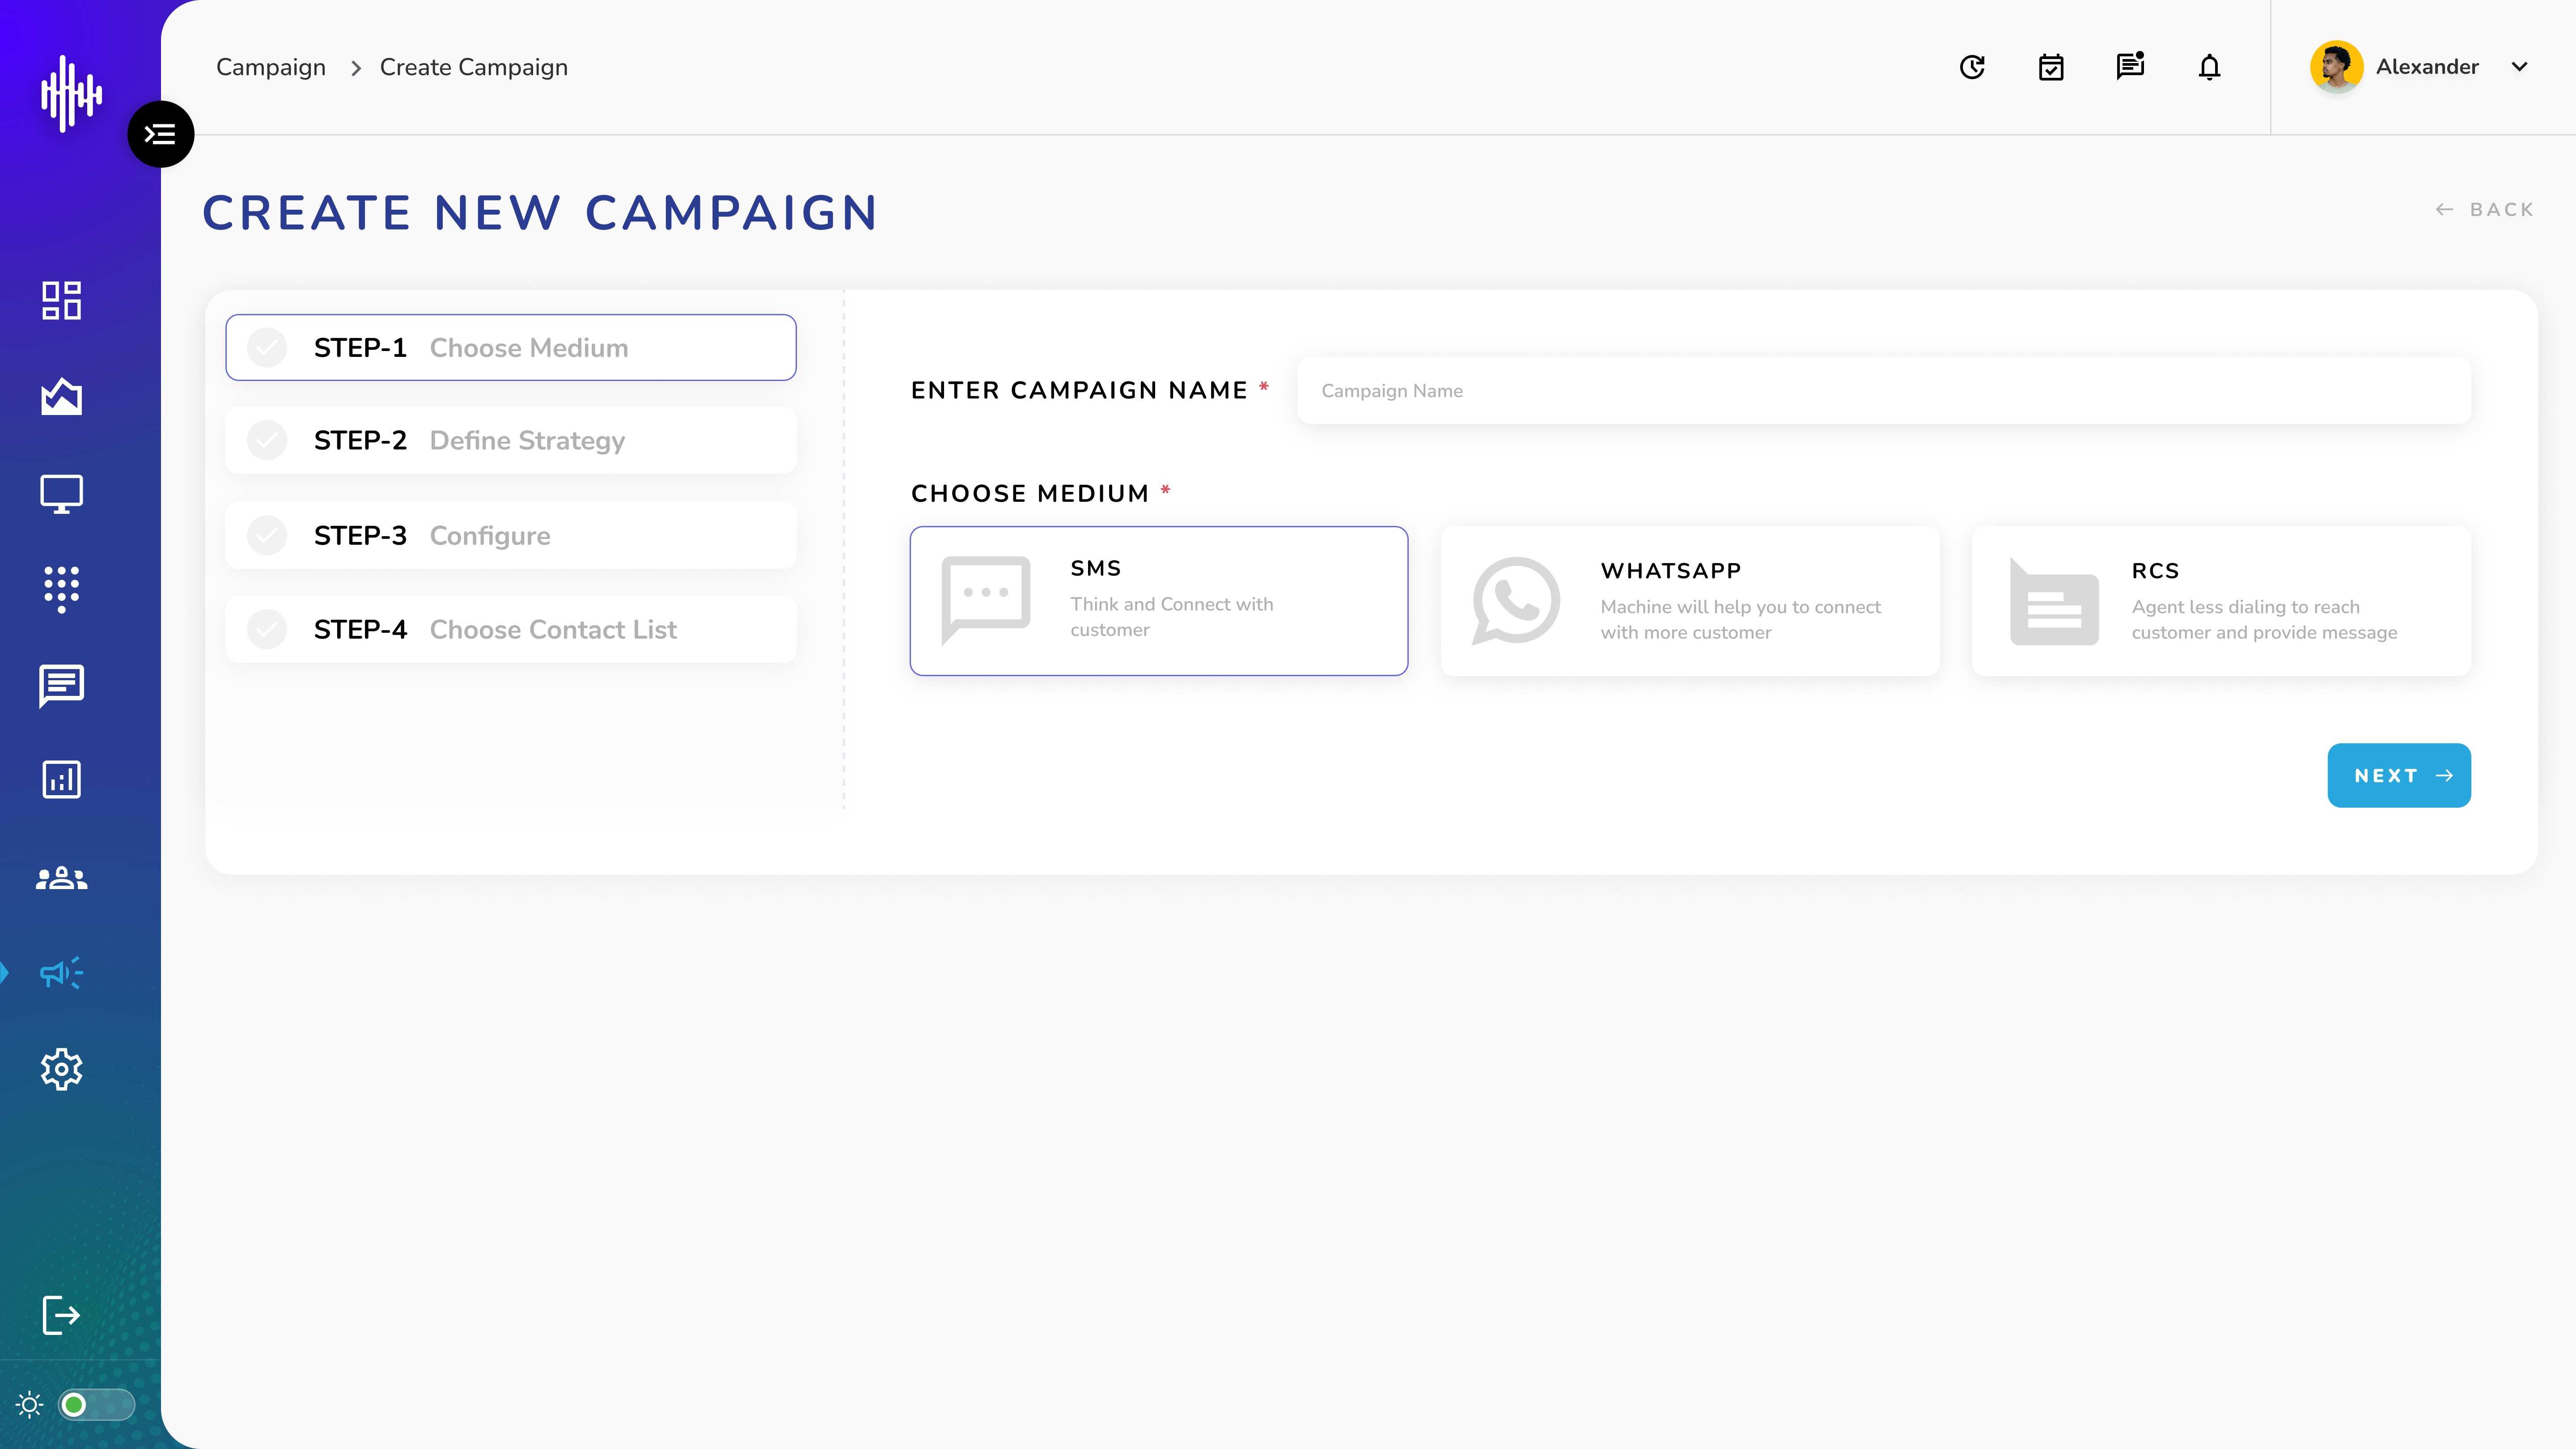
Required Fields:
| Field | Description |
|---|---|
| Campaign Name | Enter unique identifier |
| Choose Medium | Select message type |
1. Available Message Types:
a. SMS
i. Traditional text messaging
ii. Direct customer contact
b. WhatsApp
i. Rich messaging features
ii. Interactive communication
c. RCS
i. Enhanced messaging
ii. Rich media support
Navigation:
-
BACK: Return to campaign list
-
NEXT: Proceed to Define Strategy
Step 2: Define Strategy
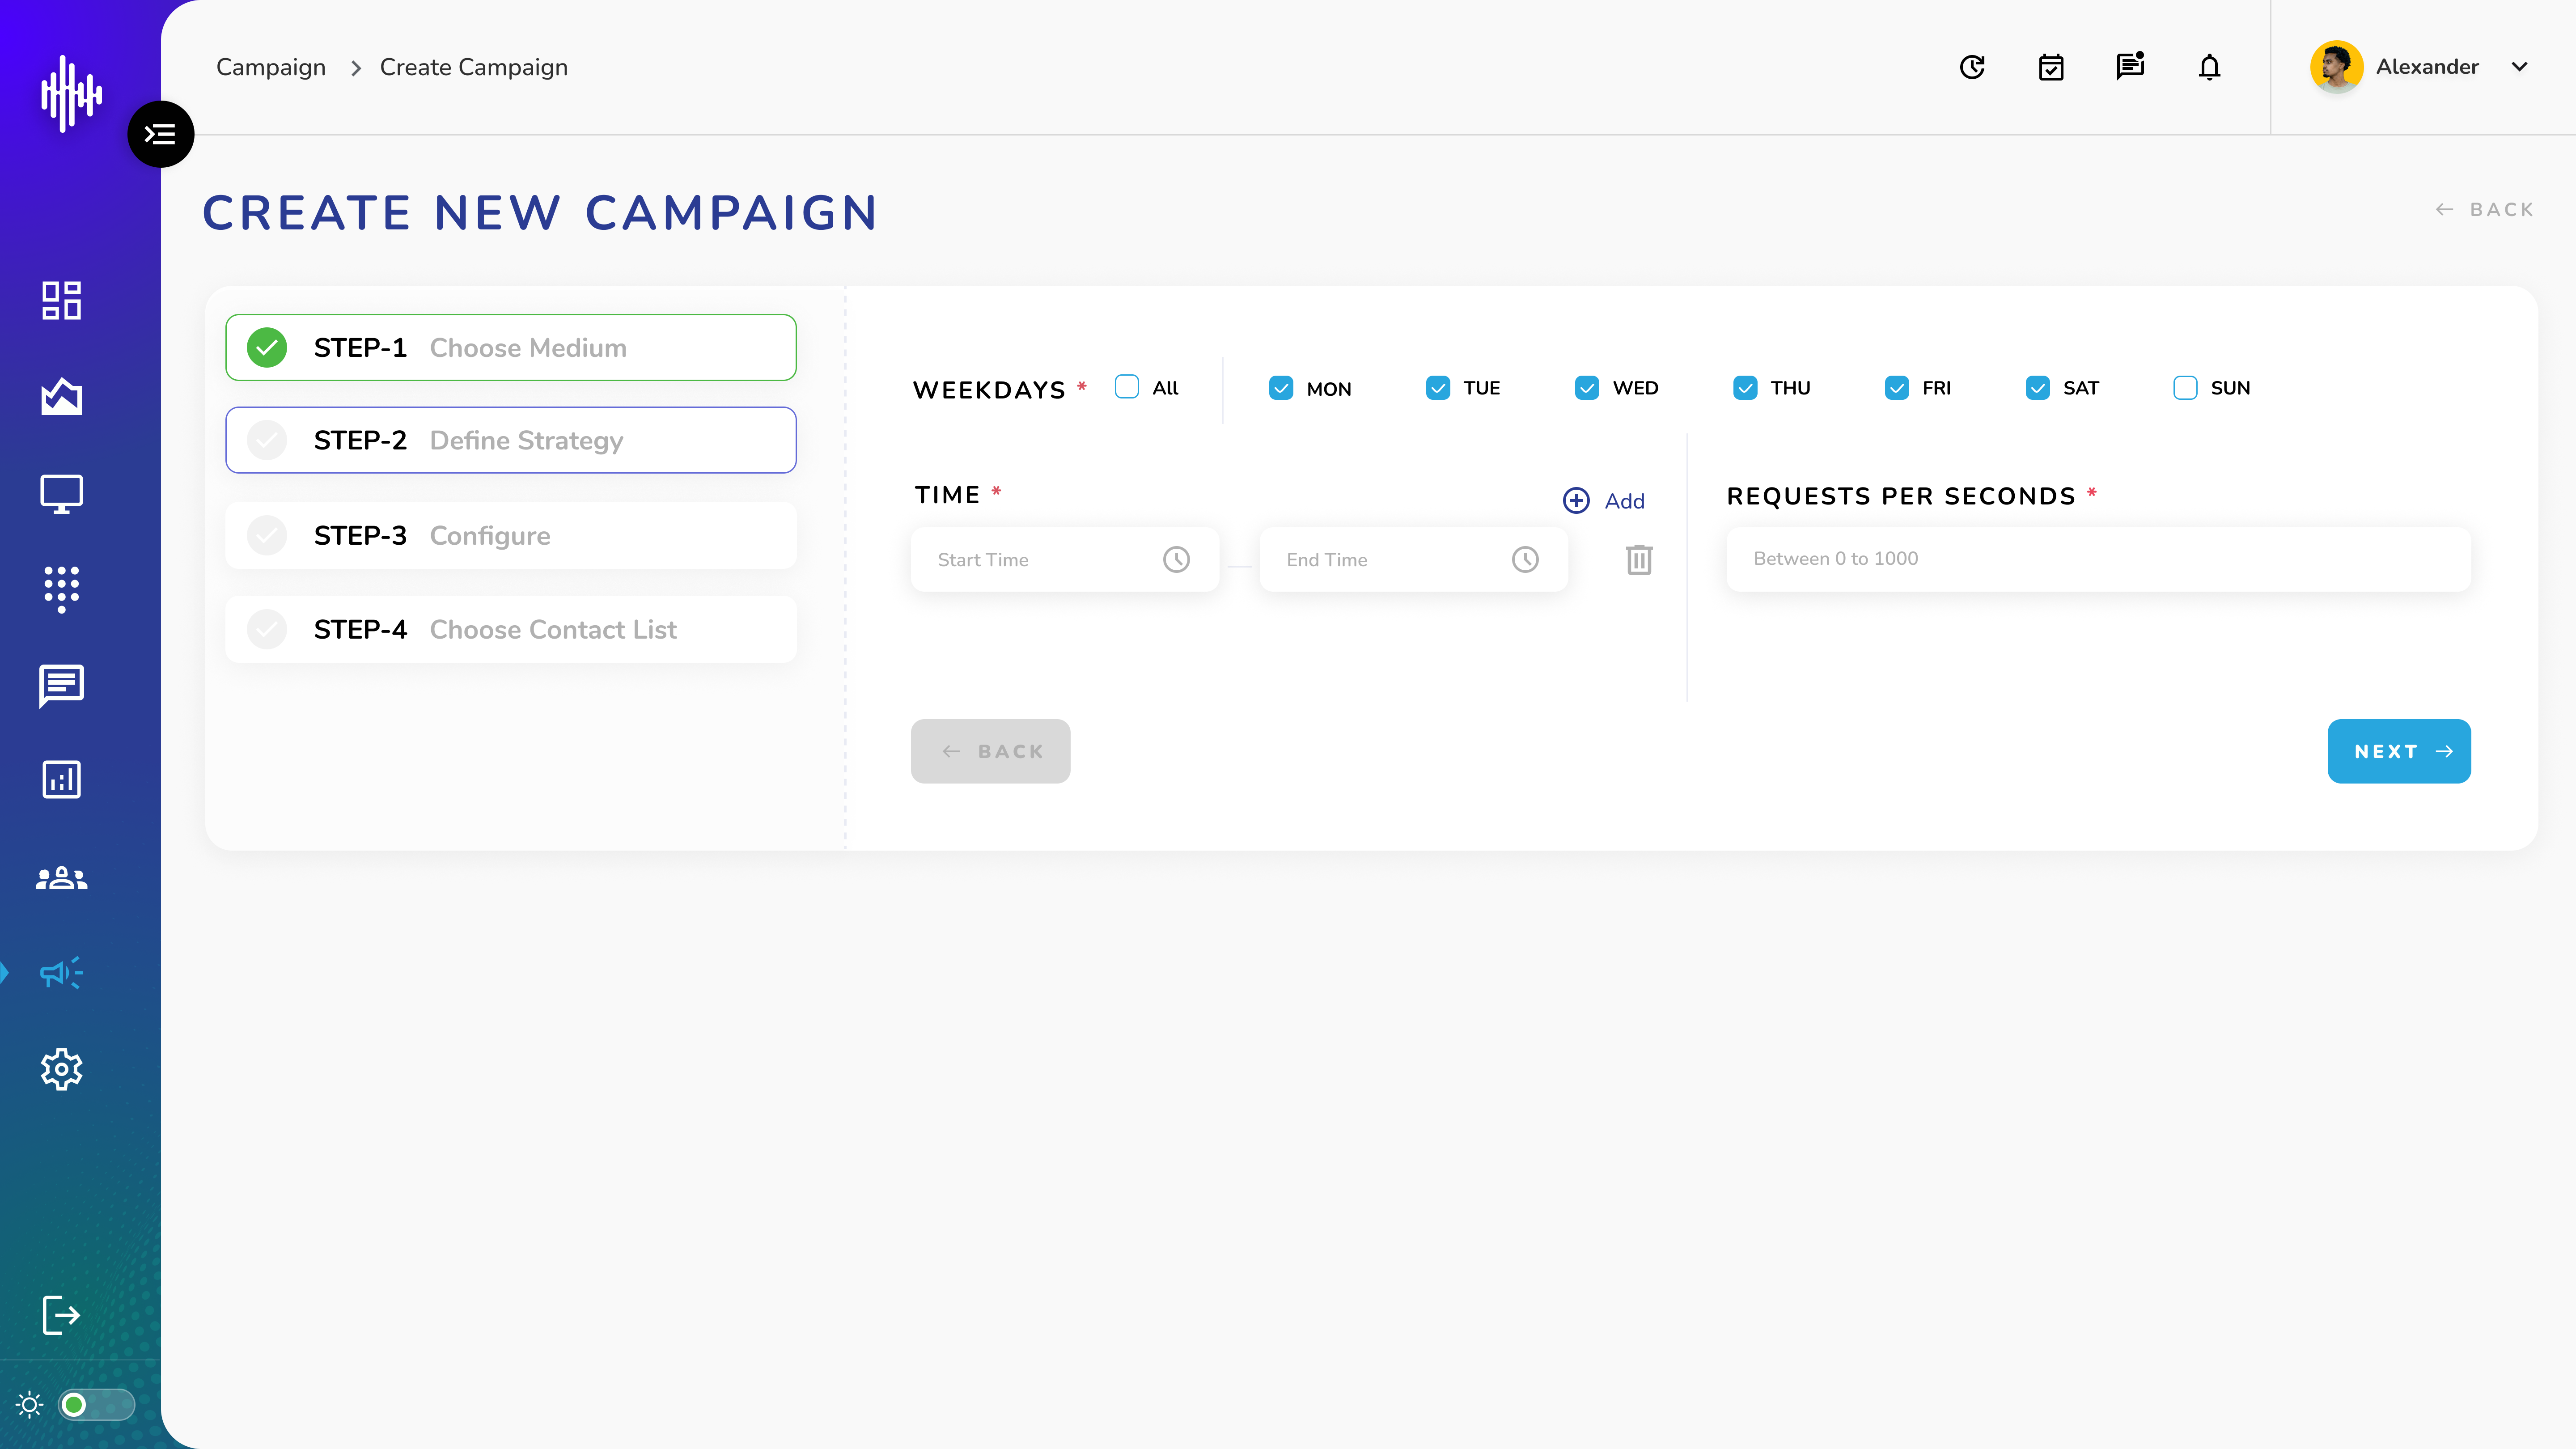
1. Common Settings for All Types:
a. Day selection: Multiple/all days
b. Custom time slots
c. Request per second: 0-1000
2. SMS / WhatsApp / RCS Campaign:
| Setting | Range/Options |
|---|---|
| Schedule | Select days & time slots |
| RPS | 0-1000 messages/sec |
Navigation:
-
BACK: Return to Step 1
-
NEXT: Proceed to Configure
Step 3: Configure
1. SMS Campaign Configuration
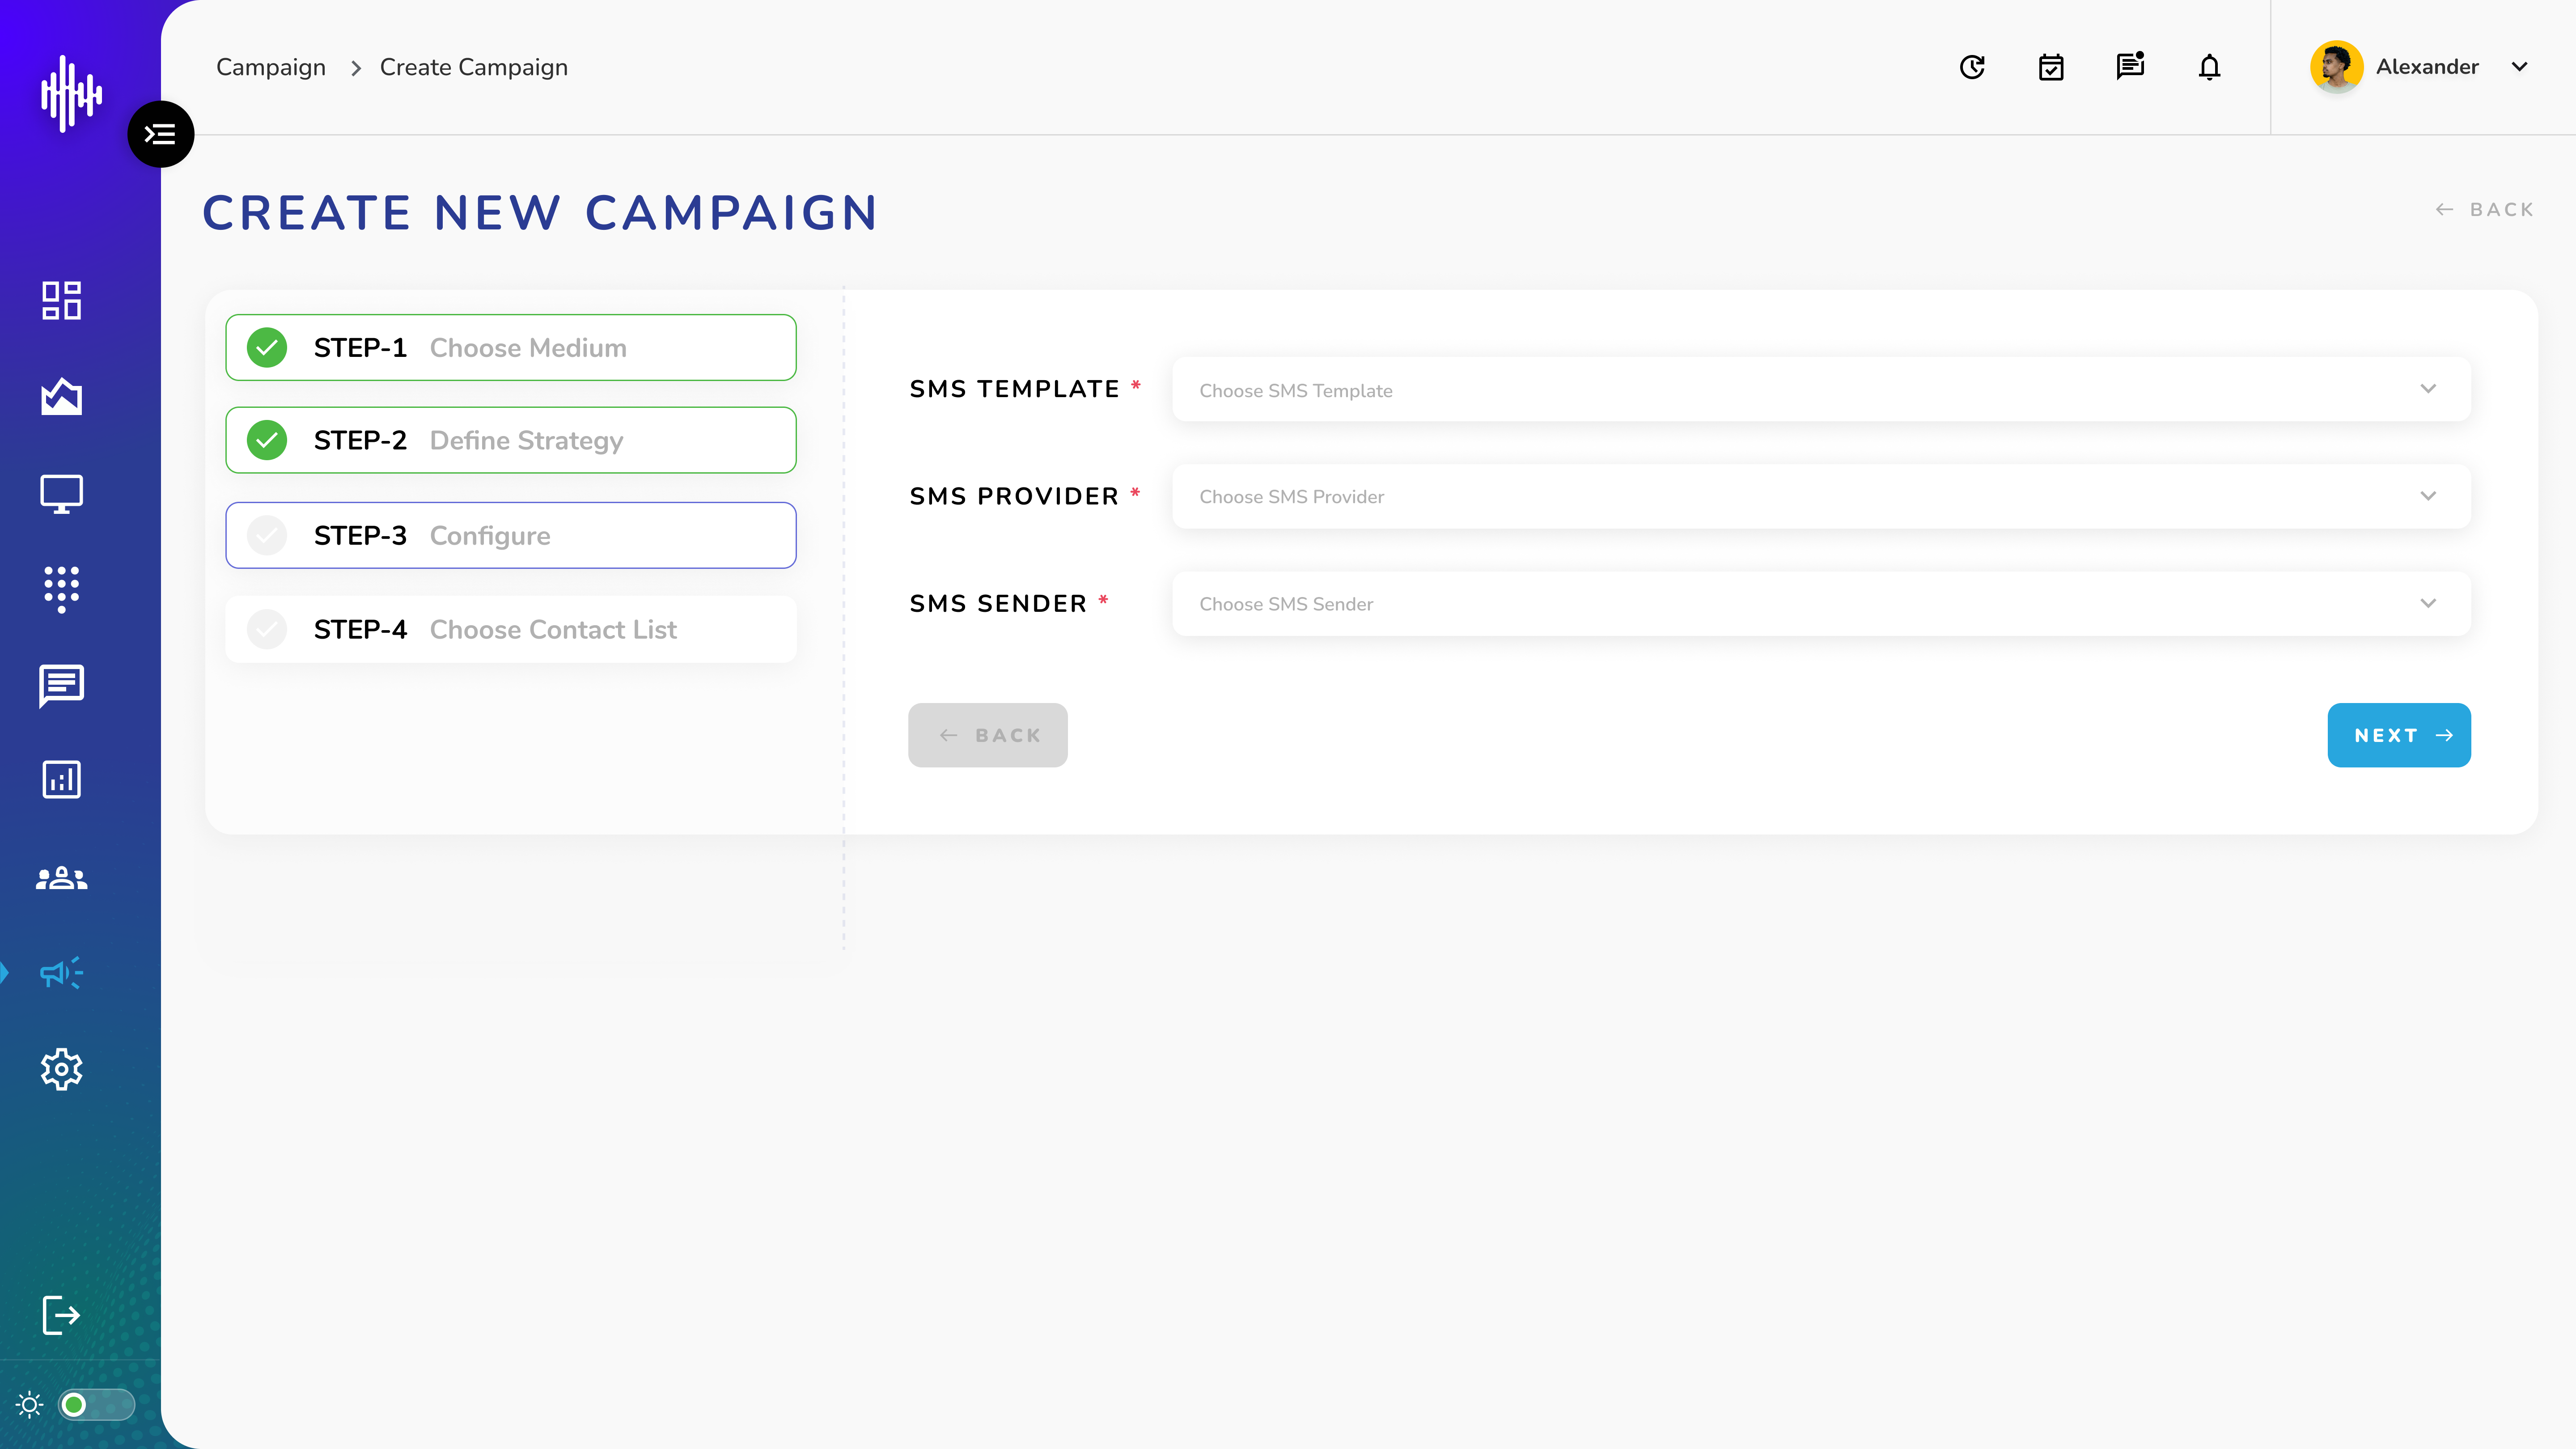
i. Select SMS Template
ii. Choose SMS Provider
iii. Pick SMS Sender ID
2. WhatsApp Campaign Configuration
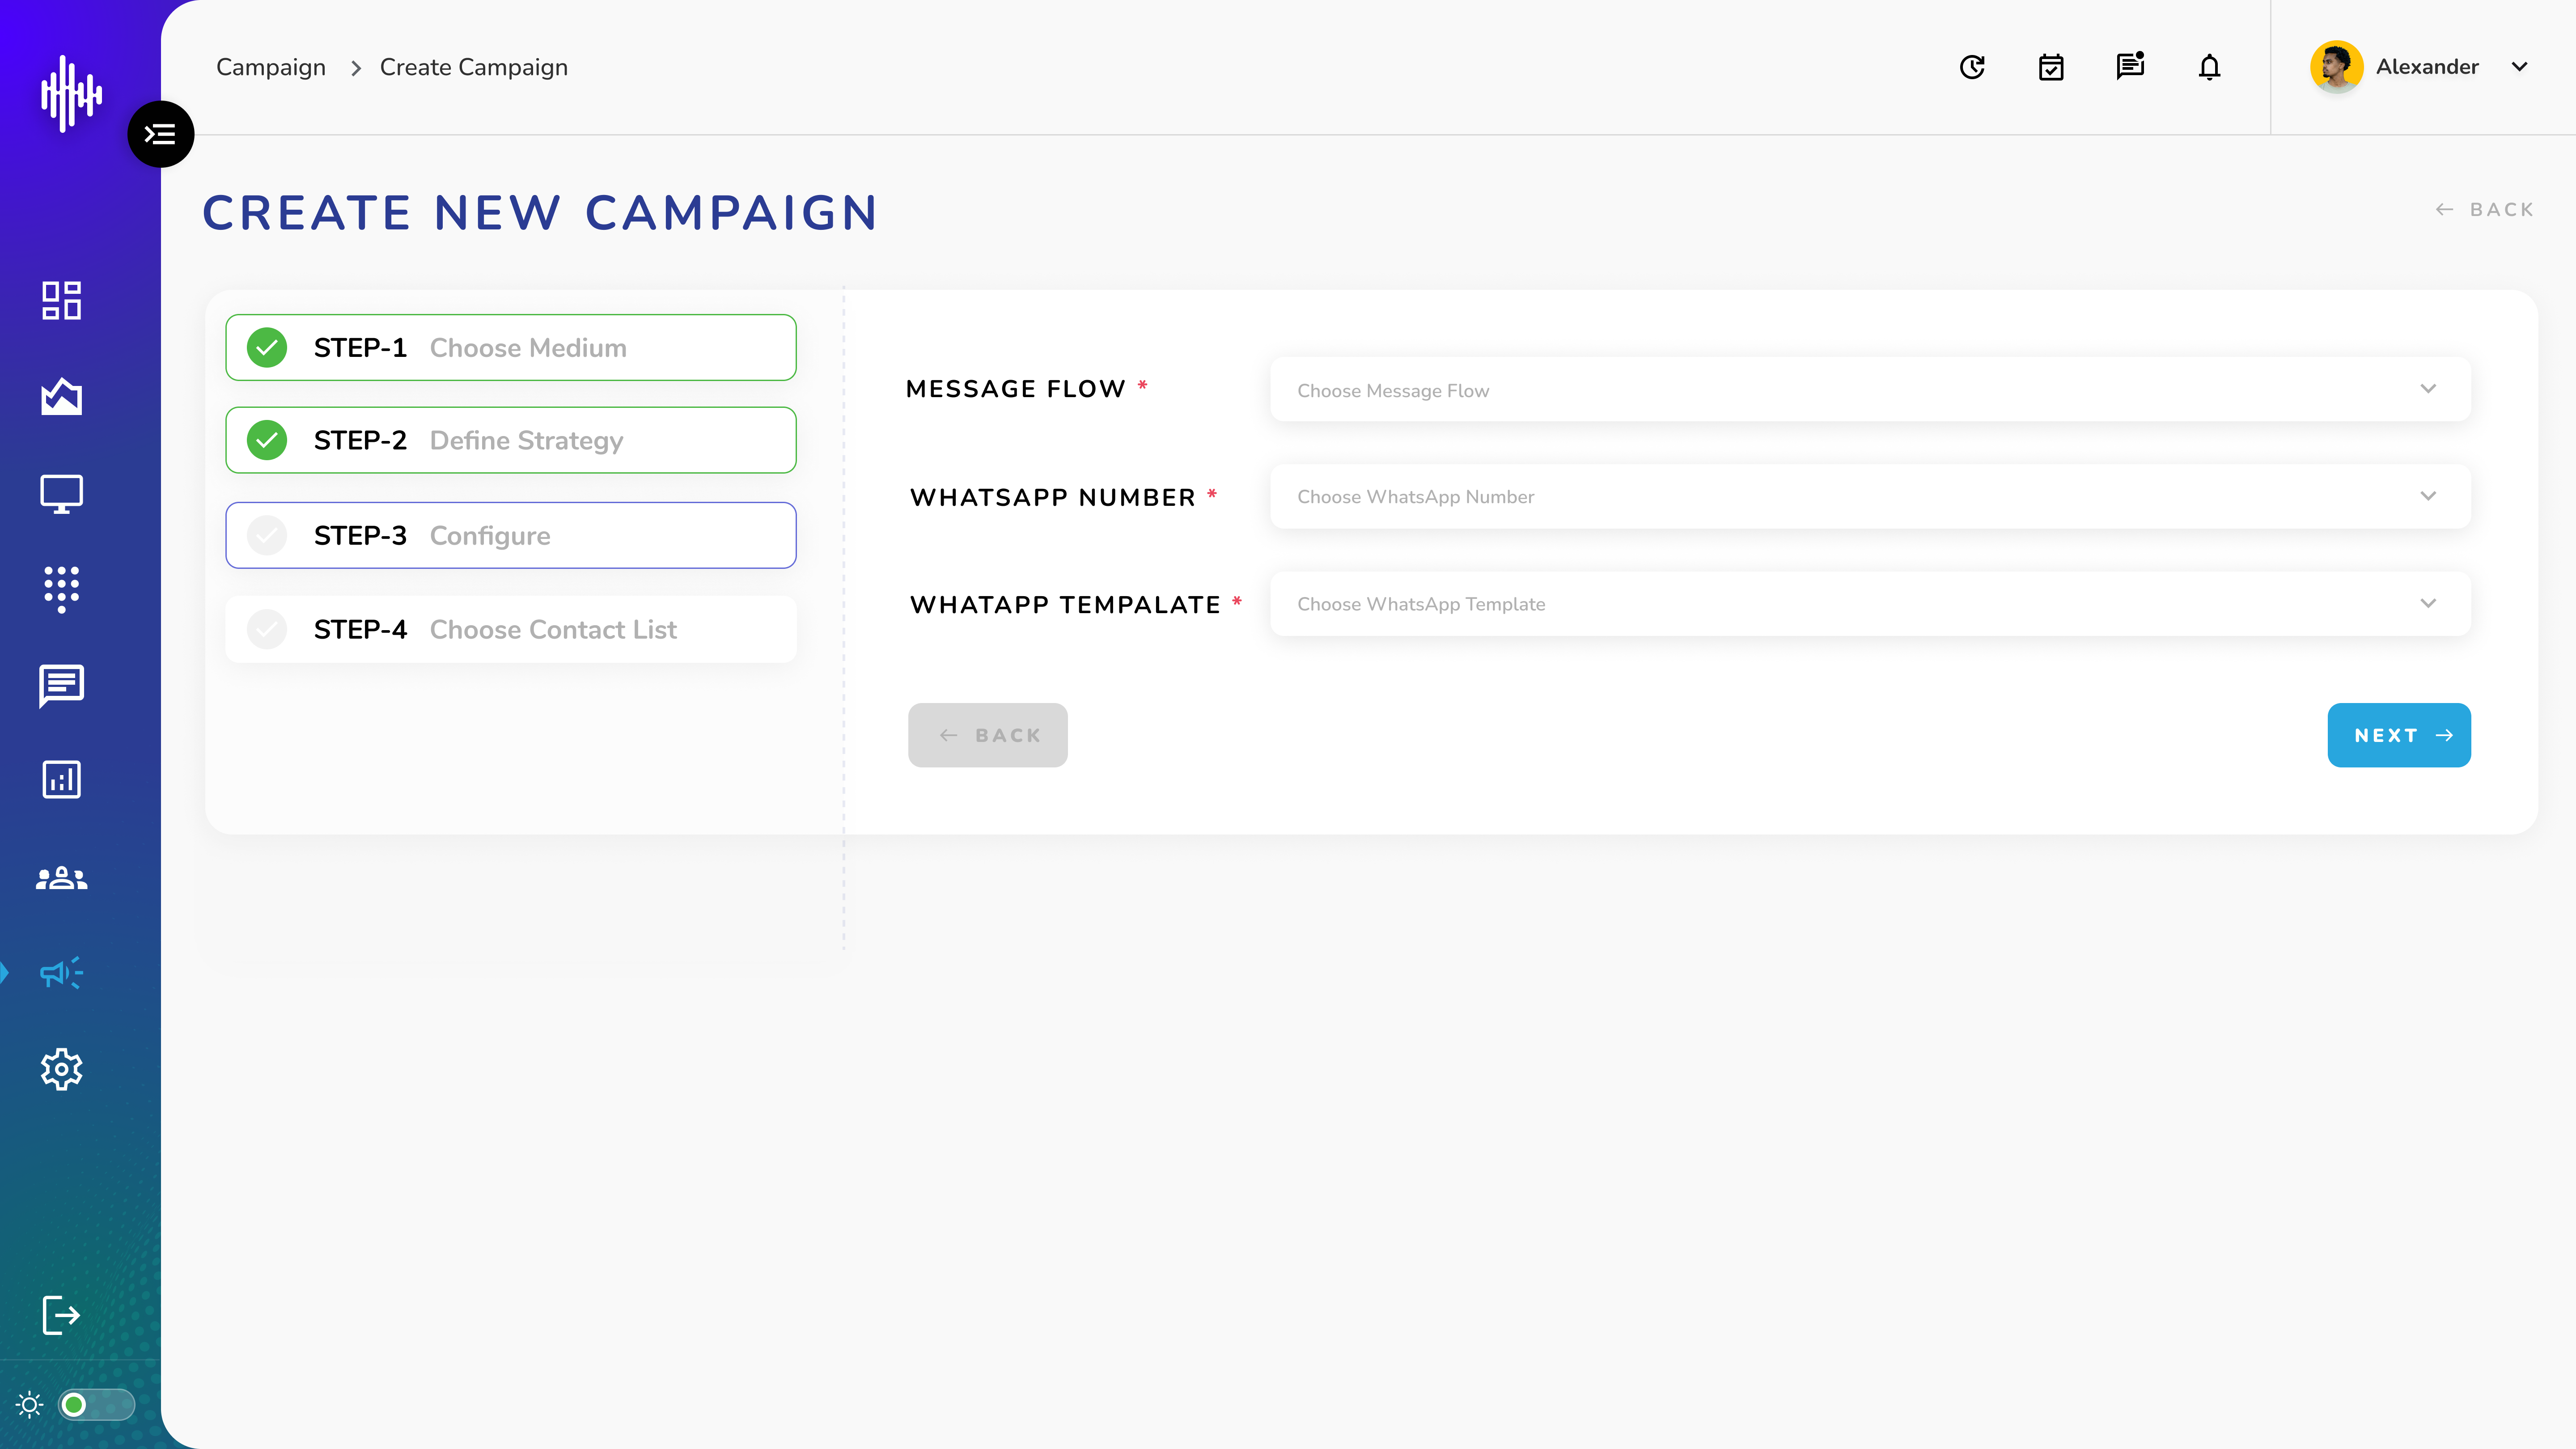
i. Choose Message Flow
ii. Select WhatsApp Number
iii. Pick WhatsApp Template
3. RCS Campaign Configuration
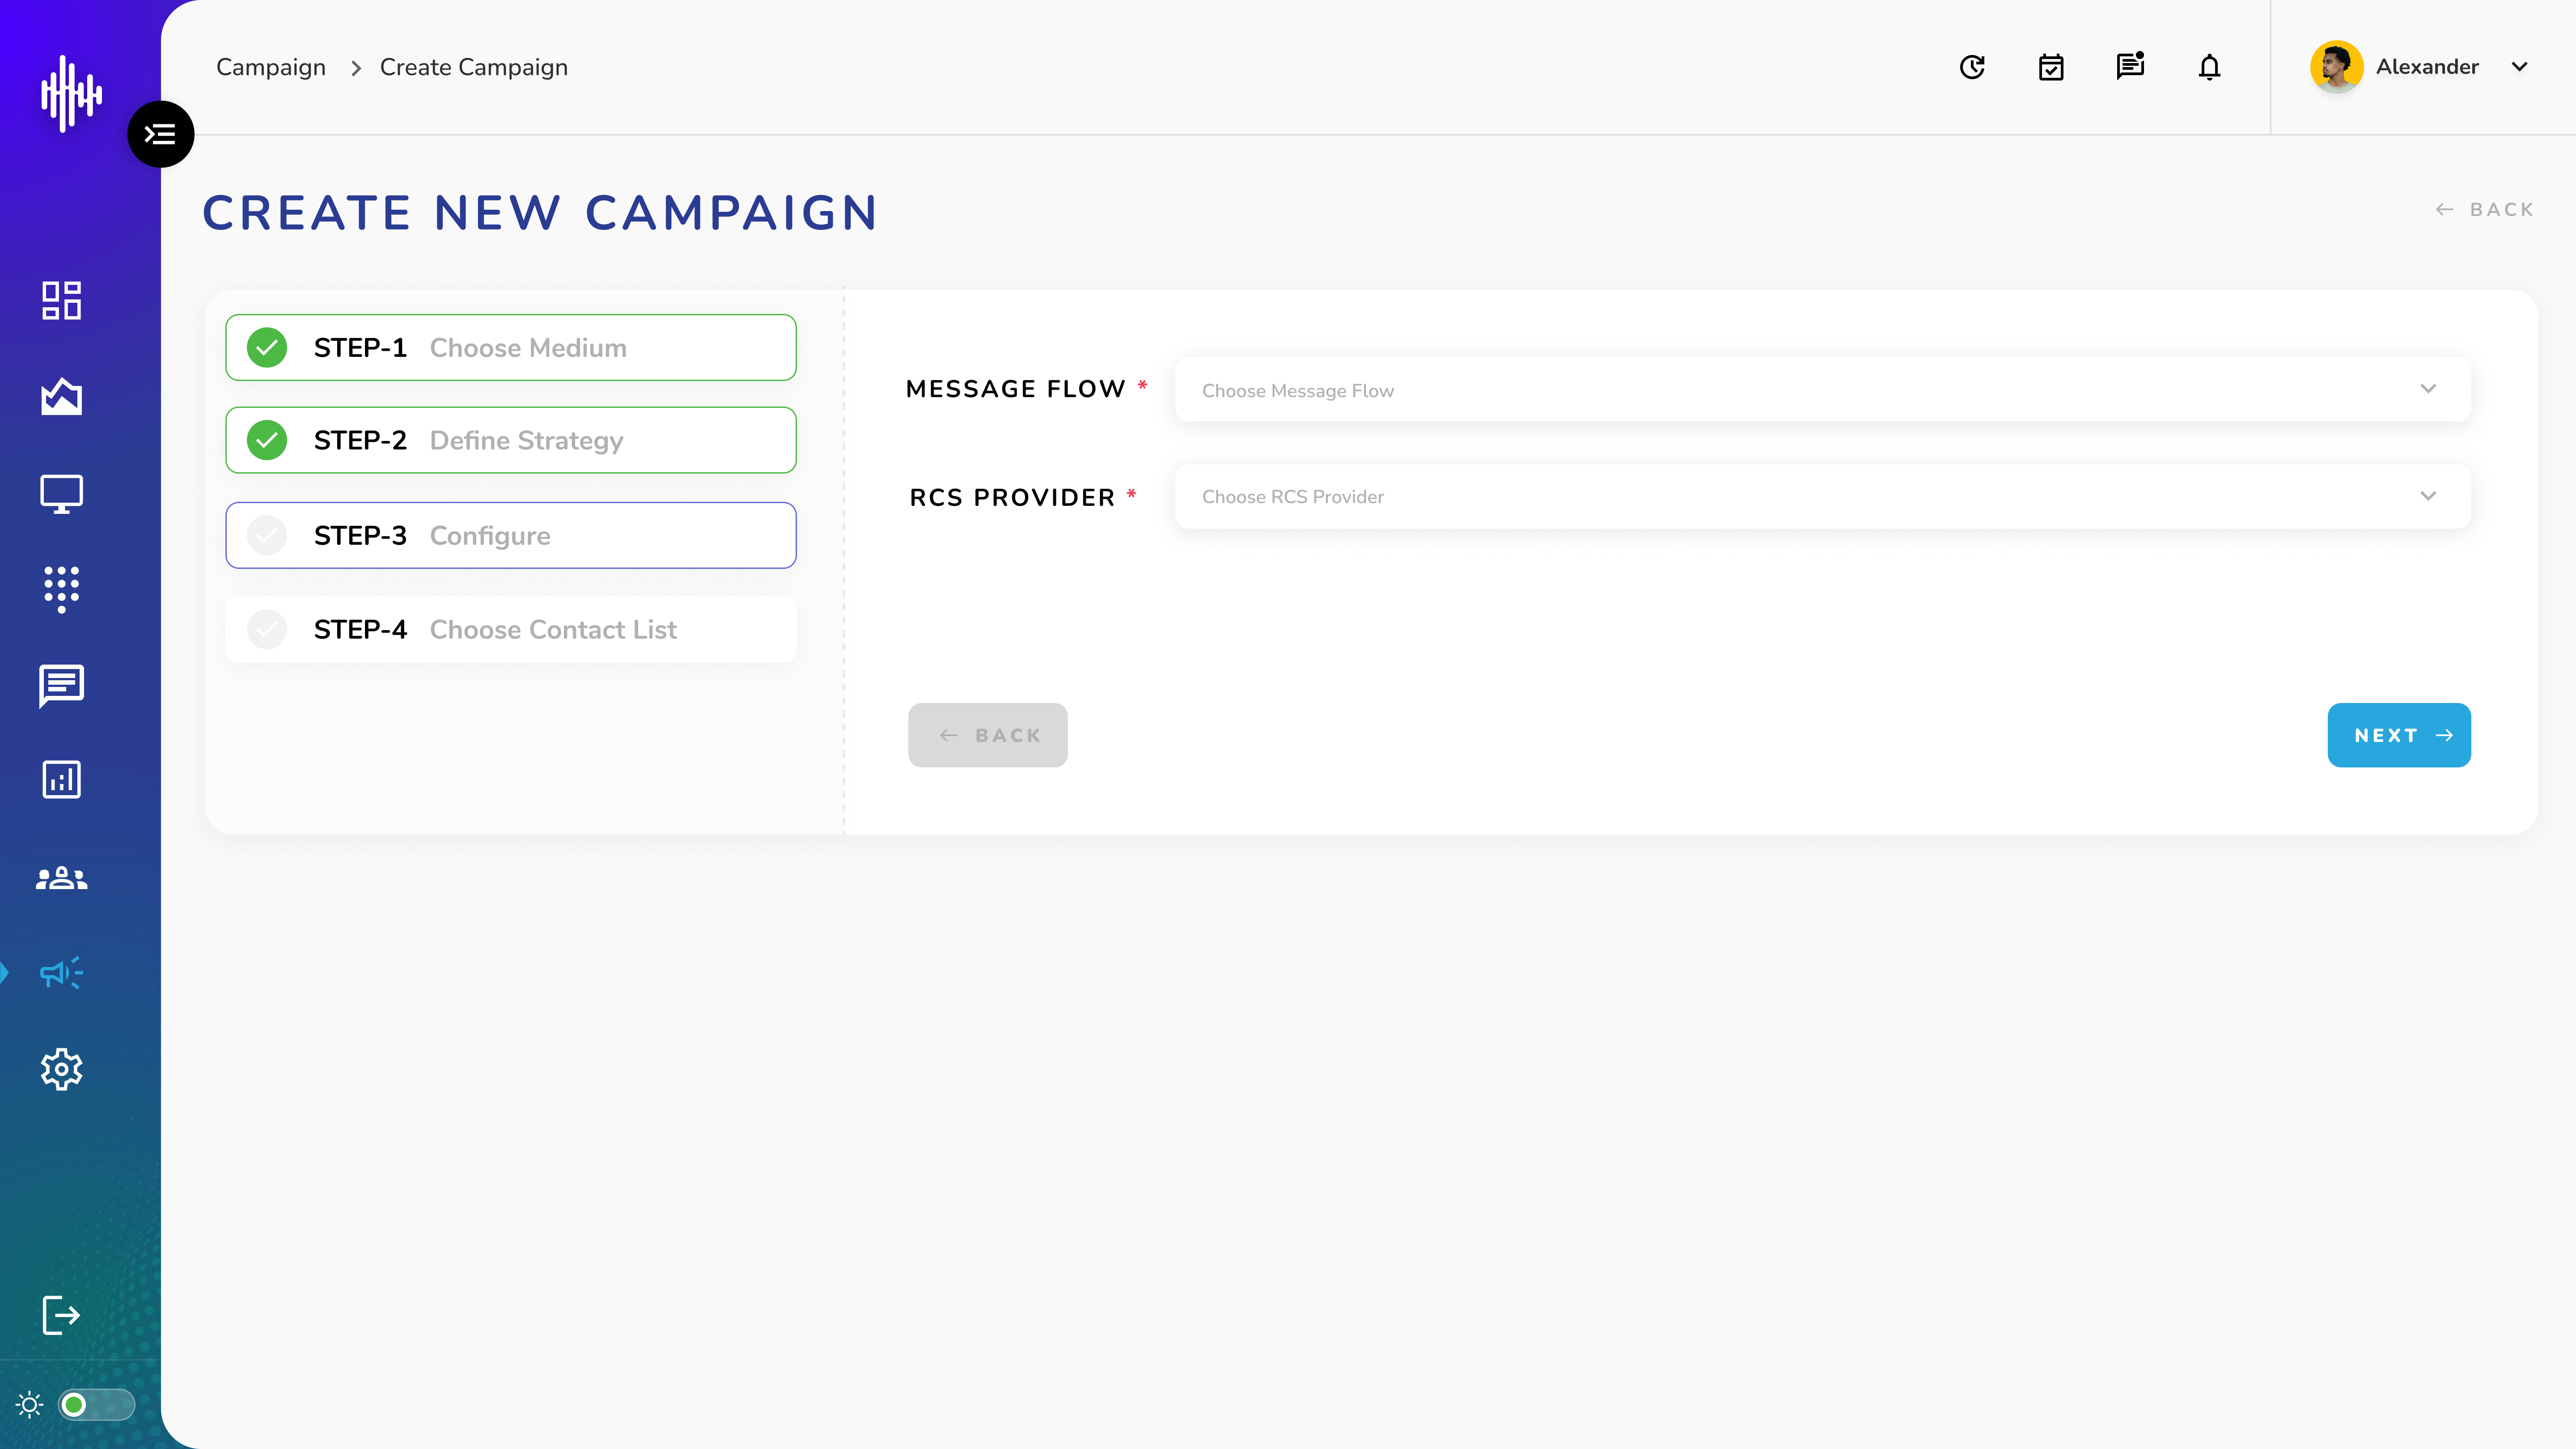
i. Select Message Flow
ii. Choose RCS Provider
Configuration Process:
-
Select from available options in dropdown lists
-
Verify selections are active/approved
-
Confirm provider settings
-
Click NEXT to proceed
Key Checks:
-
Template approval status
-
Provider availability
-
Number/sender activation
-
Flow configuration
-
Service compatibility
Step 4: Choose Contact List
1. Choose Contact List
a. Select existing list OR
b. Upload new list:
i. Click upload area
ii. Drag & drop .CSV file
iii. Browse to select file
2. Template Usage
a. Download Template button
b. Follow CSV format
b. Required columns per campaign
File Requirements:
| Item | Specification |
|---|---|
| Format | CSV only |
| Headers | Match Template |
| Numbers | Valid format |
| File Size | System limit |
Navigation:
-
BACK: Return to Configure
-
SAVE: Complete campaign setup