How to Configure Smart Agent in a Voice Flow
Learn how to add and configure a Smart Agent node within your voice flow to enable AI-driven caller interactions.
Overview
The Smart Agent node is the AI brain of your voice flow. It listens to what the caller says, understands their intent using a knowledge base, and generates an intelligent spoken response — all in real time.
A typical voice flow with Smart Agent follows this pattern:
Answer Call
  └── CONVERT: Text To Speak (Welcome prompt)
        └── LISTEN: Collect Speech Response (Capture caller input)
              └── NLP: Smart Agent (Understand and respond)
                    ├── CONDITION (Route based on response)
                    └── WRONG INPUT (Handle unrecognised input)
Step 1: Add the Smart Agent Node to the Canvas
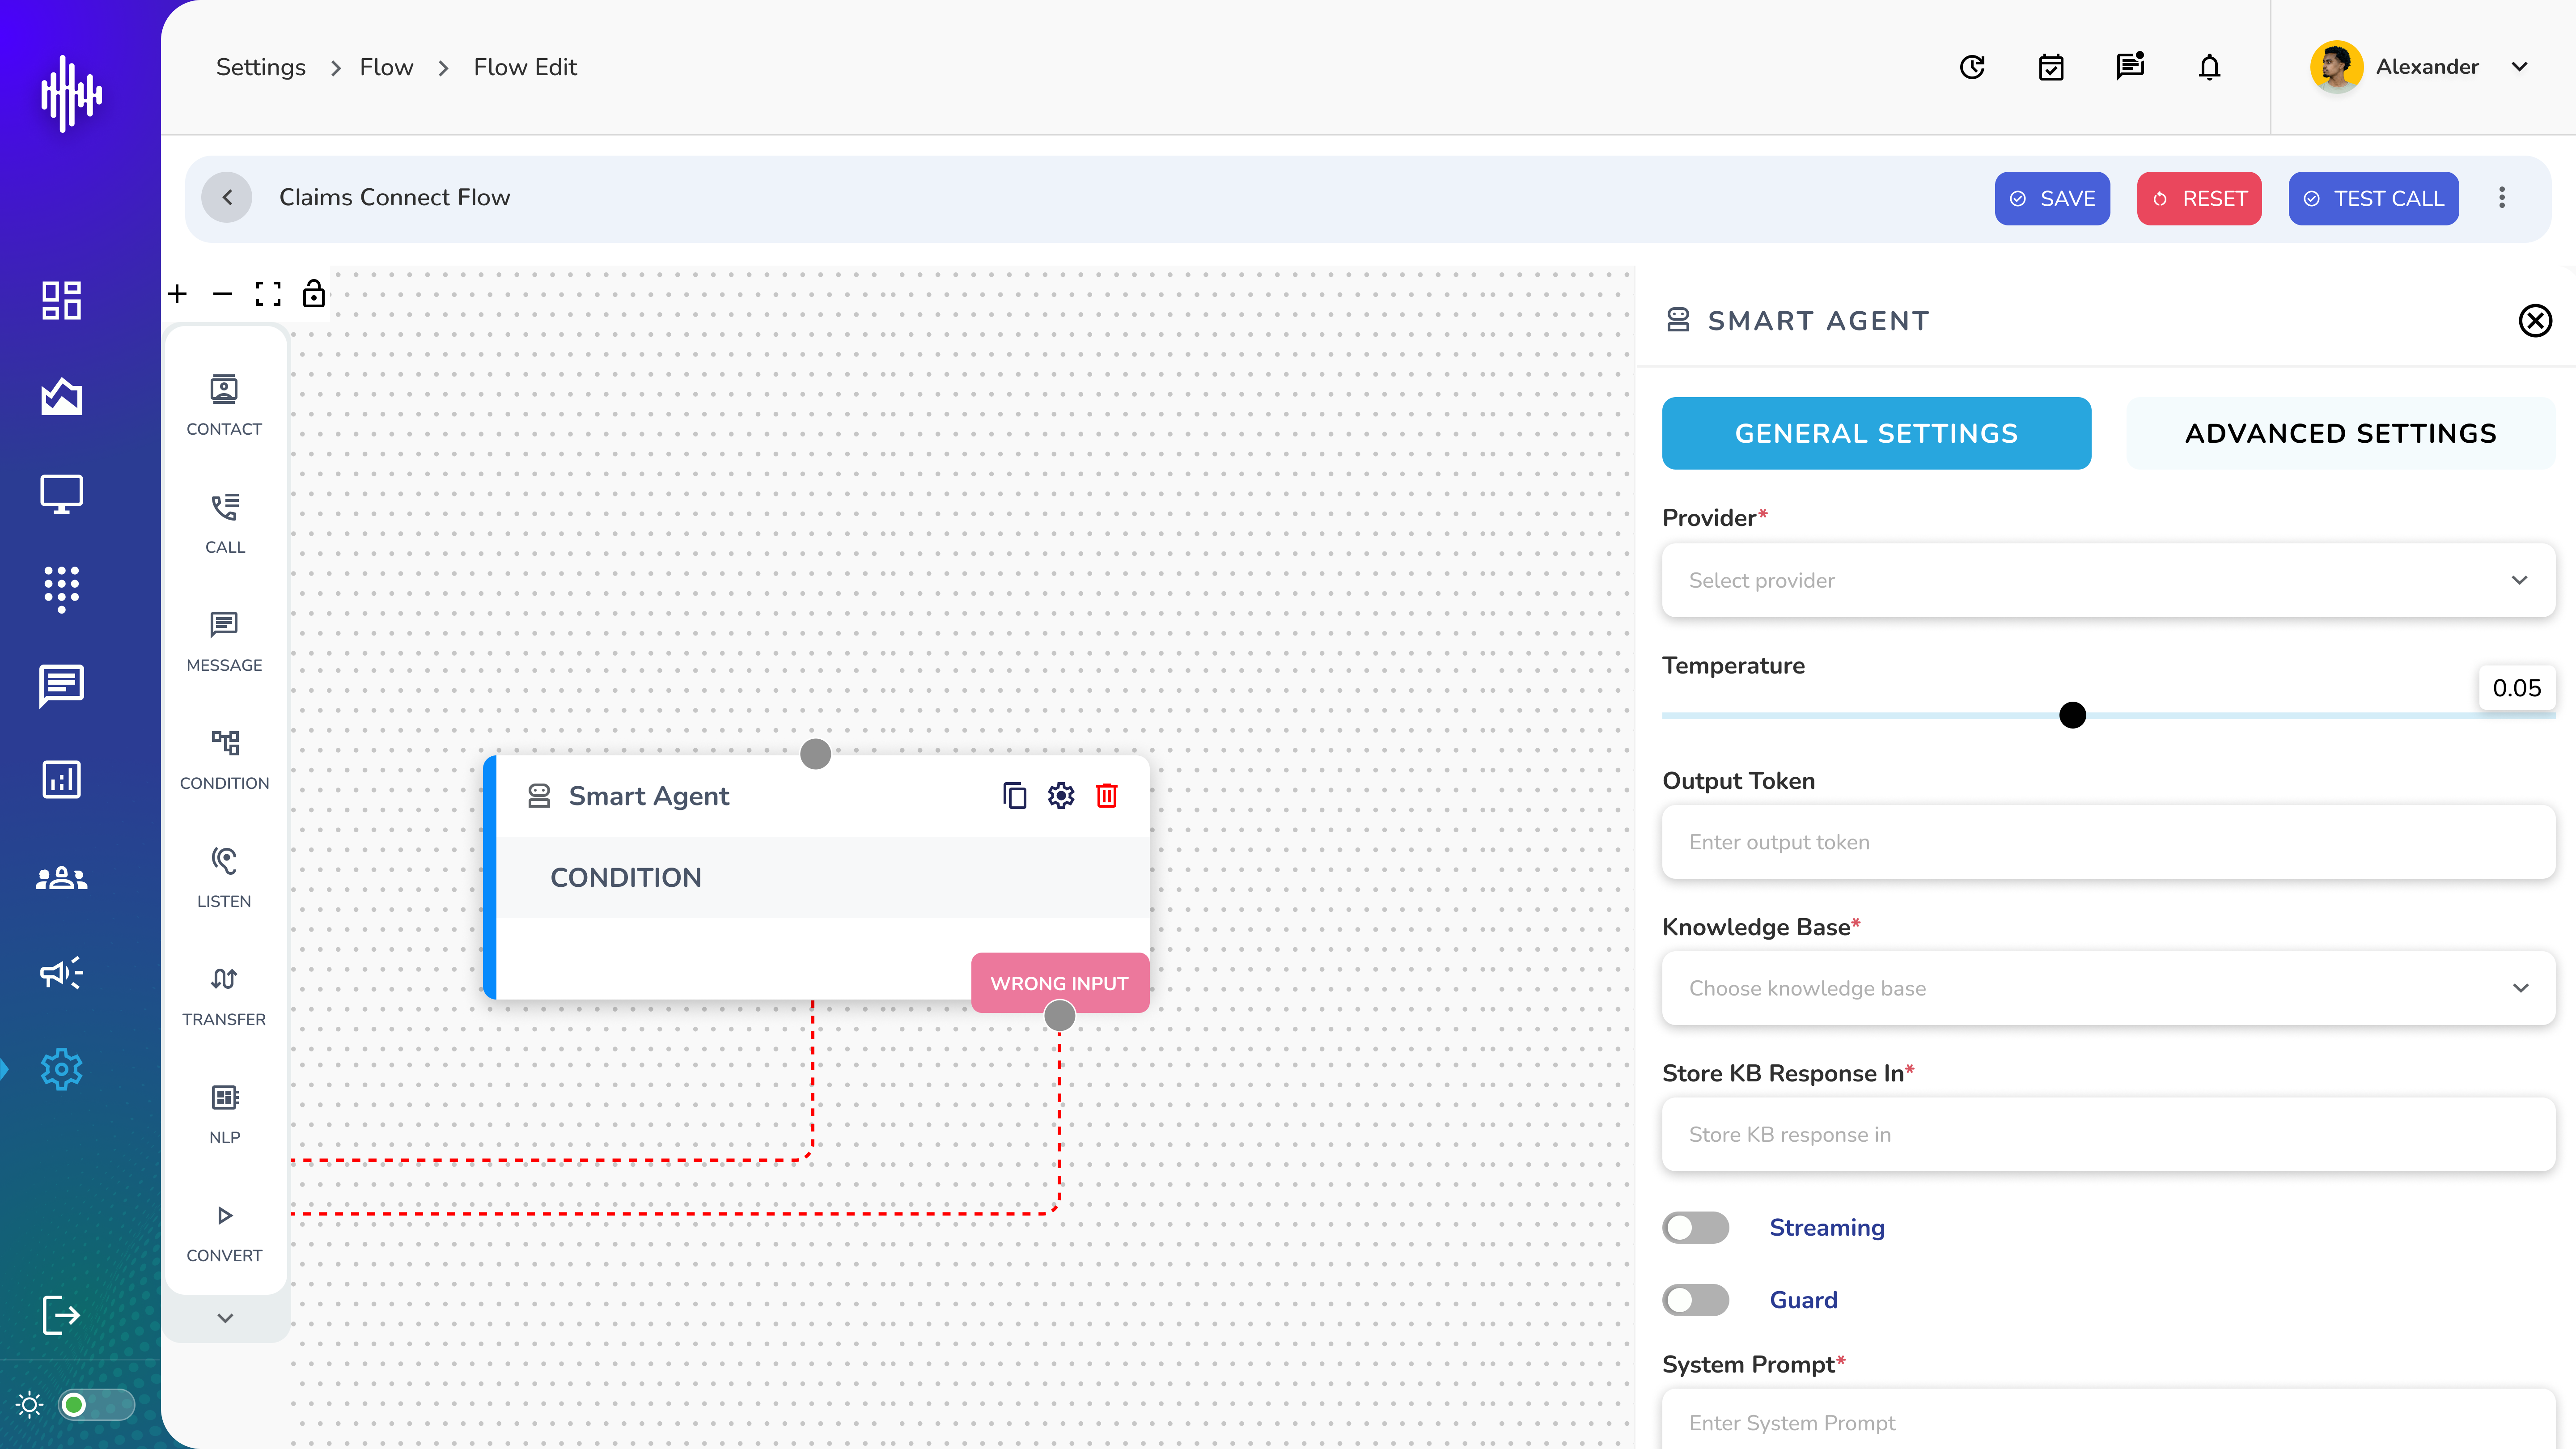
- Open your voice flow in the Flow Playground
- From the left sidebar, click NLP to expand the node options
- Drag the Smart Agent sub-node onto the canvas
- Connect it to the preceding LISTEN node and the following CONDITION or CONVERT node
- Click the settings icon on the Smart Agent node to open the configuration panel
The configuration panel has two tabs — General Settings and Advanced Settings.
The Smart Agent node will show a WRONG INPUT output path by default. Always connect this to a fallback node such as a CONVERT: Text To Speak that re-prompts the caller.
Step 2: Configure General Settings
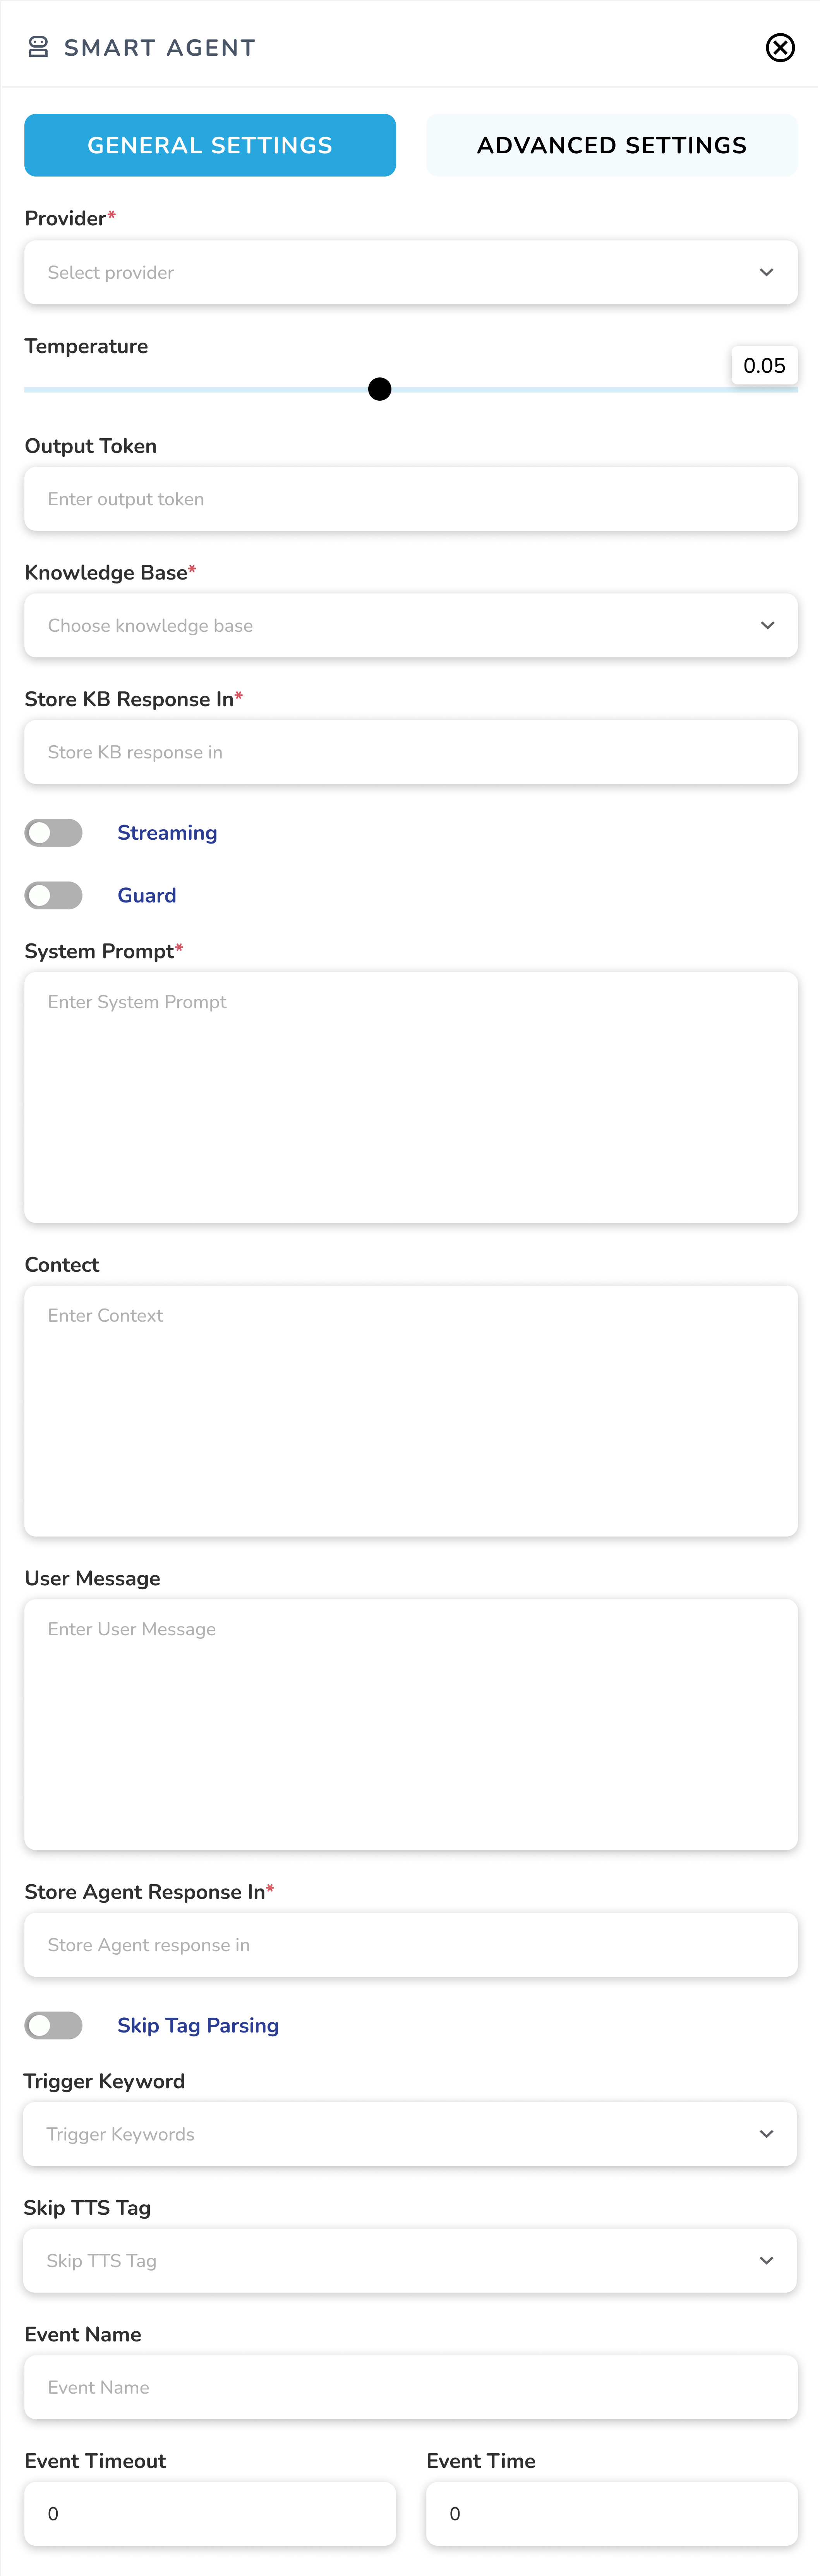
General Settings define how the Smart Agent processes caller input and generates responses.
AI Provider Settings
| Field | Description | Required |
|---|---|---|
| Provider | Select the AI service provider powering the Smart Agent | Yes |
| Temperature | Controls response creativity. Lower values (e.g. 0.05) give more precise, consistent answers. Higher values allow more varied responses. | No |
| Output Token | Set the maximum length of the AI-generated response | No |
Knowledge Base Settings
| Field | Description | Required |
|---|---|---|
| Knowledge Base | Select the knowledge base the Smart Agent will query for answers | Yes |
| Store KB Response In | Define the variable where the knowledge base response is stored | Yes |
Toggles
| Toggle | Description |
|---|---|
| Streaming | Enables real-time streaming of the AI response as it is generated. When enabled, the response streams directly to the caller — no TTS node is needed as the next step. When disabled, you must connect a CONVERT: Text To Speak node after the Smart Agent to convert the response into spoken audio. |
| Guard | Activates a safety layer to filter inappropriate or out-of-scope responses |
Prompt and Context
| Field | Description | Required |
|---|---|---|
| System Prompt | Define the AI's behaviour, role, and boundaries for the conversation | Yes |
| Context | Provide additional background information the agent should be aware of | No |
| User Message | Define the message or input passed to the AI from the caller's captured response | No |
| Store Agent Response In | Define the variable where the full AI response is stored for use later in the flow | Yes |
Additional Settings
| Field | Description |
|---|---|
| Skip Tag Parsing | Toggle to skip parsing of response tags in the AI output |
| Trigger Keyword | Define keywords that activate or trigger the Smart Agent node |
| Skip TTS Tag | Select tags to exclude from Text To Speak conversion in the agent's response |
| Event Name | Name of the event to fire upon Smart Agent completion |
| Event Timeout | Time in seconds before the event times out |
| Event Time | Scheduled time associated with the event |
Write a clear and specific System Prompt to define the agent's role. For example: "You are a helpful insurance assistant. Answer only questions related to claims and policies. Keep responses concise and suitable for voice."
Step 3: Configure Advanced Settings
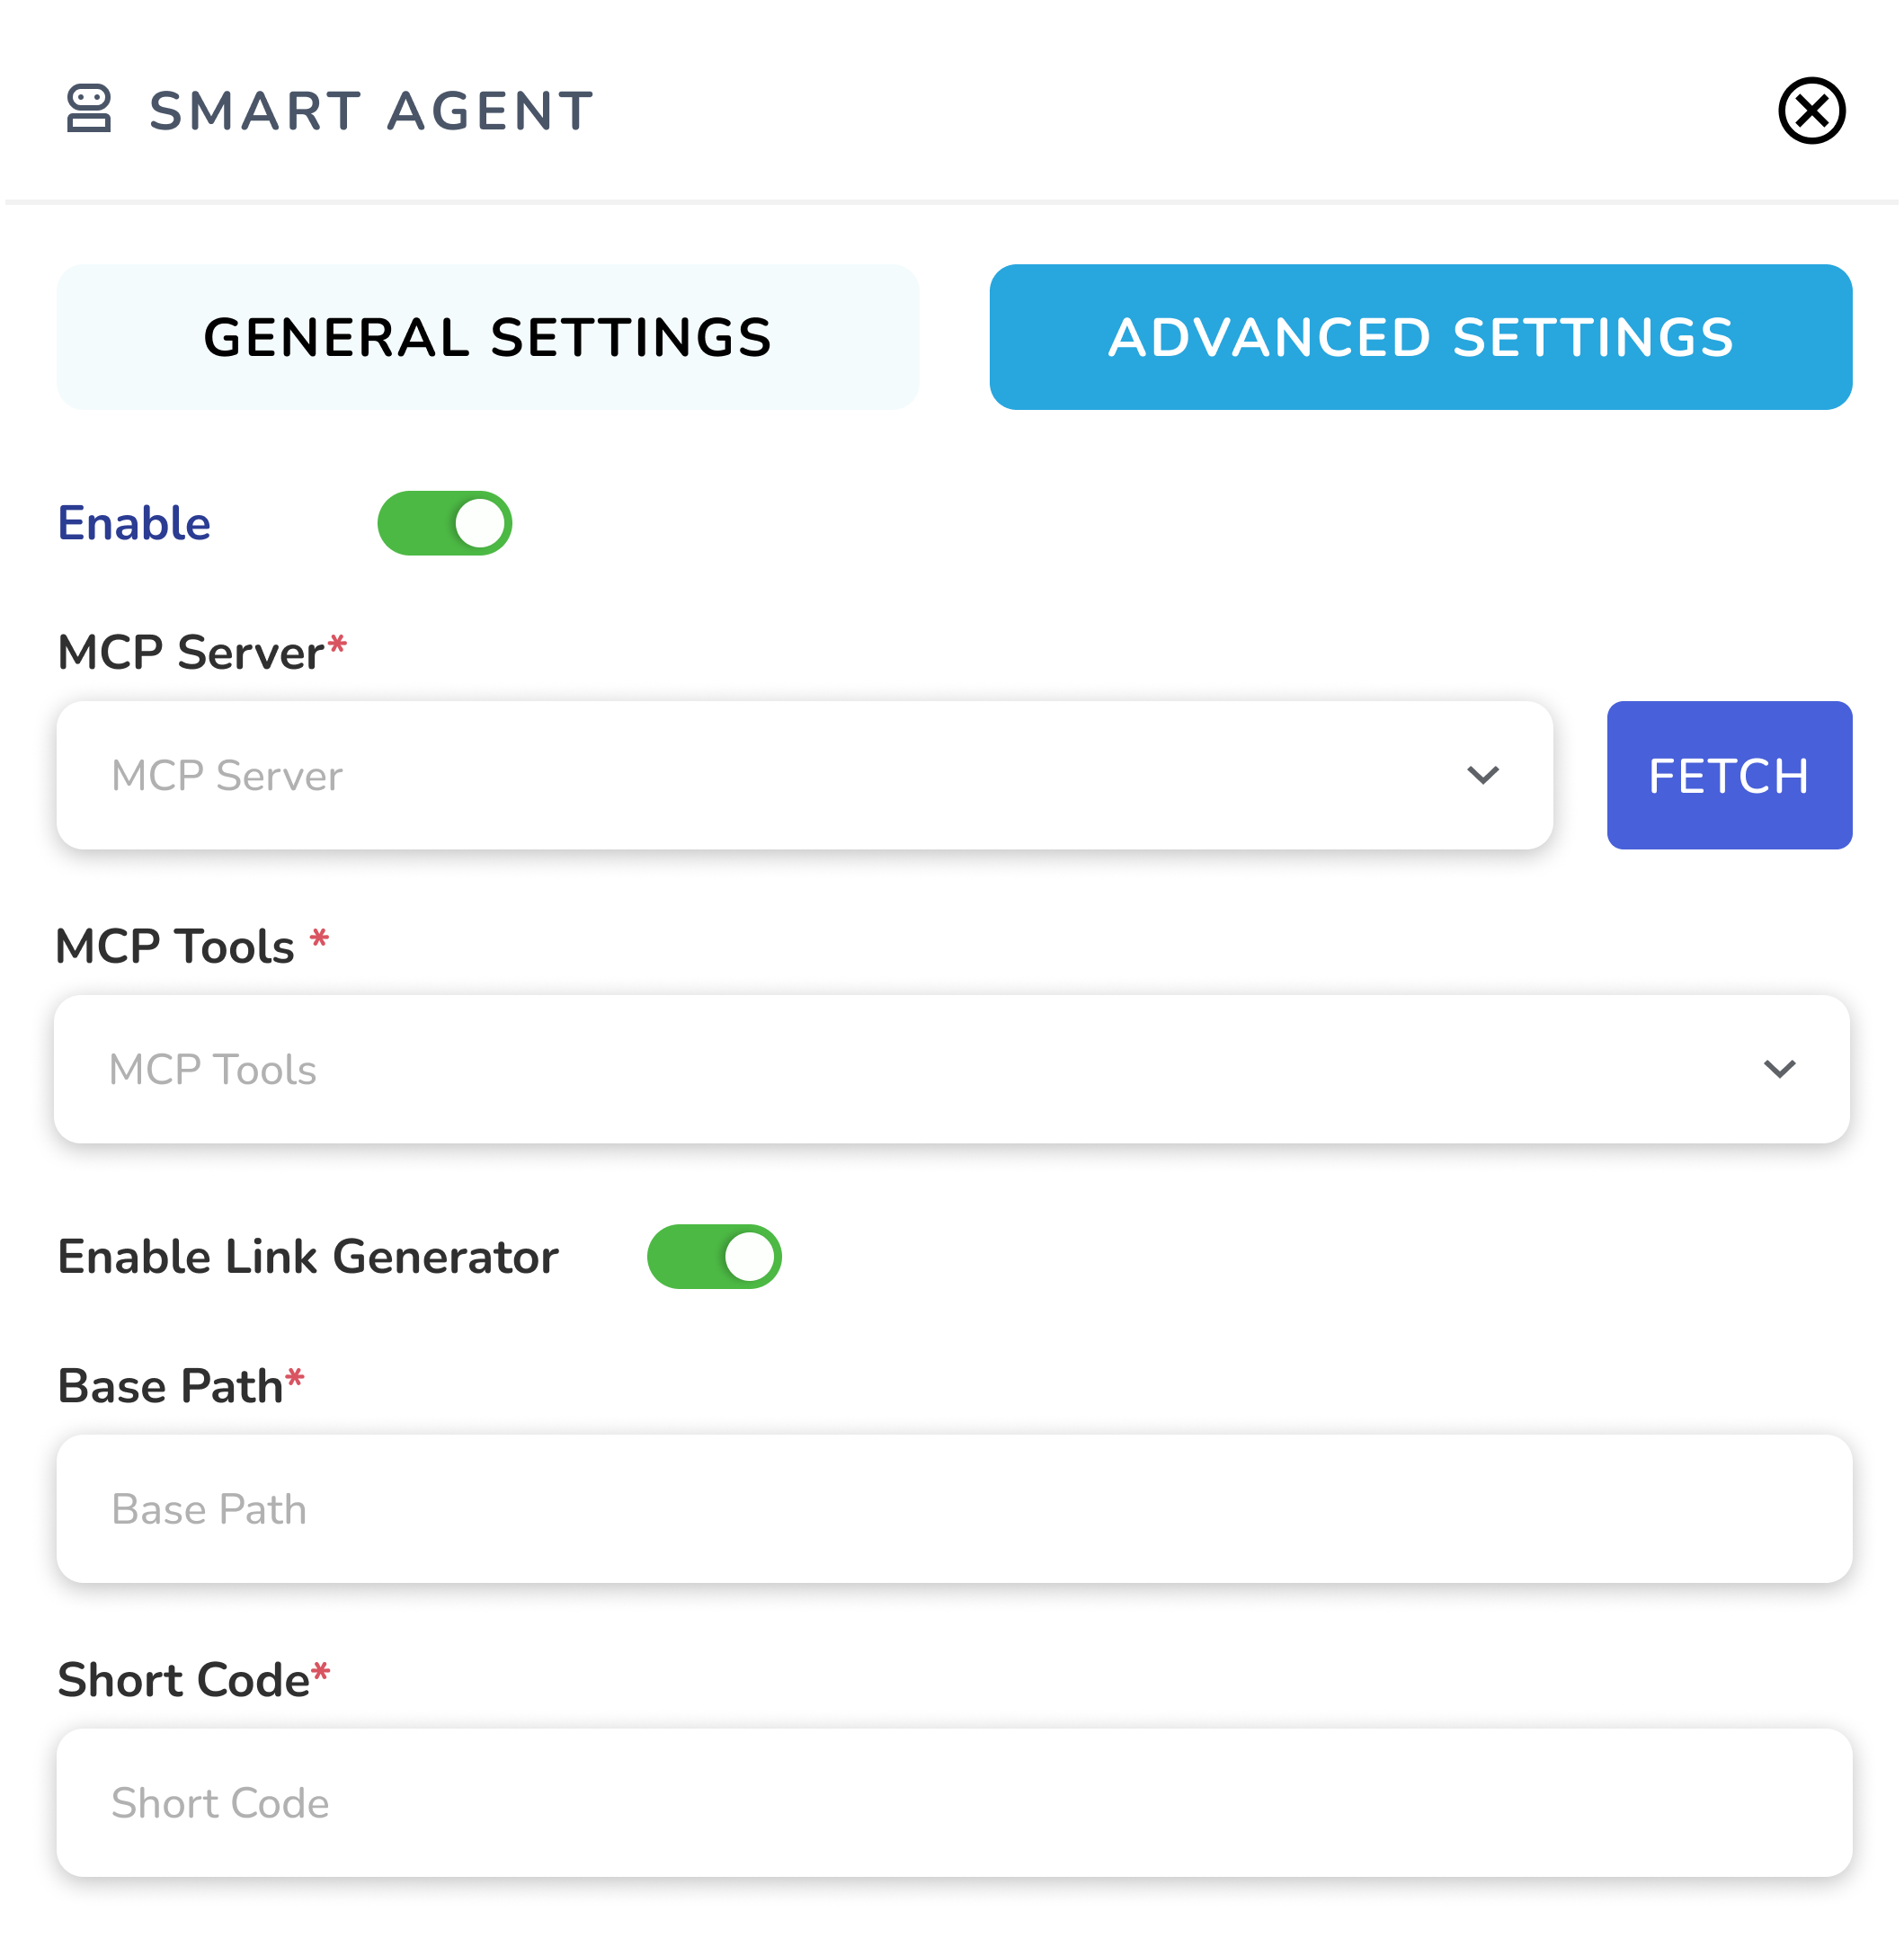
Advanced Settings connect the Smart Agent to external tools and services via MCP, and configure link generation for dynamic responses.
MCP Integration
| Field | Description | Required |
|---|---|---|
| Enable | Toggle to activate the MCP integration for this Smart Agent node | No |
| MCP Server | Select the MCP server the Smart Agent will connect to for tool execution | Yes (if enabled) |
| MCP Tools | Select the specific tools available to the Smart Agent from the MCP server | Yes (if enabled) |
Click FETCH after selecting an MCP Server to load the available tools from that server.
Link Generator
| Field | Description | Required |
|---|---|---|
| Enable Link Generator | Toggle to allow the Smart Agent to generate dynamic links in responses | No |
| Base Path | Define the base URL path used when generating links | Yes (if enabled) |
| Short Code | Define the short code appended to the base path for generated links | Yes (if enabled) |
MCP integration allows the Smart Agent to call external tools and APIs in real time during the conversation — such as looking up a policy, retrieving claim status, or fetching account details dynamically.
Step 4: Connect and Save
Once both General and Advanced Settings are configured:
- Close the configuration panel
- Ensure the Smart Agent node is connected to the correct next nodes on the canvas:
- Success path → CONDITION or CONVERT node to continue the flow
- WRONG INPUT path → CONVERT: Text To Speak to re-prompt the caller
- Click SAVE in the top bar to save your changes
- Run a TEST CALL to validate the Smart Agent's responses before going live
Best Practices
- Keep the System Prompt focused and role-specific — avoid broad or open-ended instructions
- Set a low Temperature (0.05–0.2) for voice flows to ensure consistent, accurate responses
- Always handle the WRONG INPUT path to avoid dead ends in the call flow
- Use Store Agent Response In to pass the AI response to downstream nodes such as CONDITION or TRANSFER
- Test the Smart Agent with a variety of caller inputs including edge cases and unclear phrases
- Use Guard to prevent the agent from responding to out-of-scope or inappropriate requests
Related Articles
- Flow Overview
- How to Create a Voice Flow
- Managing Channels
- Understanding Smart Agents