Projects & Knowledge Base
Transform how your team organizes, searches, and leverages documents with AI-powered knowledge management.
Your Document Workspace
Projects and Knowledge Base form the foundation of how StreamSpace Hub handles your organization's information. Every document, every folder, every piece of knowledge your AI agents use—it all lives here, organized and ready when you need it.
Think of Projects as workspaces where your team collaborates, and Knowledge Base as the intelligent filing system within each workspace. Together, they turn document chaos into structured, searchable, AI-ready information.
Understanding Projects
What Projects Are
Projects are dedicated workspaces where teams organize documents, run AI workflows, and collaborate on specific initiatives. Each project contains its own Knowledge Base, settings, and access controls.
Real-World Examples:
A legal department might have projects for:
- "Active Litigation Cases"
- "Contract Templates & Standards"
- "Regulatory Compliance Documents"
An insurance team might organize by:
- "Claims Processing - Auto"
- "Claims Processing - Property"
- "Underwriting Guidelines"
A customer support team could structure around:
- "Product Documentation"
- "Customer FAQs & Scripts"
- "Training Materials"
Why Projects Matter
Without projects, all your documents would exist in one massive repository—impossible to navigate, difficult to secure, and useless for AI agents that need context.
Projects provide:
- Focused Context - AI agents search only relevant documents.
- Team Collaboration - Right people access right information.
- Organized Workflows - Each initiative has its own space.
- Security Boundaries - Sensitive data stays appropriately restricted.
Your Projects View
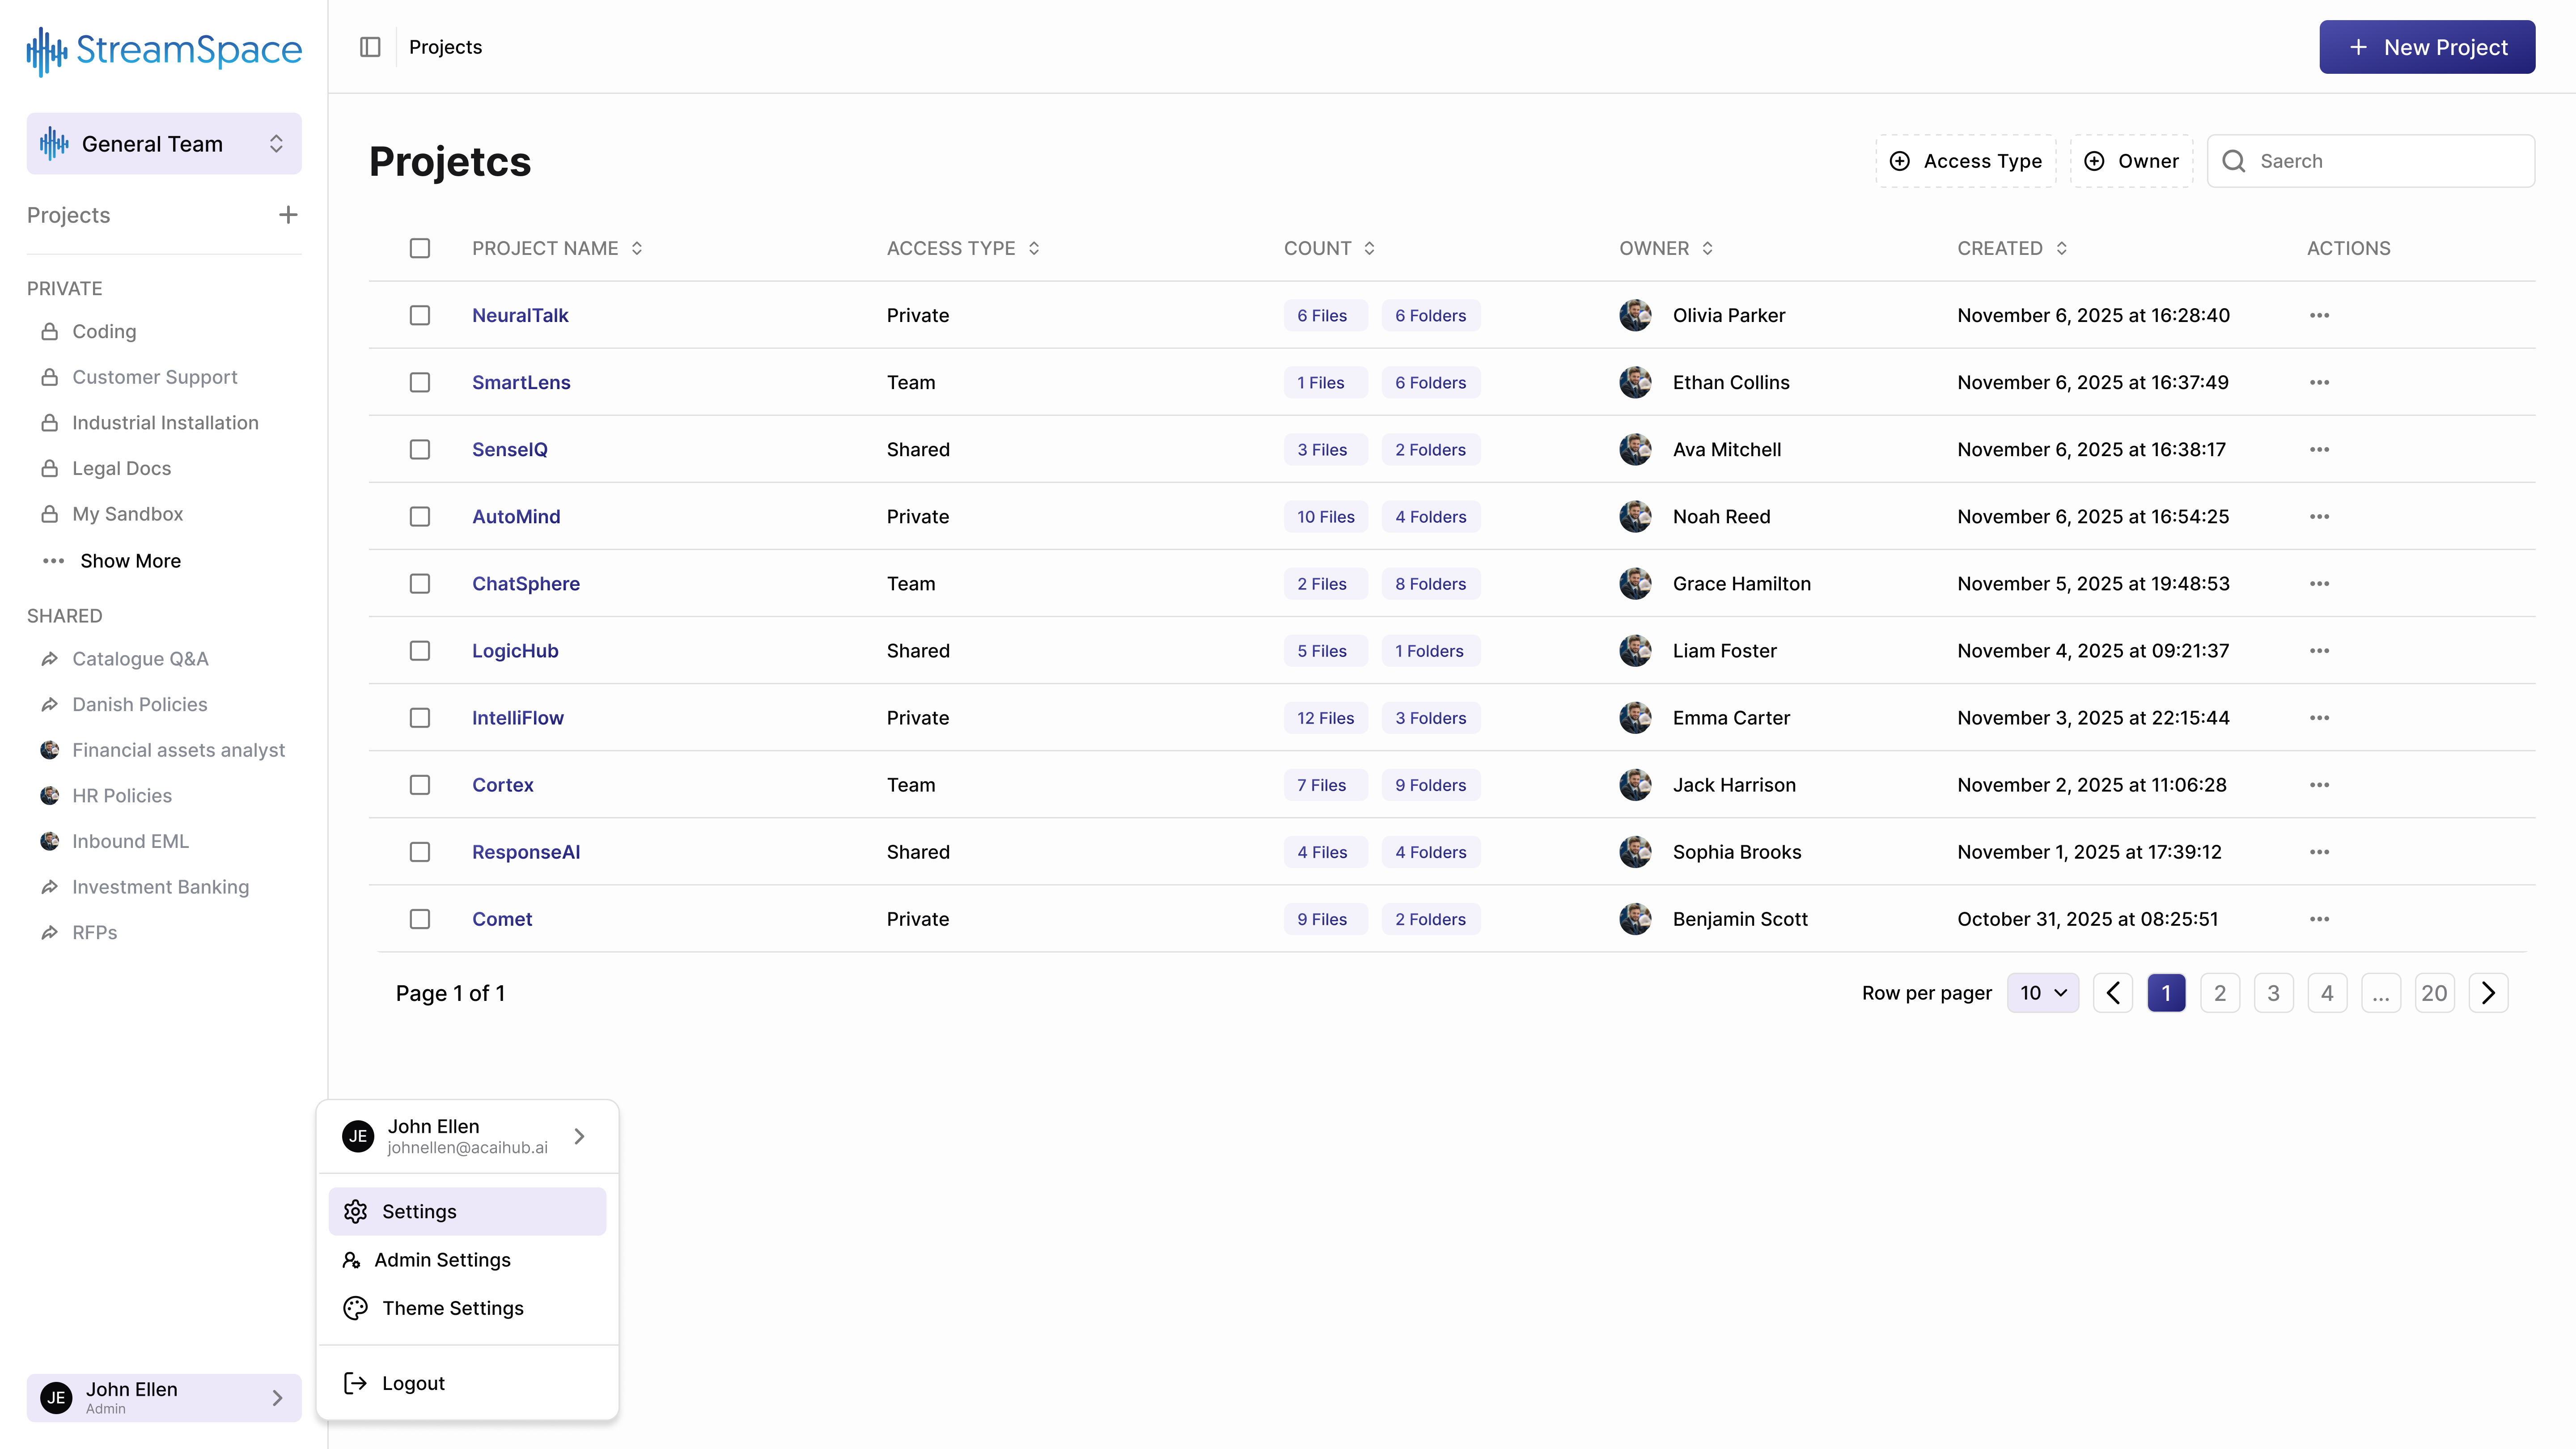
When you navigate to Projects, you see all workspaces you can access. Let's understand what you're looking at.
The Projects Table
Project Name: Click any name to open that workspace. Names should immediately communicate purpose—"Q1 2025 Financial Analysis" beats "Project 47."
Access Type:
- Private - Only you can access (personal workspaces).
- Team - Your designated team members can access.
- Shared - Multiple users or teams have access.
Count: Shows how much content exists—"6 Files, 8 Folders" tells you there's substantial work already done.
Owner: The person who created this project. They typically maintain it and grant access.
Created: When this workspace came into existence. Older projects might need review and cleanup.
Sidebar Organization
Your projects are split into two categories:
PRIVATE: Your personal workspaces. Use these for individual work, draft documents, or projects not ready for team collaboration.
SHARED: Projects where you collaborate with others. These represent team initiatives, department resources, or cross-functional work.
Click "Show More" if you have additional projects beyond the initial view.
Finding the Right Project
Filter by Owner
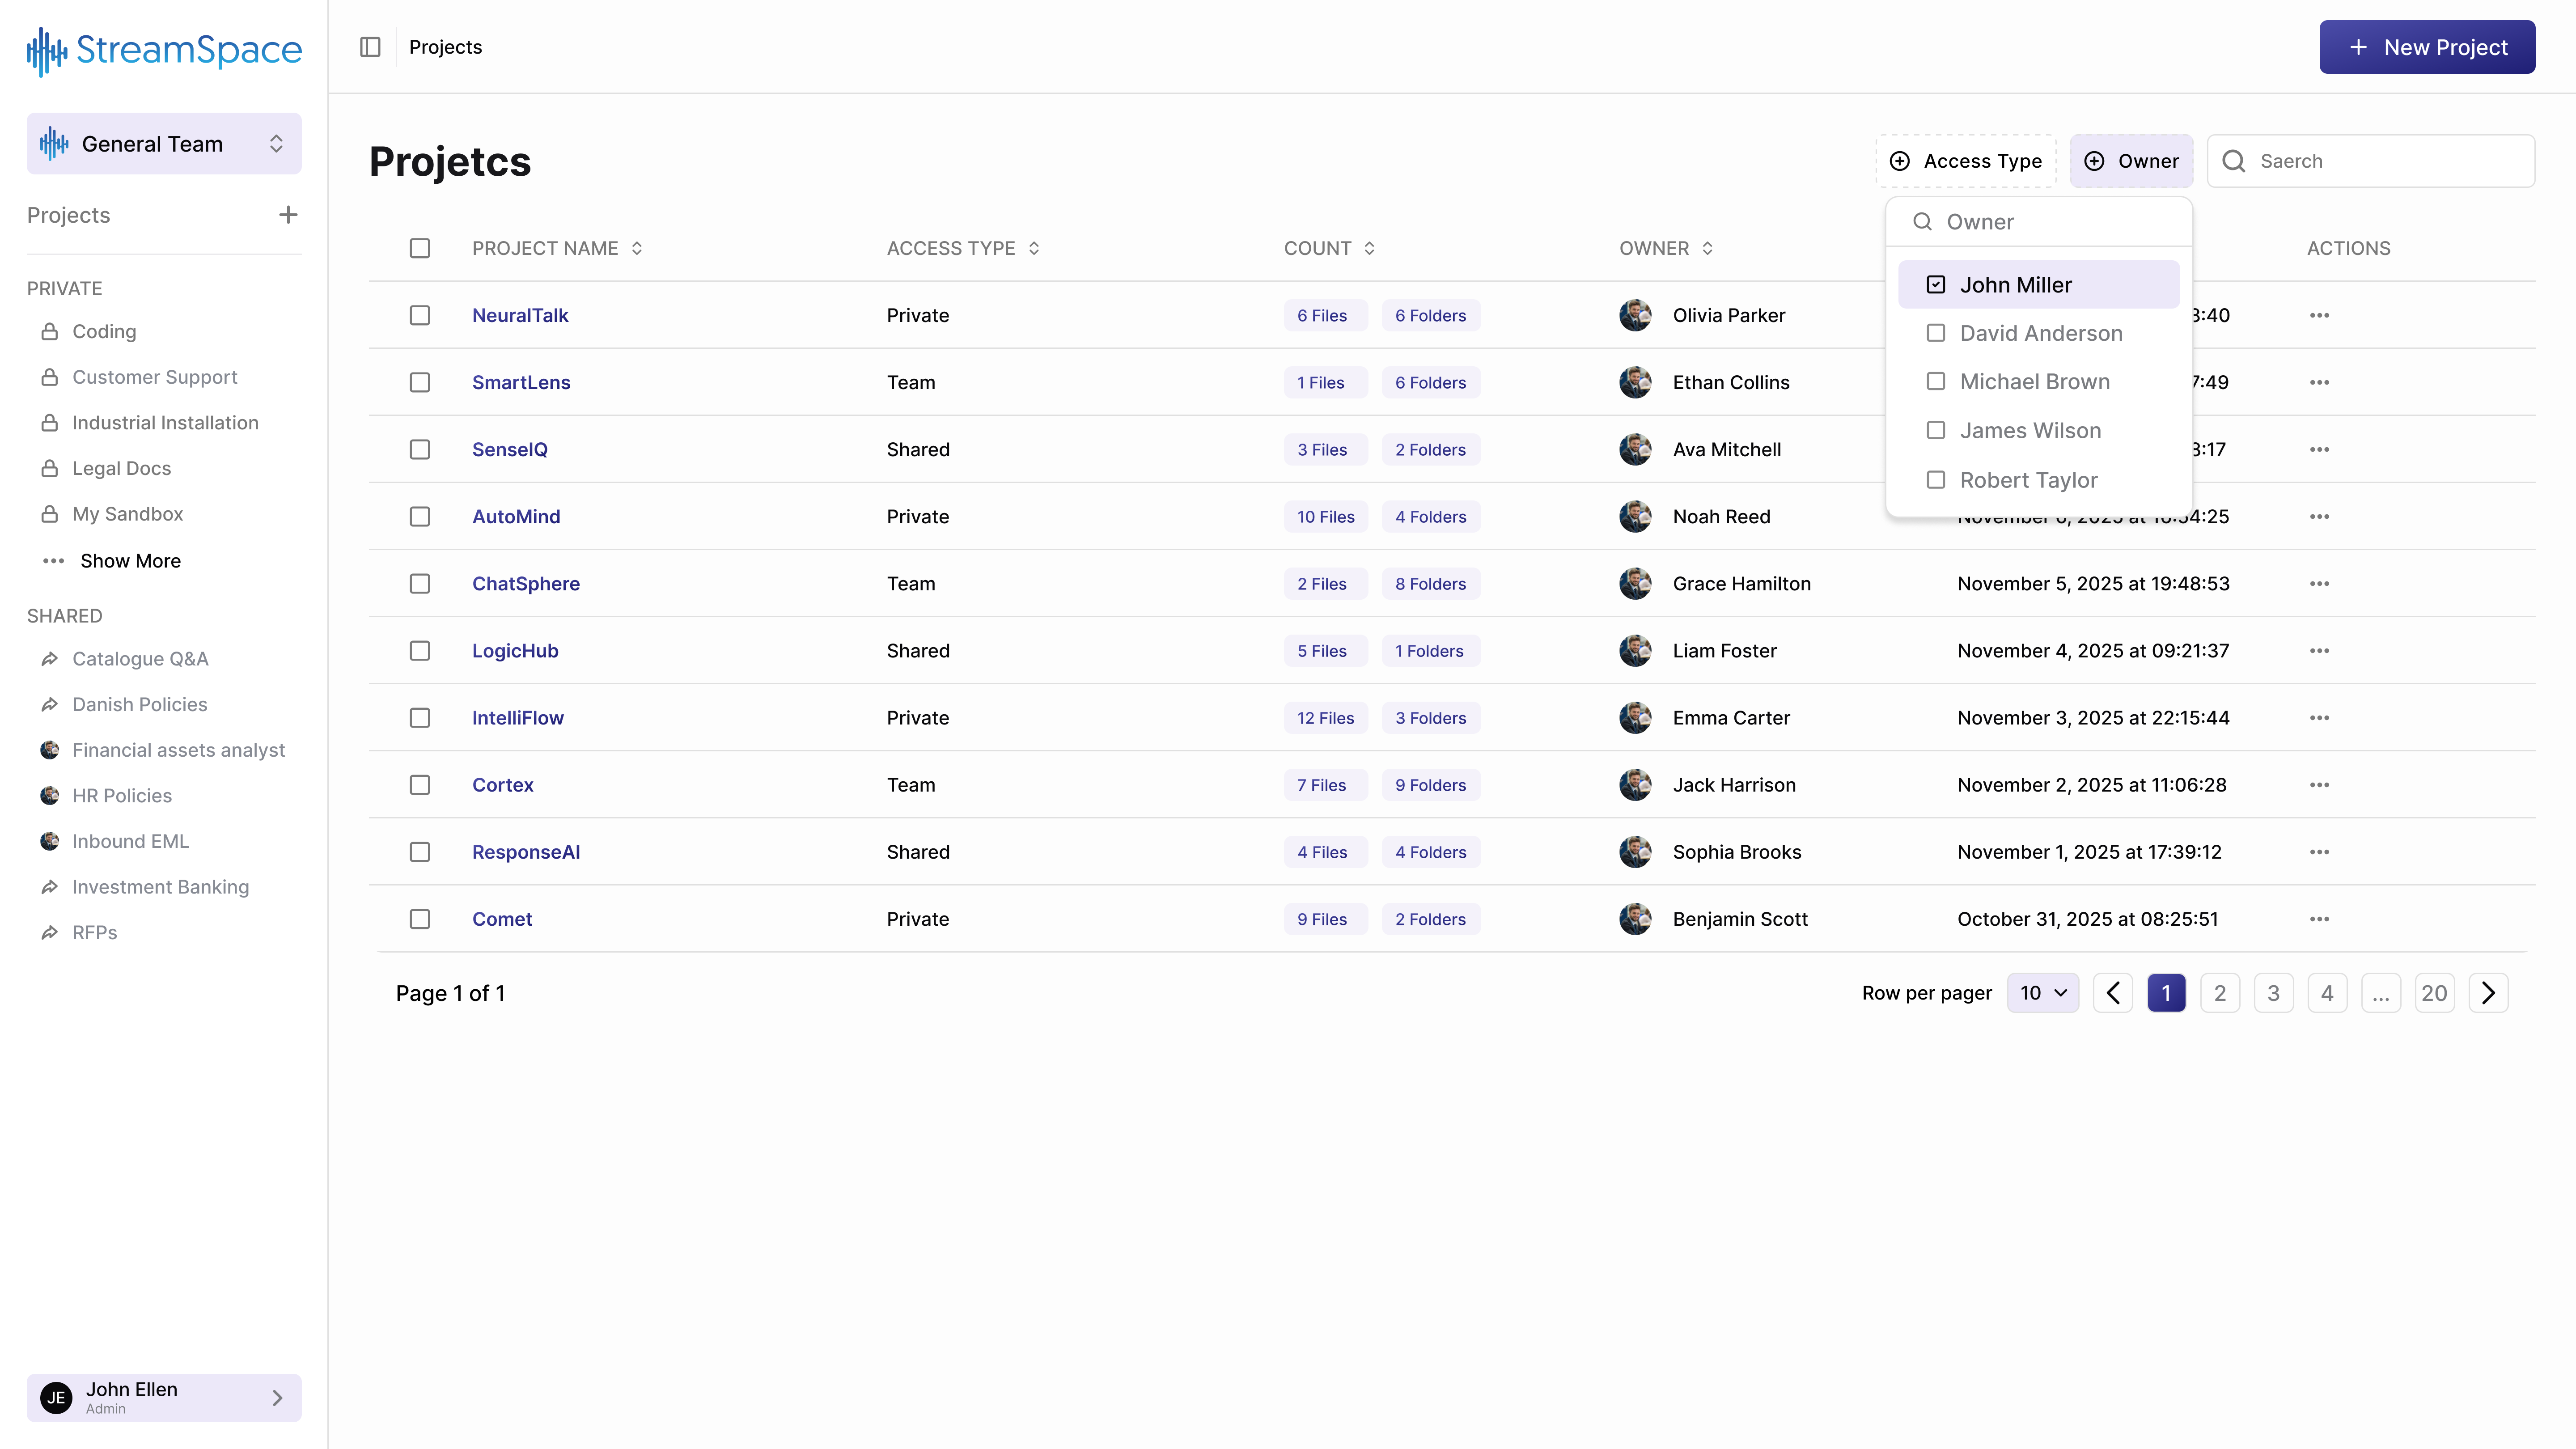
When you need to find all projects created by a specific person:
- Click the Owner filter button.
- Select one or more names from the dropdown.
- The table updates instantly.
When This Helps:
- Reviewing a colleague's work before they leave on vacation.
- Auditing project distribution across team members.
- Finding all projects you own for maintenance.
Filter by Access Type
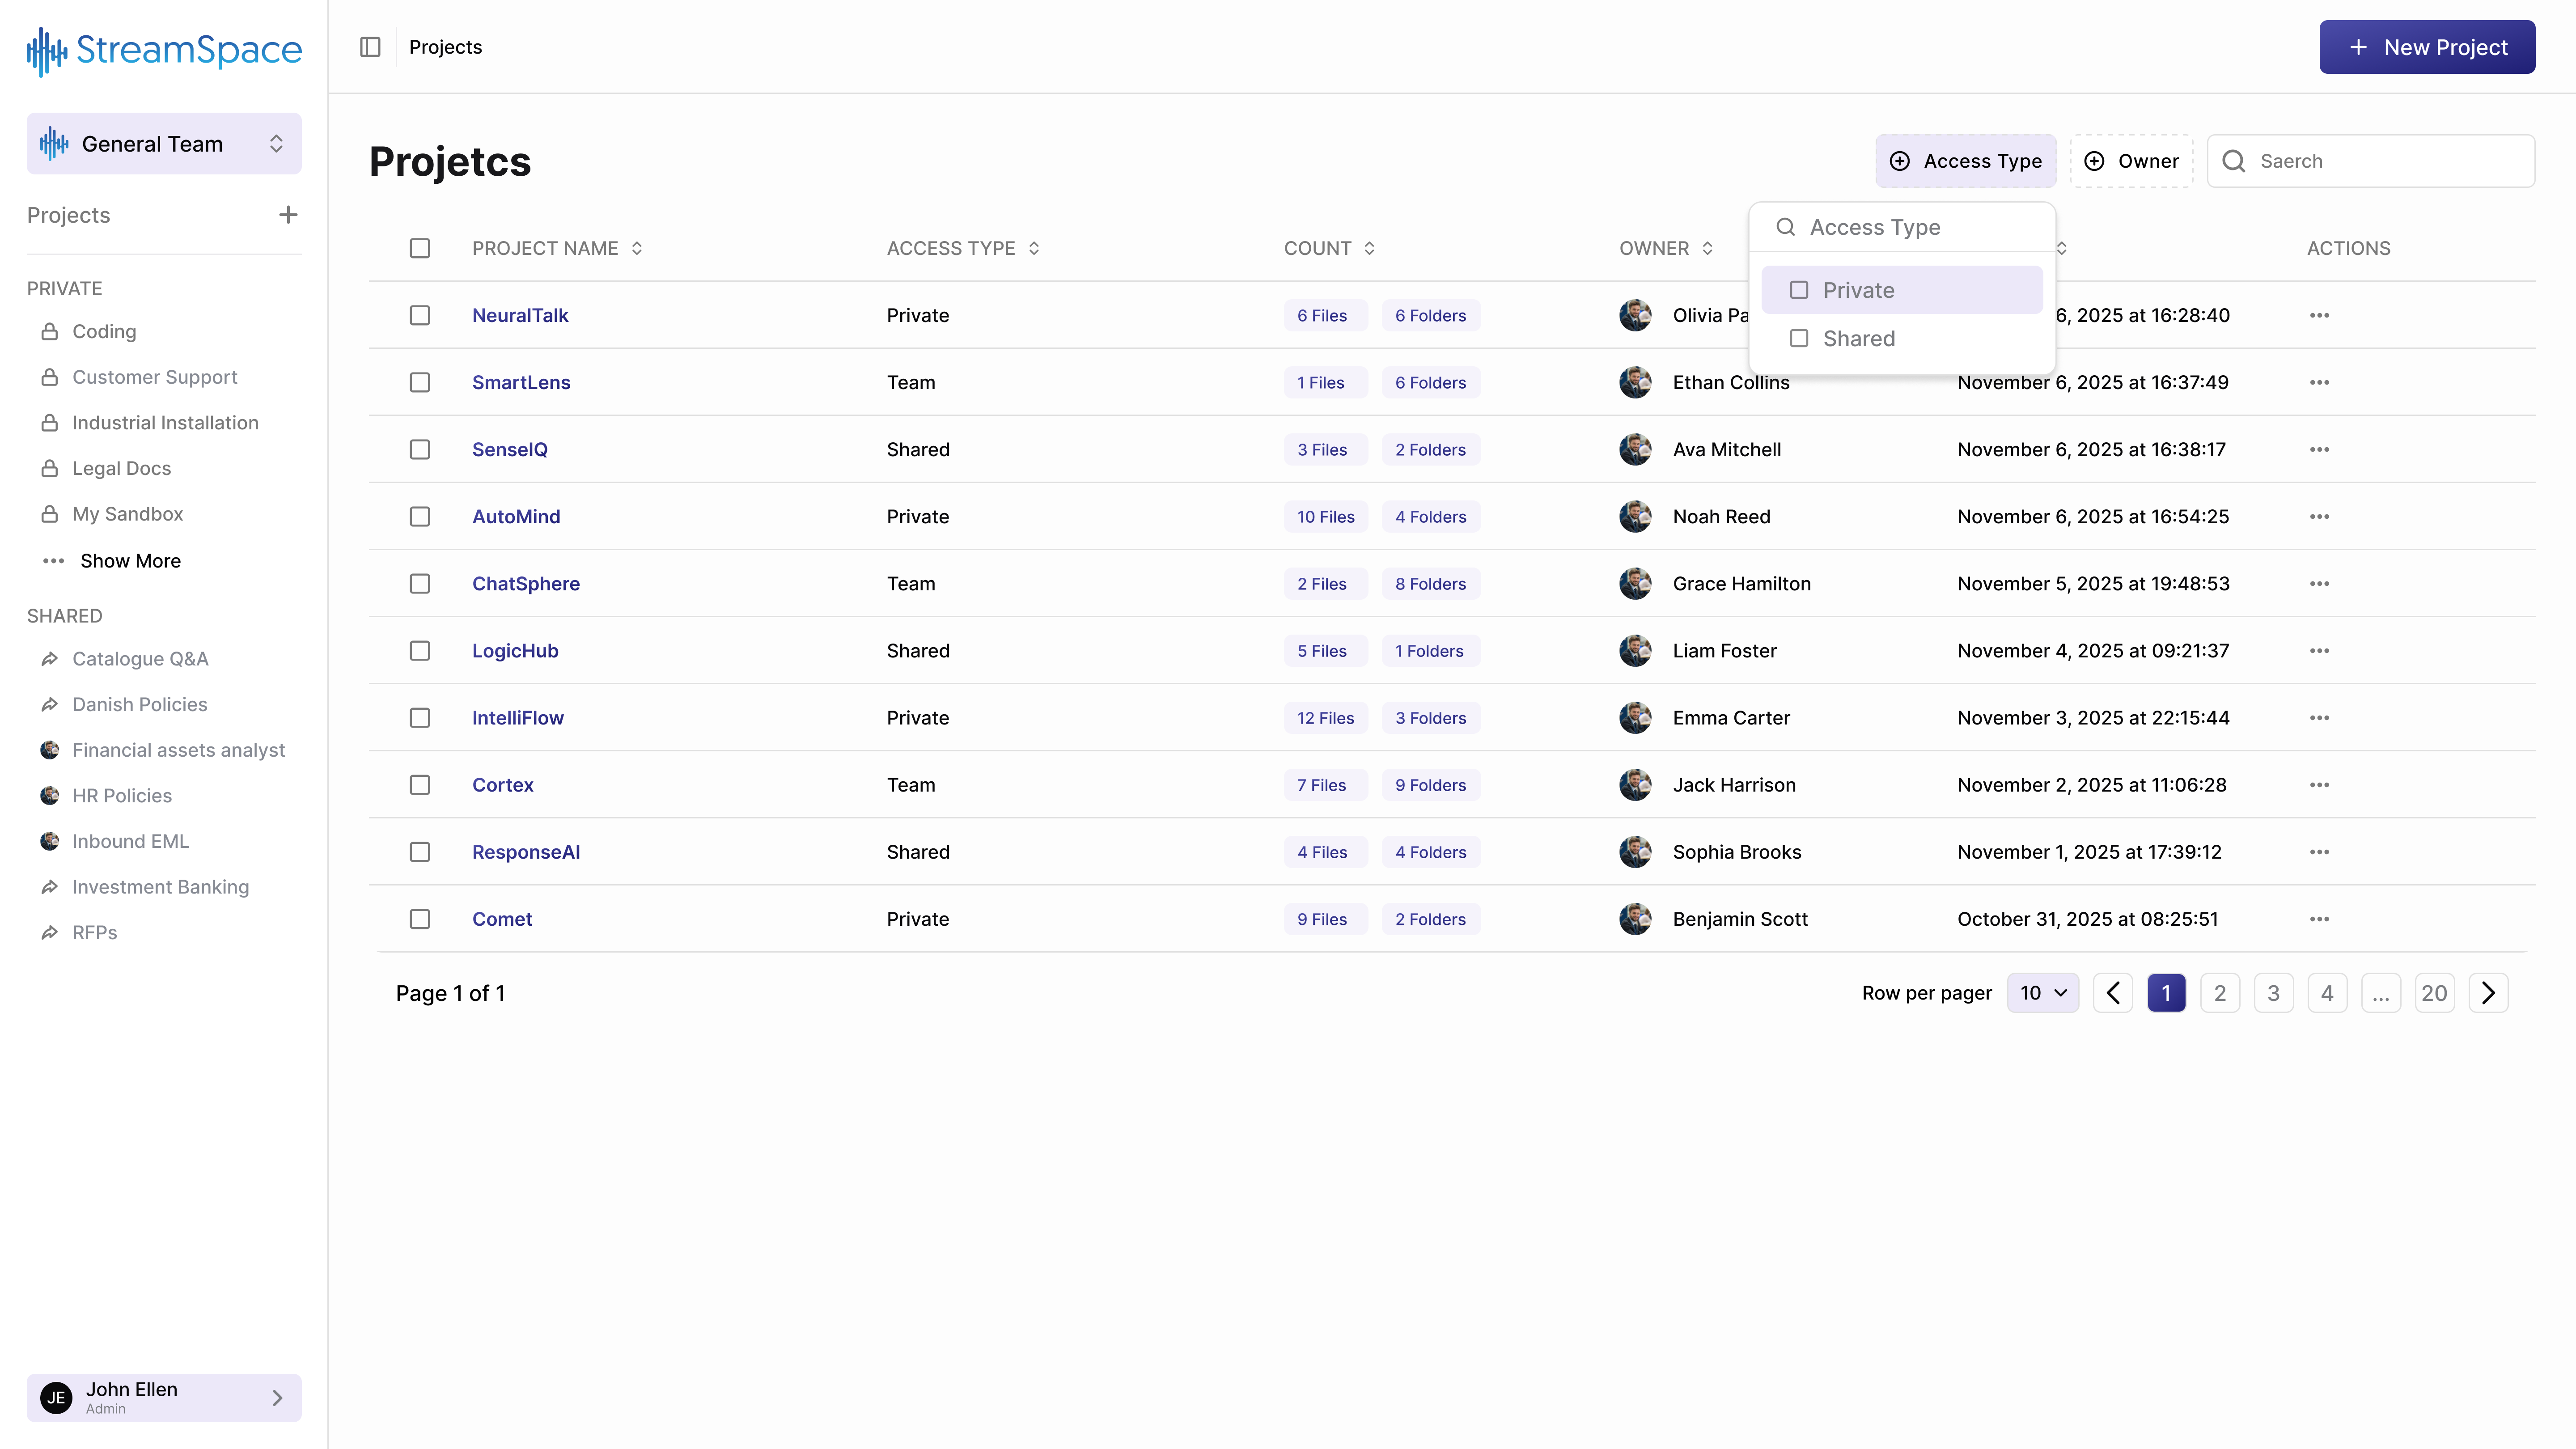
To see only personal or only collaborative projects:
- Click Access Type in the toolbar.
- Check Private, Shared, or both.
- Results filter immediately.
When This Helps:
- Quickly accessing your personal workspace.
- Reviewing all team collaboration areas.
- Separating private from shared work.
Search by Name
The search box finds projects by name instantly. Type "Claims" and see only claims-related projects, regardless of owner or access type.
Creating Your First Project
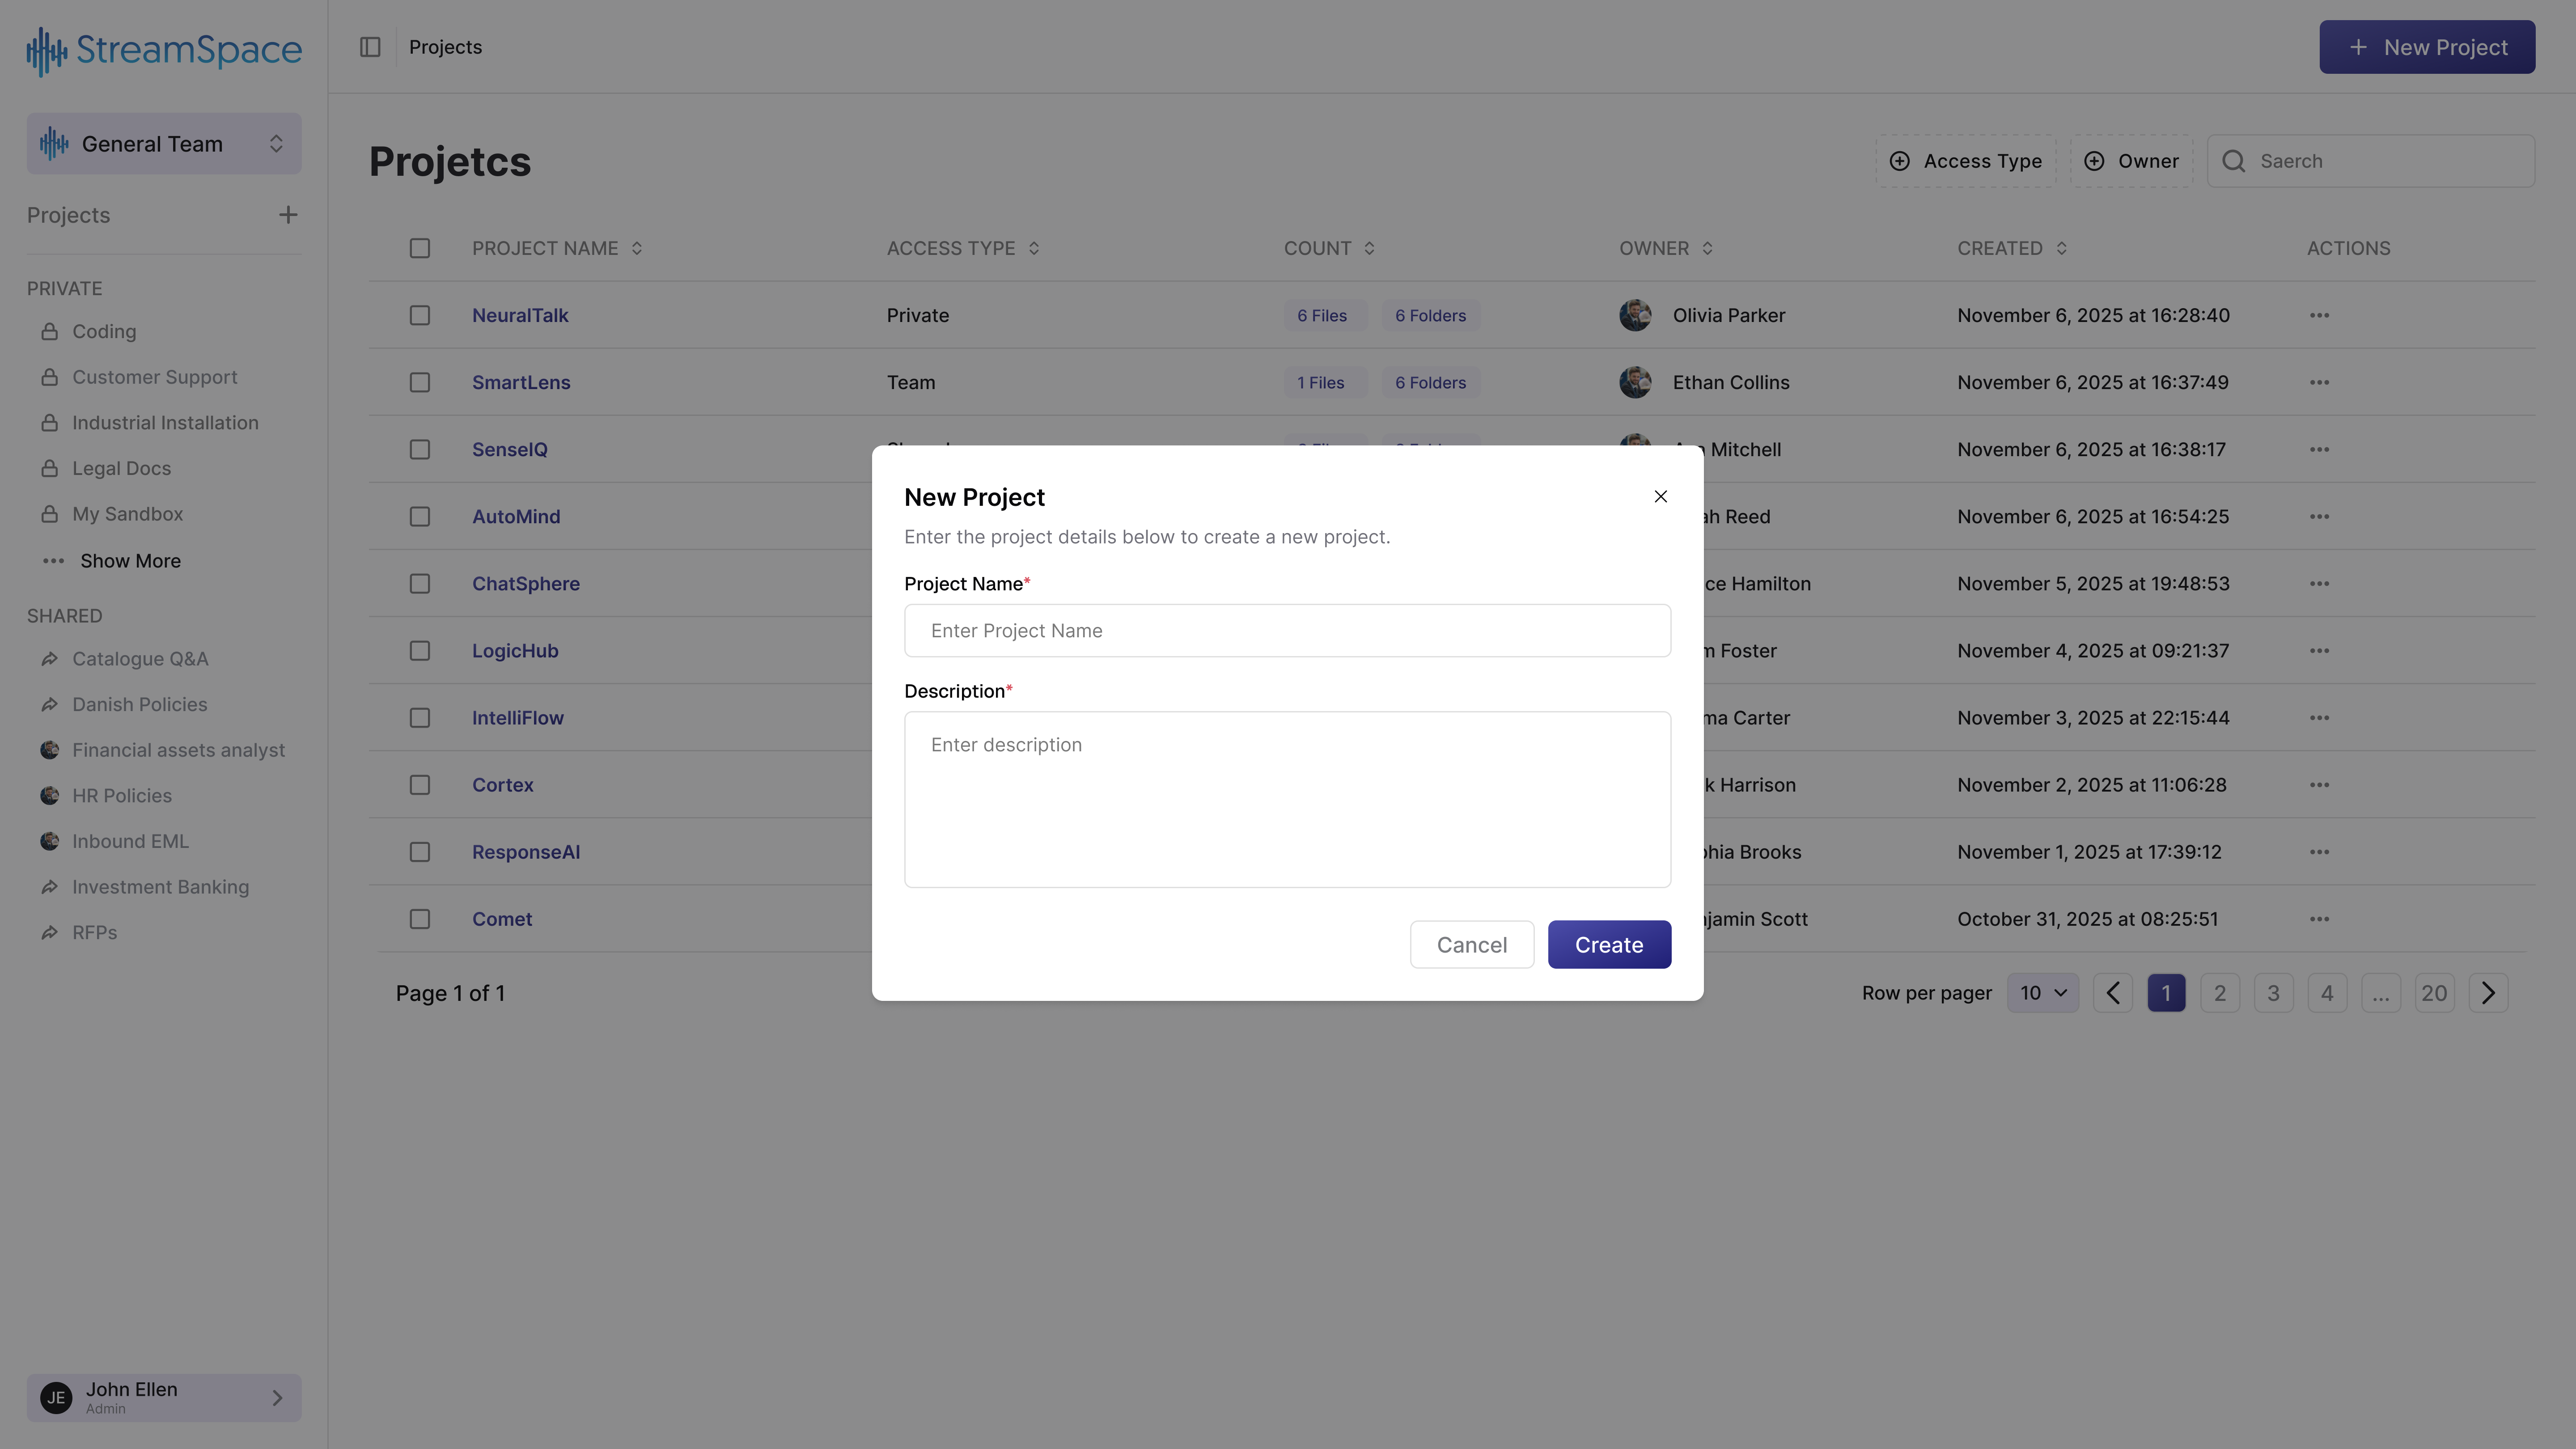
Now let's create a workspace for your team's work.
When to Create a Project
Create a new project when:
- You're starting a new initiative that needs document organization.
- A team needs a dedicated collaboration space.
- You want to isolate specific documents for AI workflows.
- Different access controls are required for certain information.
The Creation Process
Step 1: Click "New Project"
Find the button in the top-right corner. This opens the creation dialog.
Step 2: Name Your Project
Choose a name that immediately communicates purpose:
Good Examples:
- "Customer Support Documentation - 2025"
- "Legal Contracts Repository"
- "Product Launch - New Banking App"
- "Training Materials - Sales Team"
Avoid: Generic names like "Project 1" or "Misc Files" or vague descriptions.
Step 3: Write the Description
Explain what this project contains, who should use it, and what it's for.
Example Description: "Central repository for all customer support documentation, training materials, and resources. Used by the support team to access scripts, FAQs, and troubleshooting guides. Updated quarterly by the Support Operations team."
This description tells you:
- What's inside (support documentation)
- Who uses it (support team)
- What it's for (accessing scripts and guides)
- Who maintains it (Support Operations)
Step 4: Click "Create"
Your new project appears immediately on the dashboard. All assigned team members can now access it.
The Knowledge Base
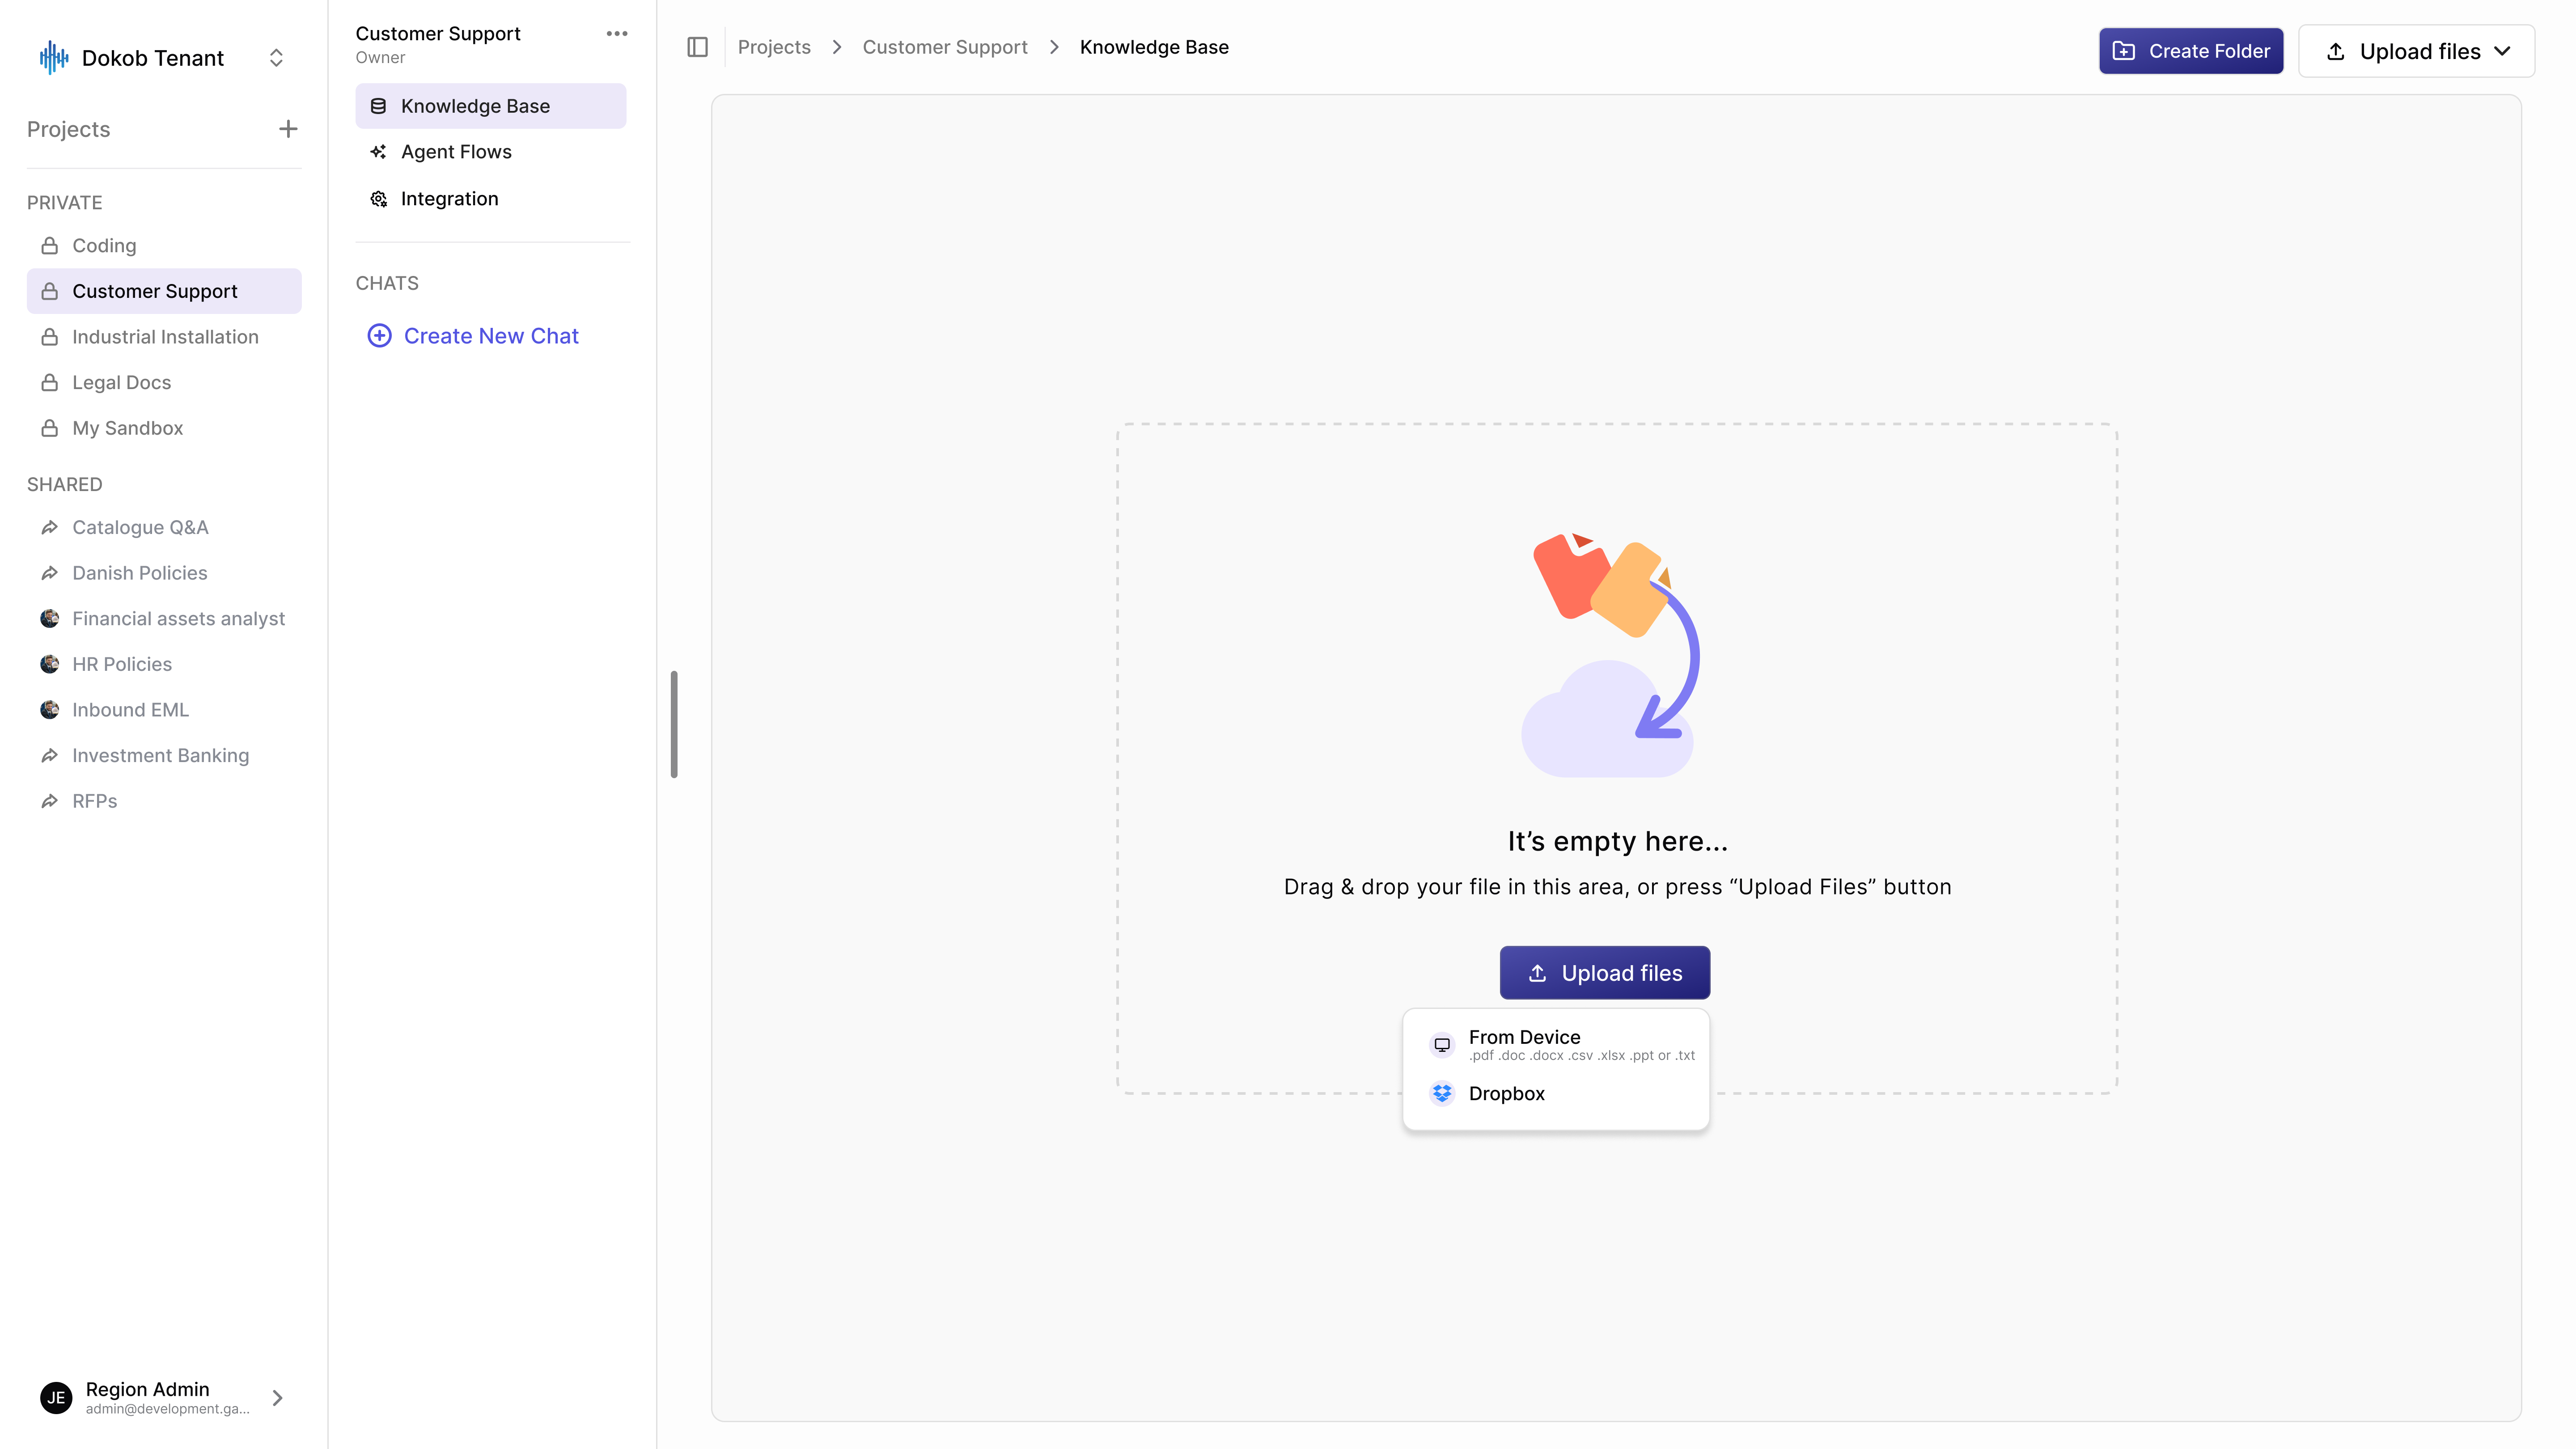
When you first open a project, you'll see an empty Knowledge Base. This is where your documents live.
Understanding Knowledge Base
Knowledge Base is your AI-ready document repository. Unlike a traditional file system, Knowledge Base:
- Indexes Content - AI can search inside documents, not just filenames.
- Extracts Metadata - Automatically identifies key information.
- Generates Keywords - Makes documents discoverable by topic.
- Enables AI Workflows - Modules can analyze and process documents.
Think of it as a smart filing cabinet that not only stores documents but understands what's inside them.
Two Ways to Upload
Option 1: Upload Files Button
Click the button and choose your source:
- From Device - Upload from your computer (PDF, DOC, DOCX, CSV, XLSX, PPT, TXT).
- Dropbox - Import directly from Dropbox cloud storage.
Option 2: Drag and Drop
The fastest method for most users:
- Open your file browser.
- Select one or multiple files.
- Drag them into the dashed border area.
- Release to start upload.
What Happens During Upload
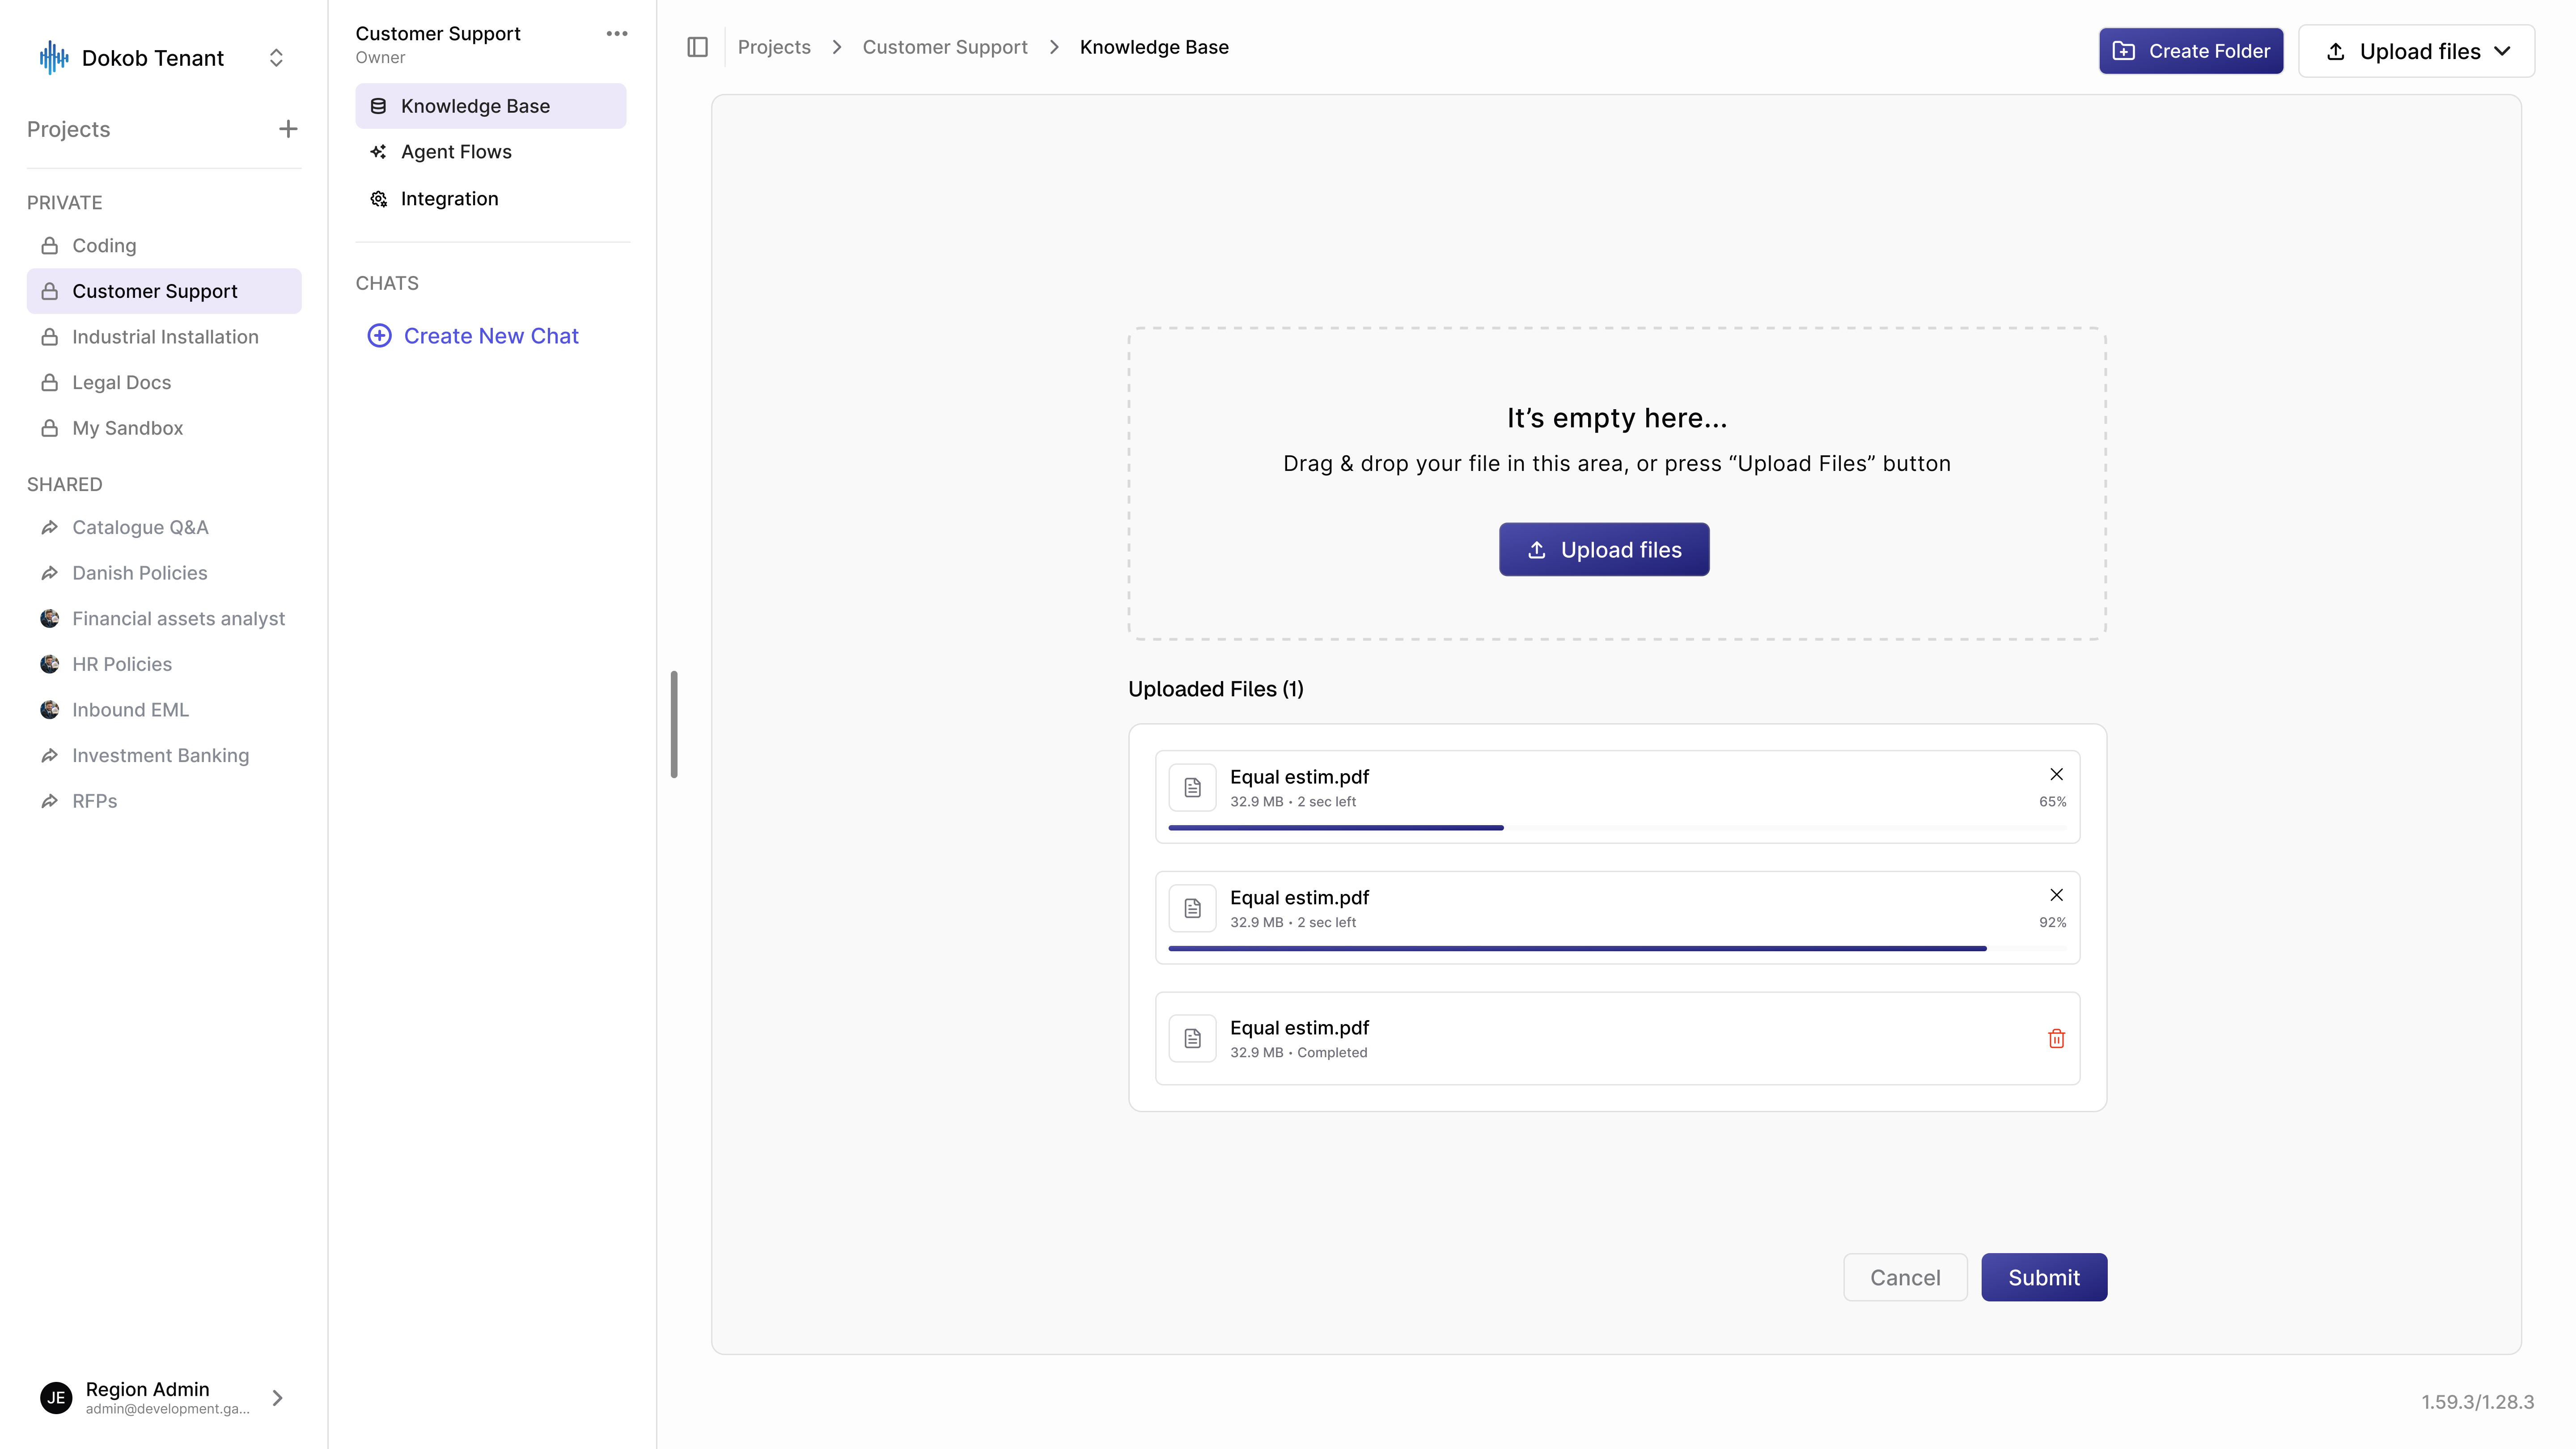
After you select files, StreamSpace Hub processes them through three stages:
Stage 1: Uploading (Blue Progress Bar)
- File transfers from your device to StreamSpace Hub.
- Shows percentage and estimated time remaining.
- You can cancel individual files if needed.
Stage 2: Processing (Purple Progress Bar)
- AI reads the document content.
- OCR extracts text from scanned documents.
- System identifies document type and structure.
- Keywords are automatically generated.
Stage 3: Completed (Green Checkmark)
- Document is fully processed and searchable.
- AI modules can now analyze this content.
- File appears in your Knowledge Base table.
The processing stage is where StreamSpace Hub transforms a static file into AI-ready information. A 50-page contract becomes searchable text with extracted clauses, dates, and parties. A scanned invoice becomes structured data with amounts, vendors, and line items.
Click Submit when all files show "Completed" status.
Managing Your Documents
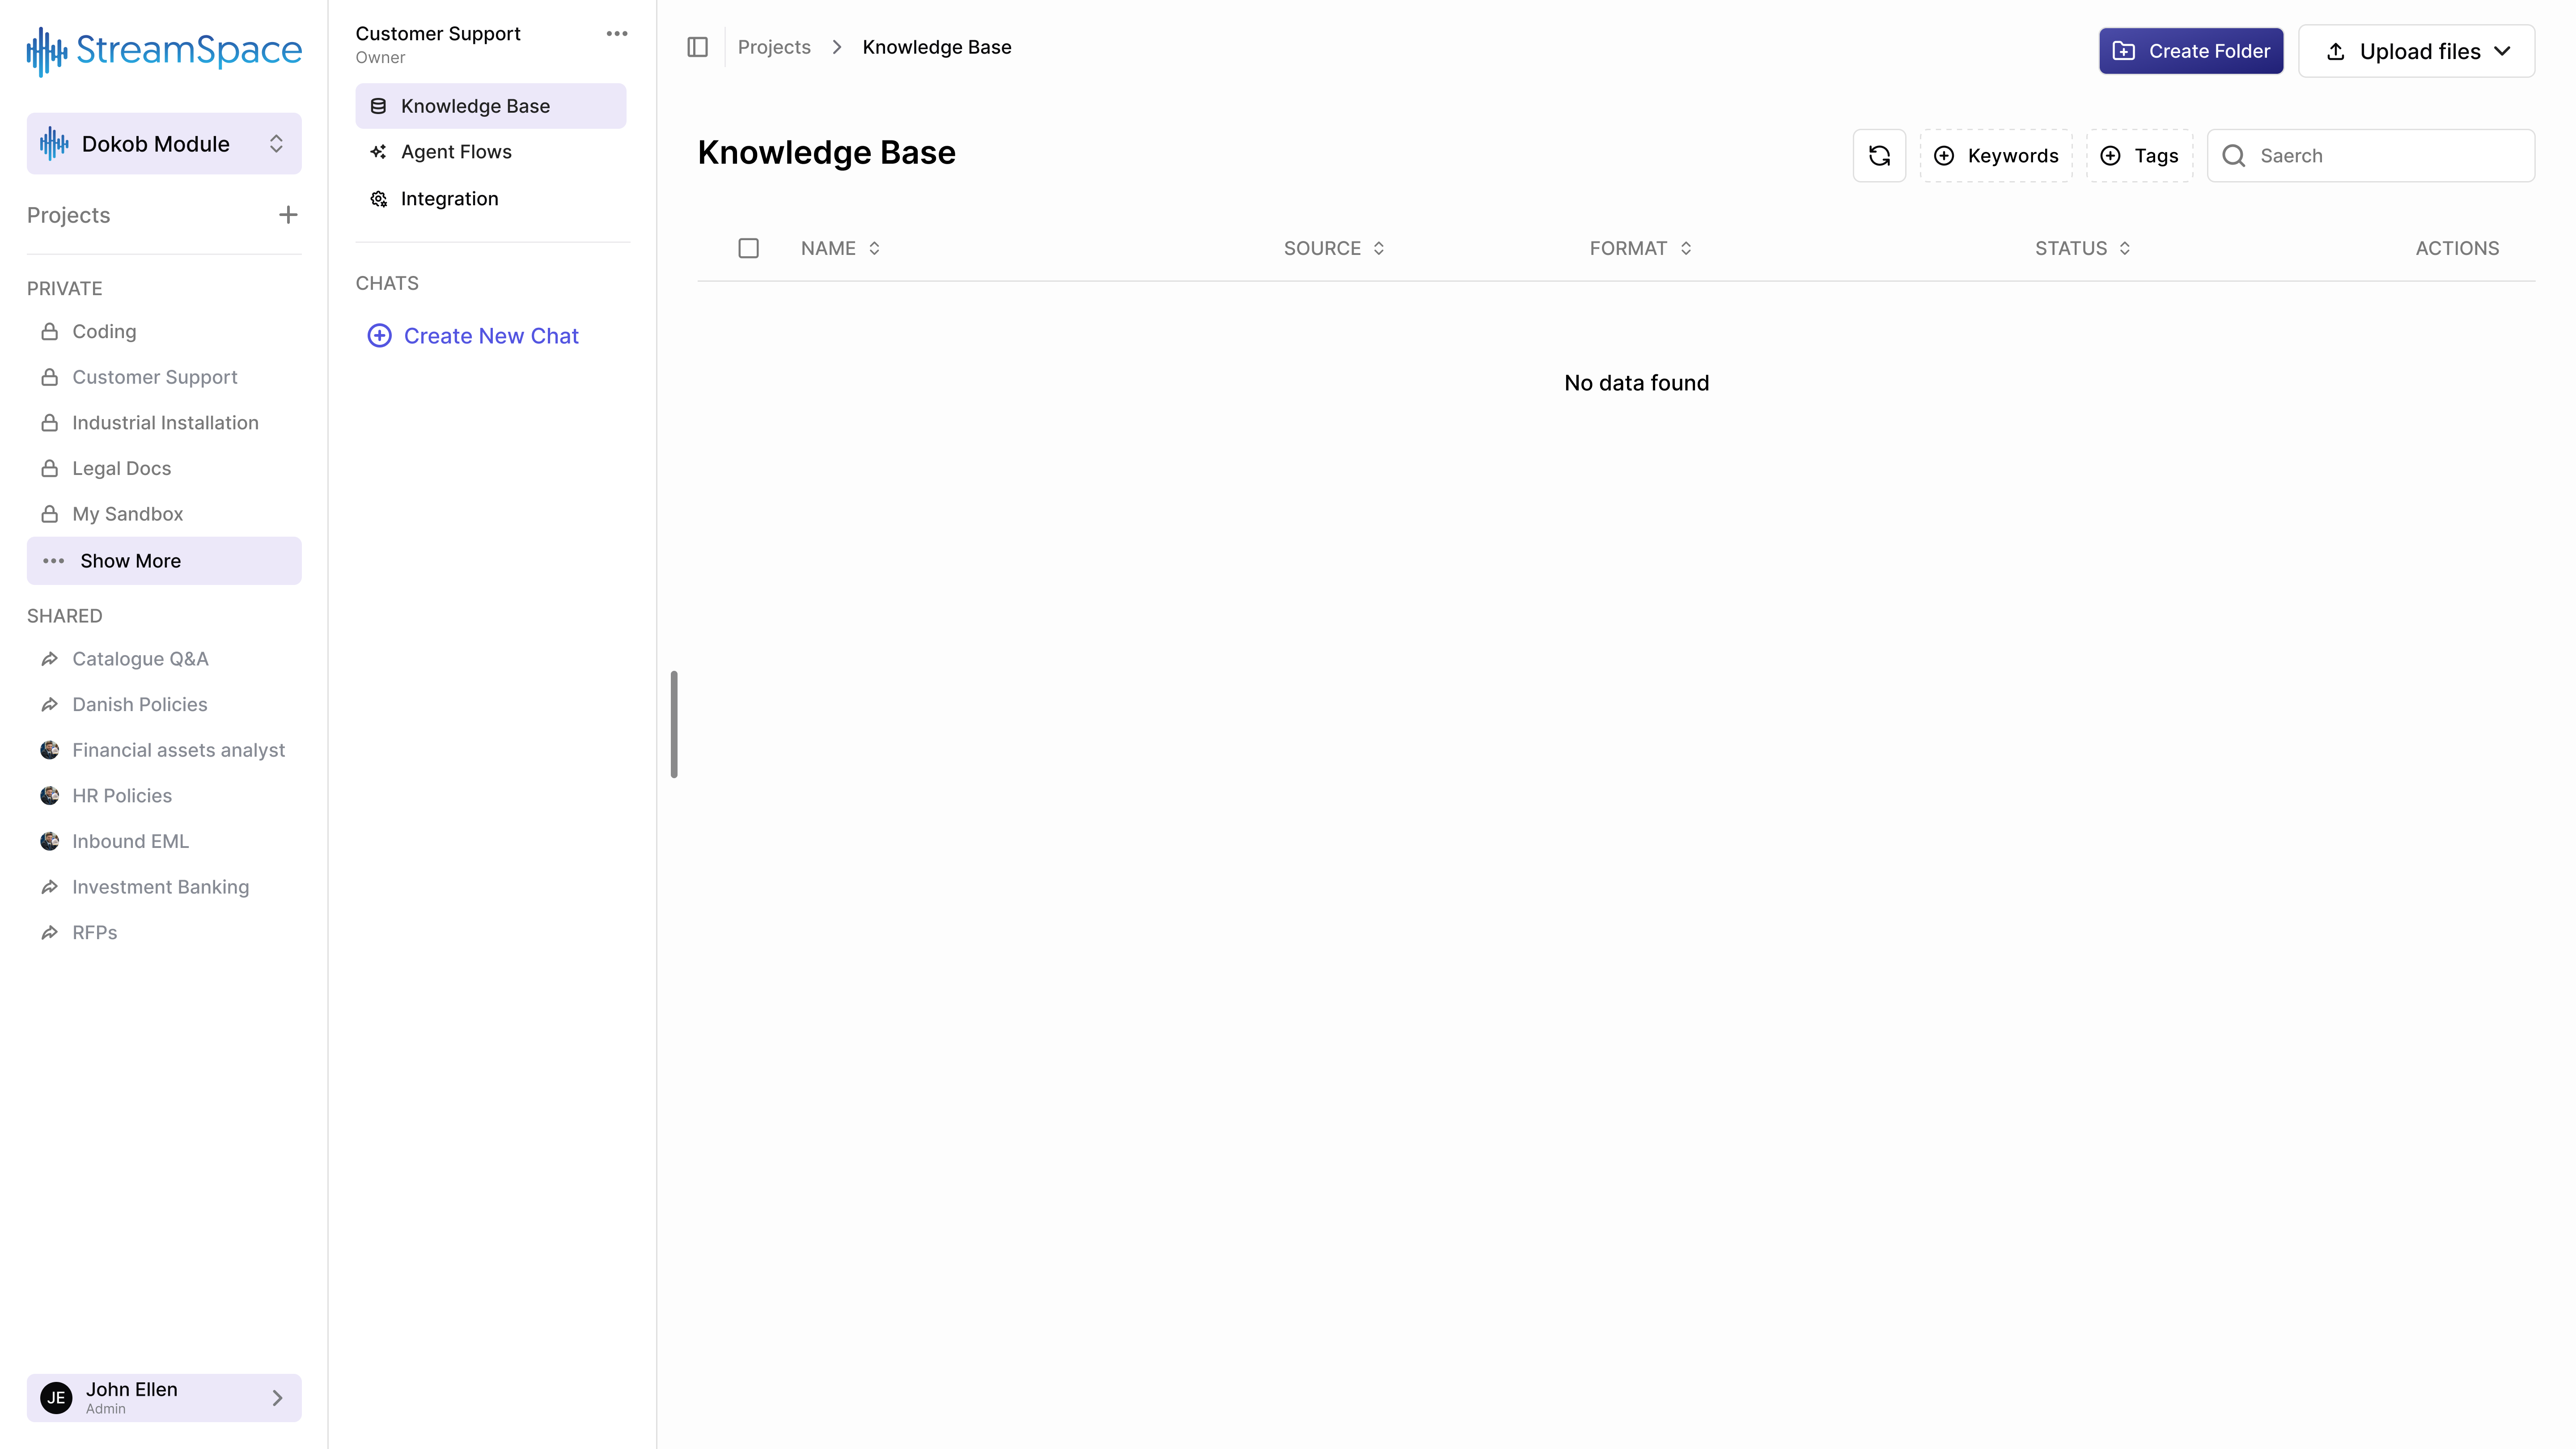
After uploading, your files appear in the Knowledge Base table. Let's understand how to work with them.
The Toolbar
- Refresh Button: Reload the file list to see recently added documents.
- Keywords Button: Filter files by AI-generated keywords extracted from content.
- Tags Button: Filter by custom labels you've assigned to organize documents.
- Search Box: Find files by name instantly.
- Create Folder: Add directories to organize documents into logical groups.
- Upload Files: Add more documents to this Knowledge Base.
The File Table
Name Column:
- Folder icons (📁) indicate directories you can click to navigate.
- File icons show document type (PDF, DOC, etc.).
- Click any name to open that file or folder.
Source Column: Shows who uploaded each file. The avatar and name help you identify document contributors.
Format Column:
- FOLDER - Directory containing other files.
- PDF, DOC, XLSX - Specific file formats.
Status Column: Shows when each file was last updated. "Updated on June 15, 2025" tells you how current the information is.
Actions Column: Click the three-dot menu (⋮) to:
- Edit - Rename or modify properties.
- Move - Relocate to different folder.
- Regenerate - Reprocess with AI (if content changed).
- Delete - Remove permanently.
Pagination
At the bottom:
- "Page 1 of 1" shows your current position.
- "Row per page: 10" lets you adjust visible files.
- Navigation arrows move between pages.
Organizing with Folders
Why Folders Matter
Without folders, all documents exist in a flat list. Finding anything requires scrolling or searching. With folders, you create logical hierarchies that match how your team thinks about information.
Example Folder Structures:
Legal Department:
Knowledge Base/
├── Active Cases/
├── Contract Templates/
├── Regulatory Documents/
└── Archived Matters/
Customer Support:
Knowledge Base/
├── Product Documentation/
├── FAQs/
├── Training Materials/
└── Escalation Guides/
Creating Folders
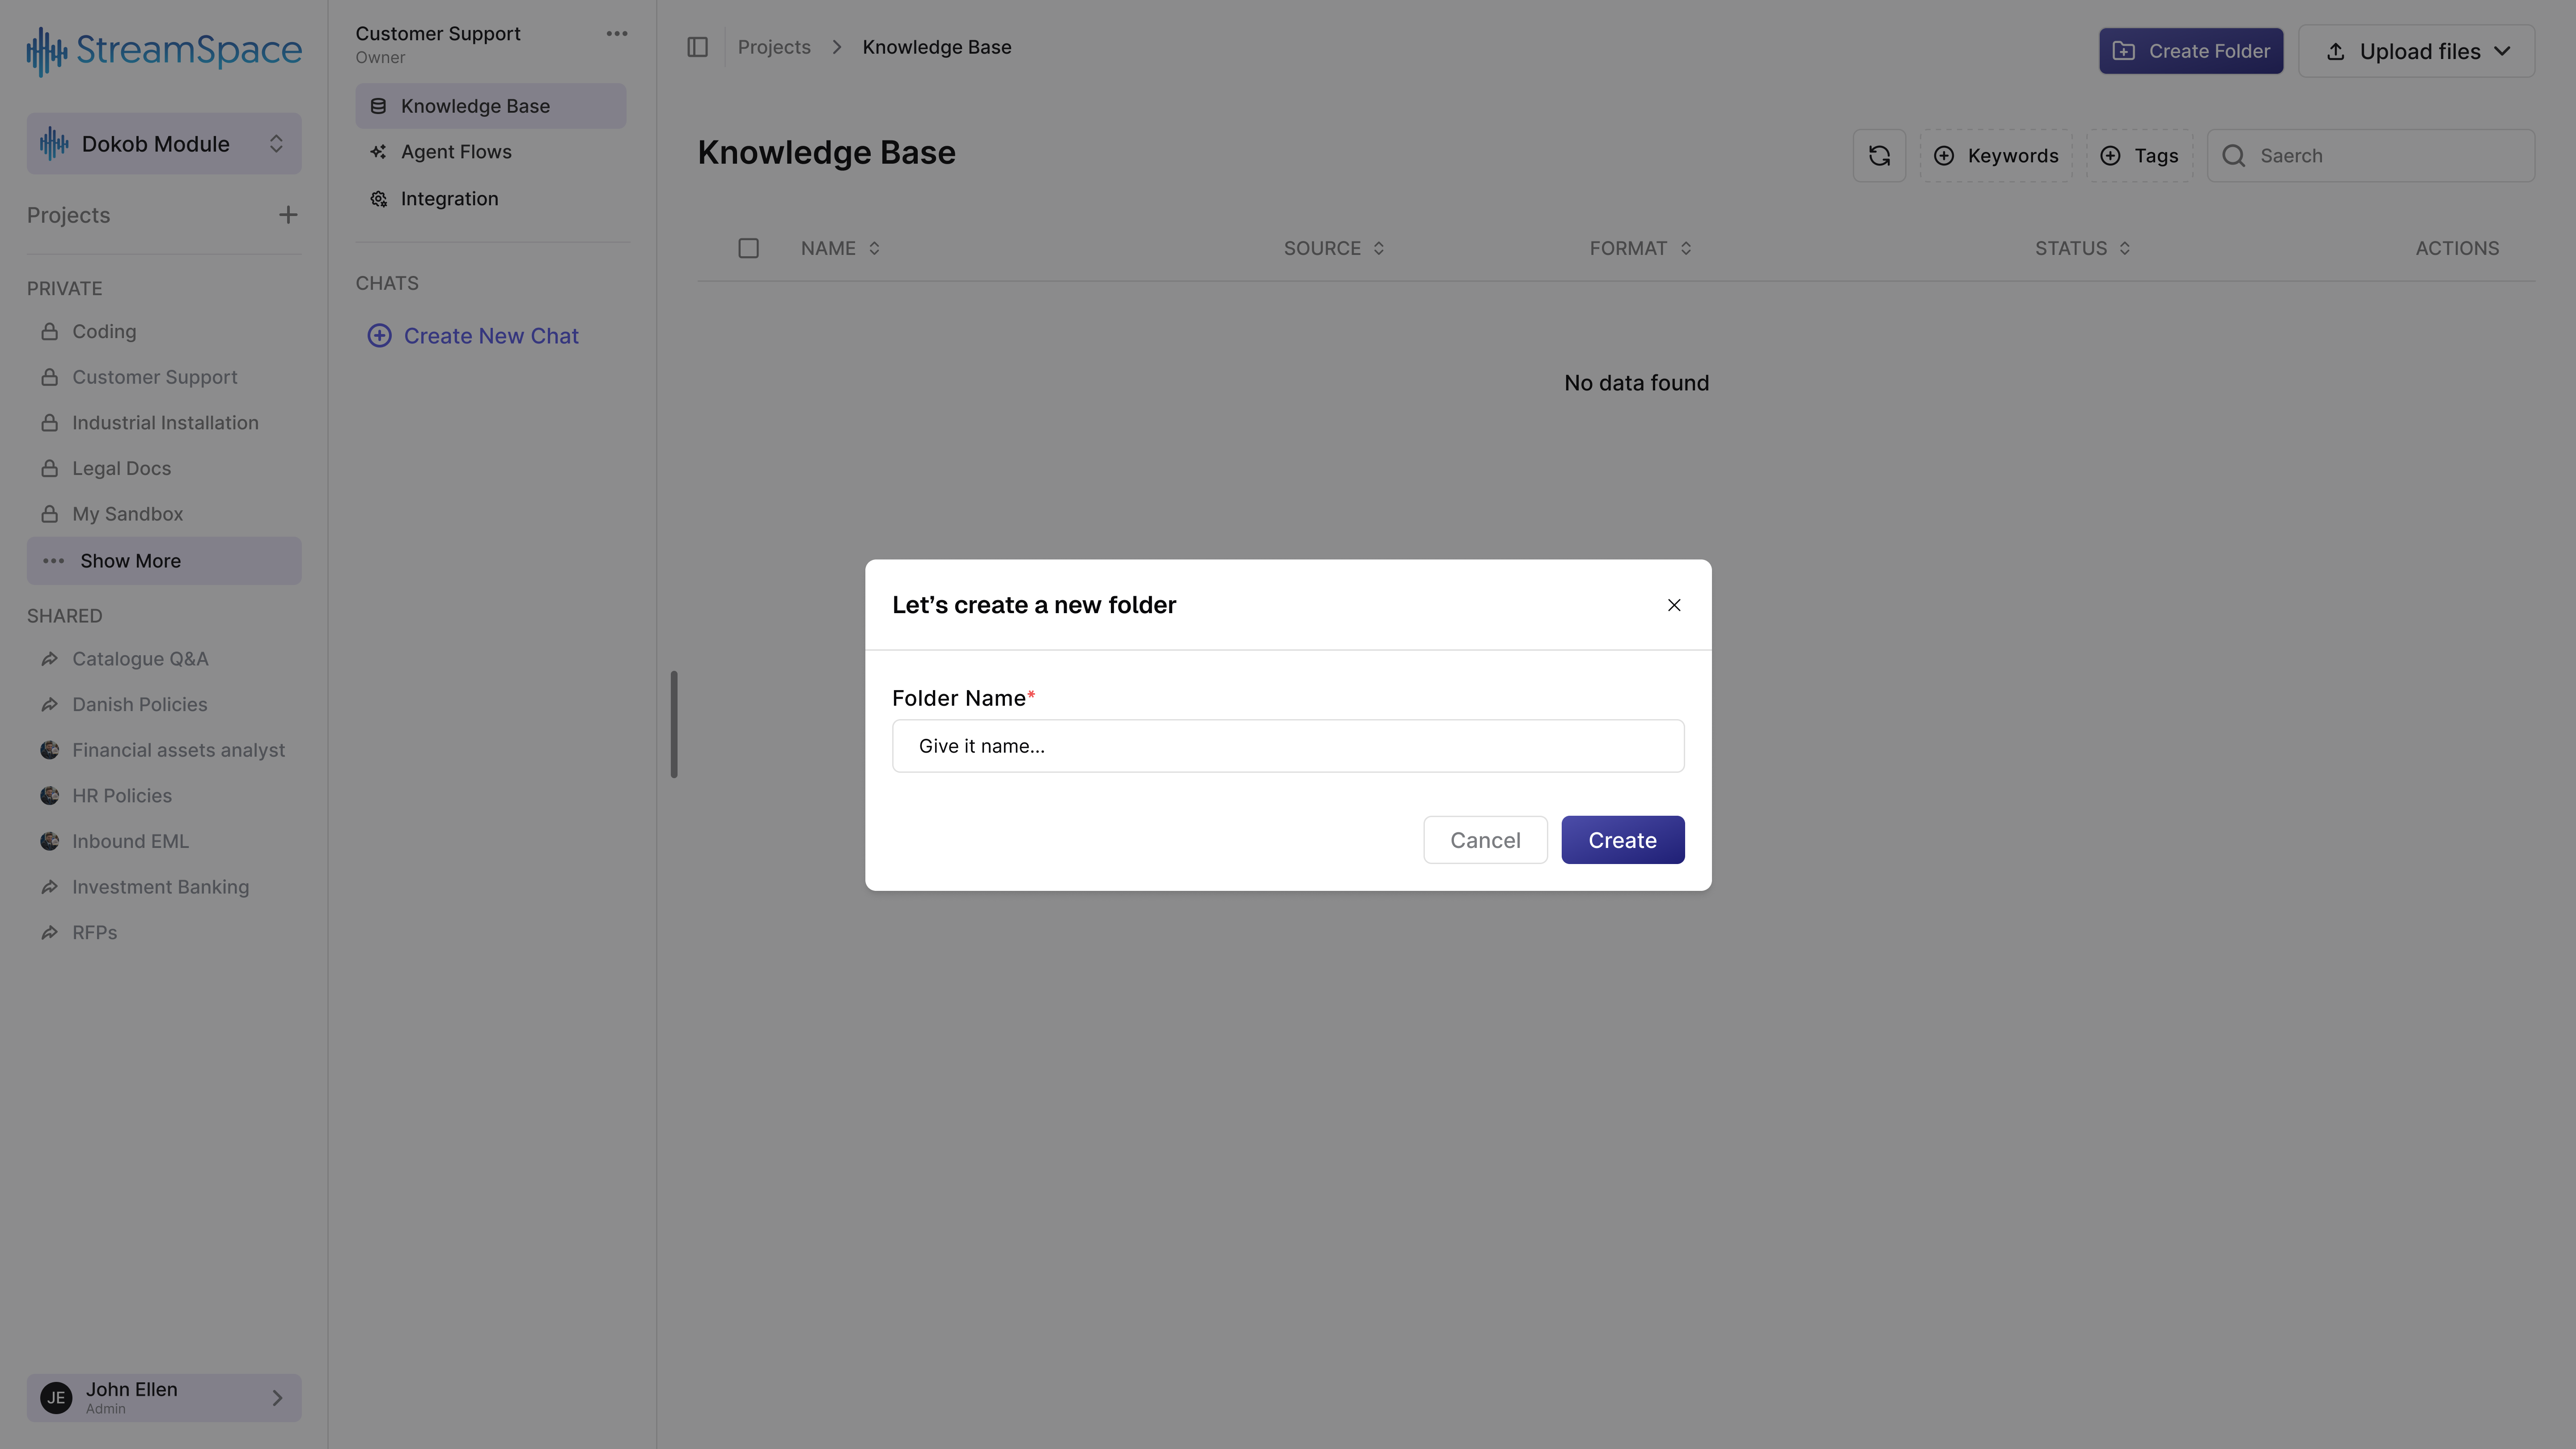
Step 1: Click "Create Folder"
Find the button in the top-right area of the Knowledge Base view.
Step 2: Name Your Folder
Choose a descriptive name that clearly indicates what belongs inside.
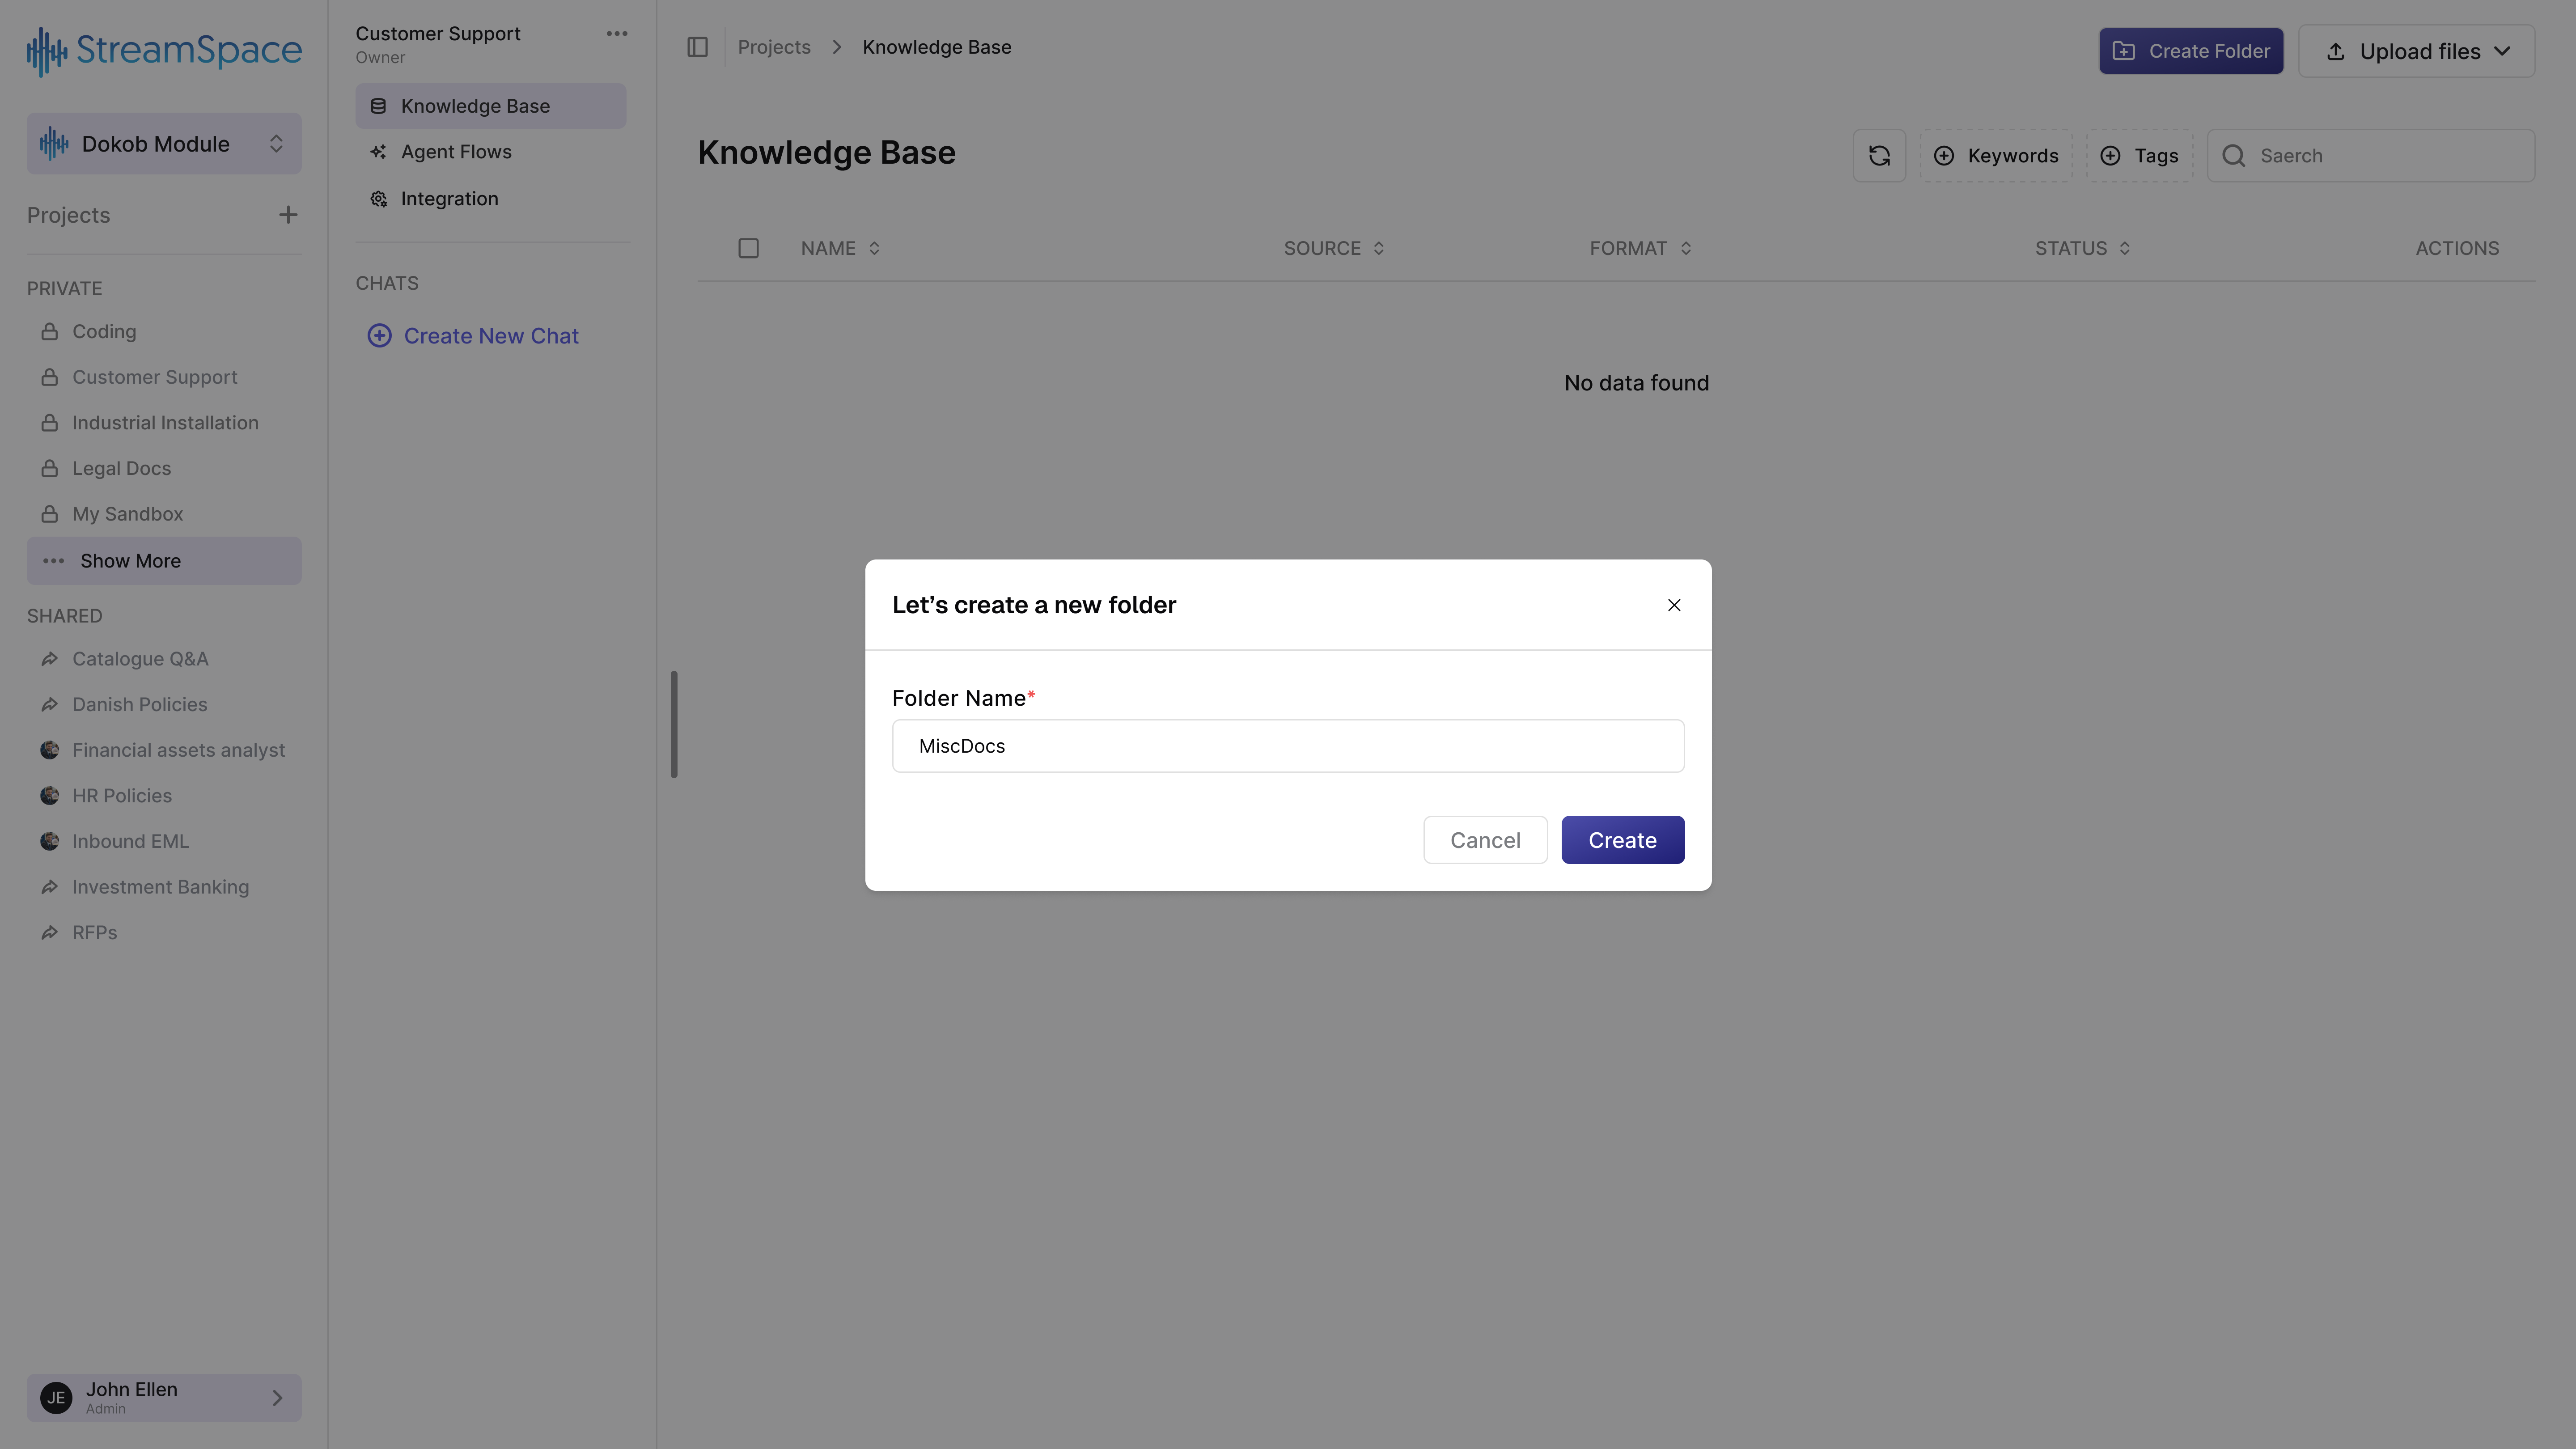
Good Folder Names:
- "Q1 2025 Financial Reports"
- "Customer Contract Templates"
- "Training Videos - Sales Process"
Avoid: Generic names like "Folder 1" or "Misc", overly long names, or special characters.
Step 3: Click "Create"
The folder appears immediately in your Knowledge Base.
Working Inside Folders
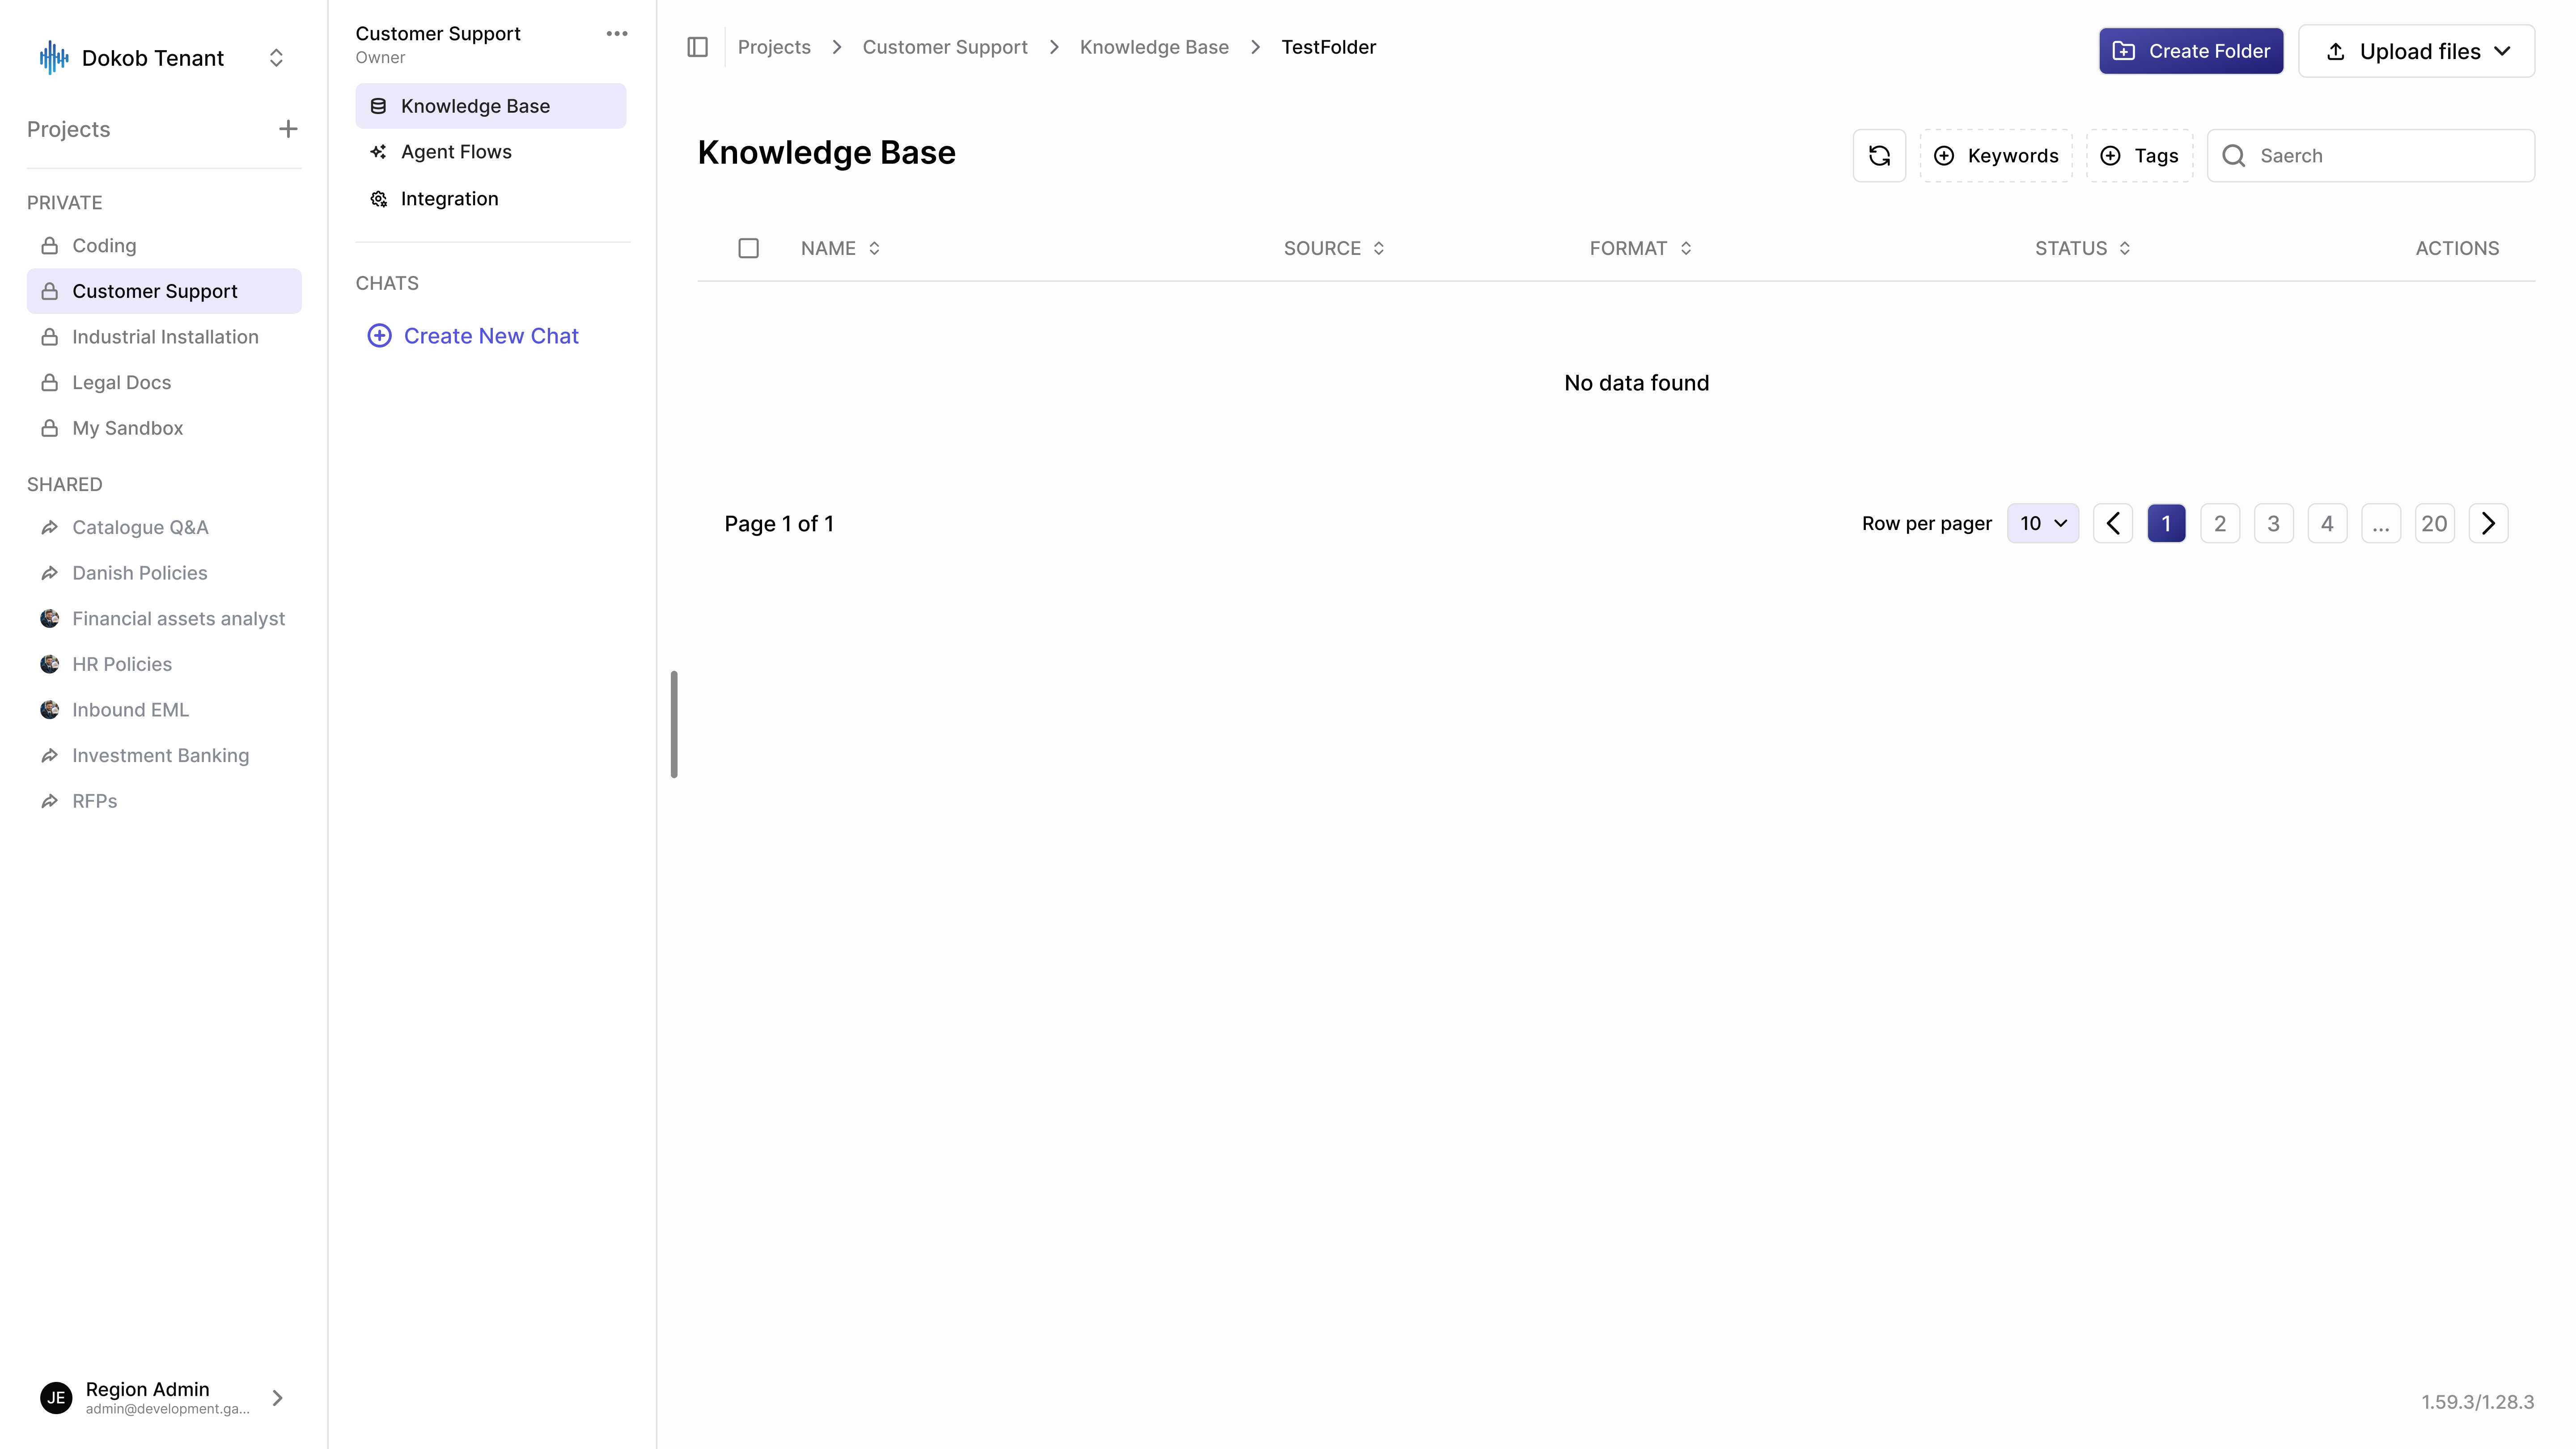
When you click a folder name, you navigate into that directory. Notice the breadcrumb navigation at the top:
Projects → Your Project → Knowledge Base → Folder Name
Click any breadcrumb element to navigate back to that level instantly.
Inside a folder:
- Upload files directly here.
- Create subfolders for deeper organization.
- All the same tools work (search, filter, etc.).
- The three-dot menu offers folder-specific actions.
Folder Best Practices
- Keep Structure Shallow: 2-3 levels deep maximum. Deeper hierarchies become difficult to navigate.
- Use Consistent Naming: Pick a pattern (like "YYYY-QQ-Name") and stick to it.
- Consider Your Workflow: Organize folders based on how your team actually works.
- Review Regularly: Schedule periodic reviews to clean up and restructure folders.
AI-Powered Filtering
Keywords: AI-Generated Discovery
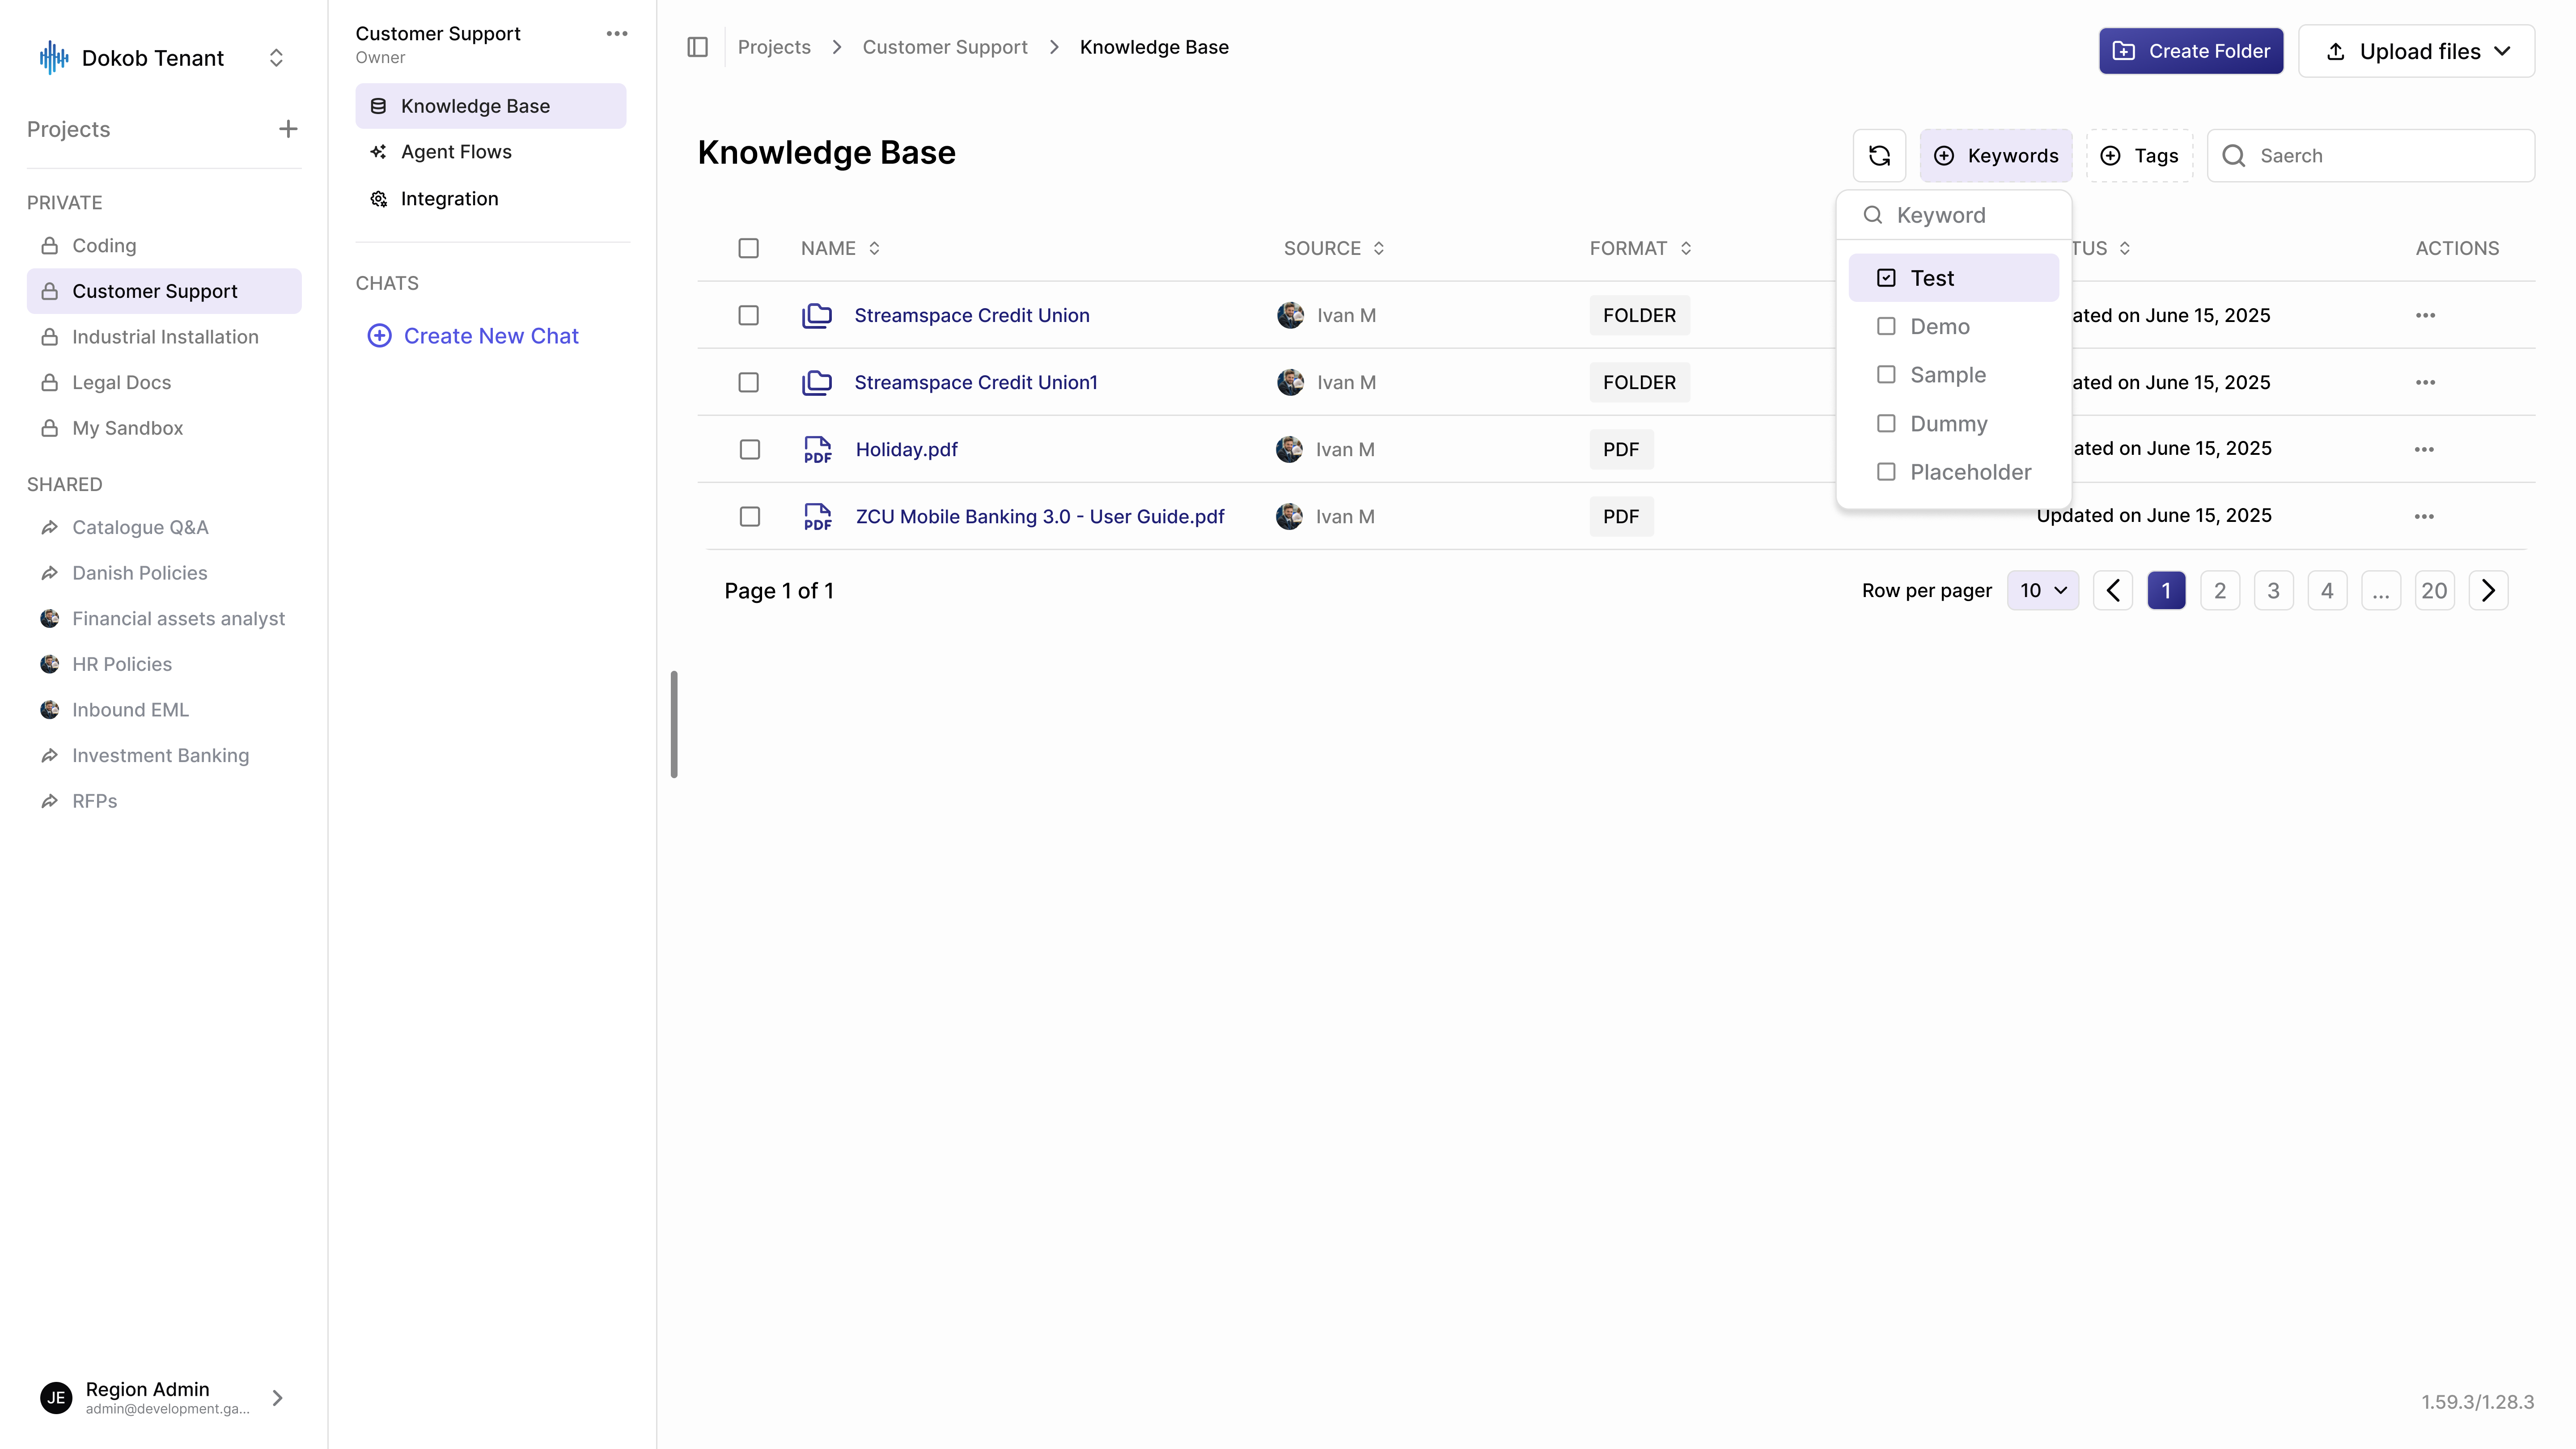
Keywords are terms the AI automatically extracts from your documents during processing. They represent the actual content, not just filenames.
How Keywords Work: When StreamSpace Hub processes a document:
- AI reads the entire content (text, tables, metadata).
- Natural language processing identifies key terms.
- System generates relevant keywords automatically.
- Keywords become filterable immediately.
Example: Upload a loan application document. AI might extract keywords like "mortgage", "credit score", "employment verification", and "property appraisal". You can filter all documents by "mortgage" and see every file mentioning mortgages, regardless of filename.
To Filter by Keywords:
- Click the Keywords button in the toolbar.
- Check boxes next to relevant terms.
- Select multiple keywords for precision.
- The file list updates instantly.
Tags: AI-Generated Organization
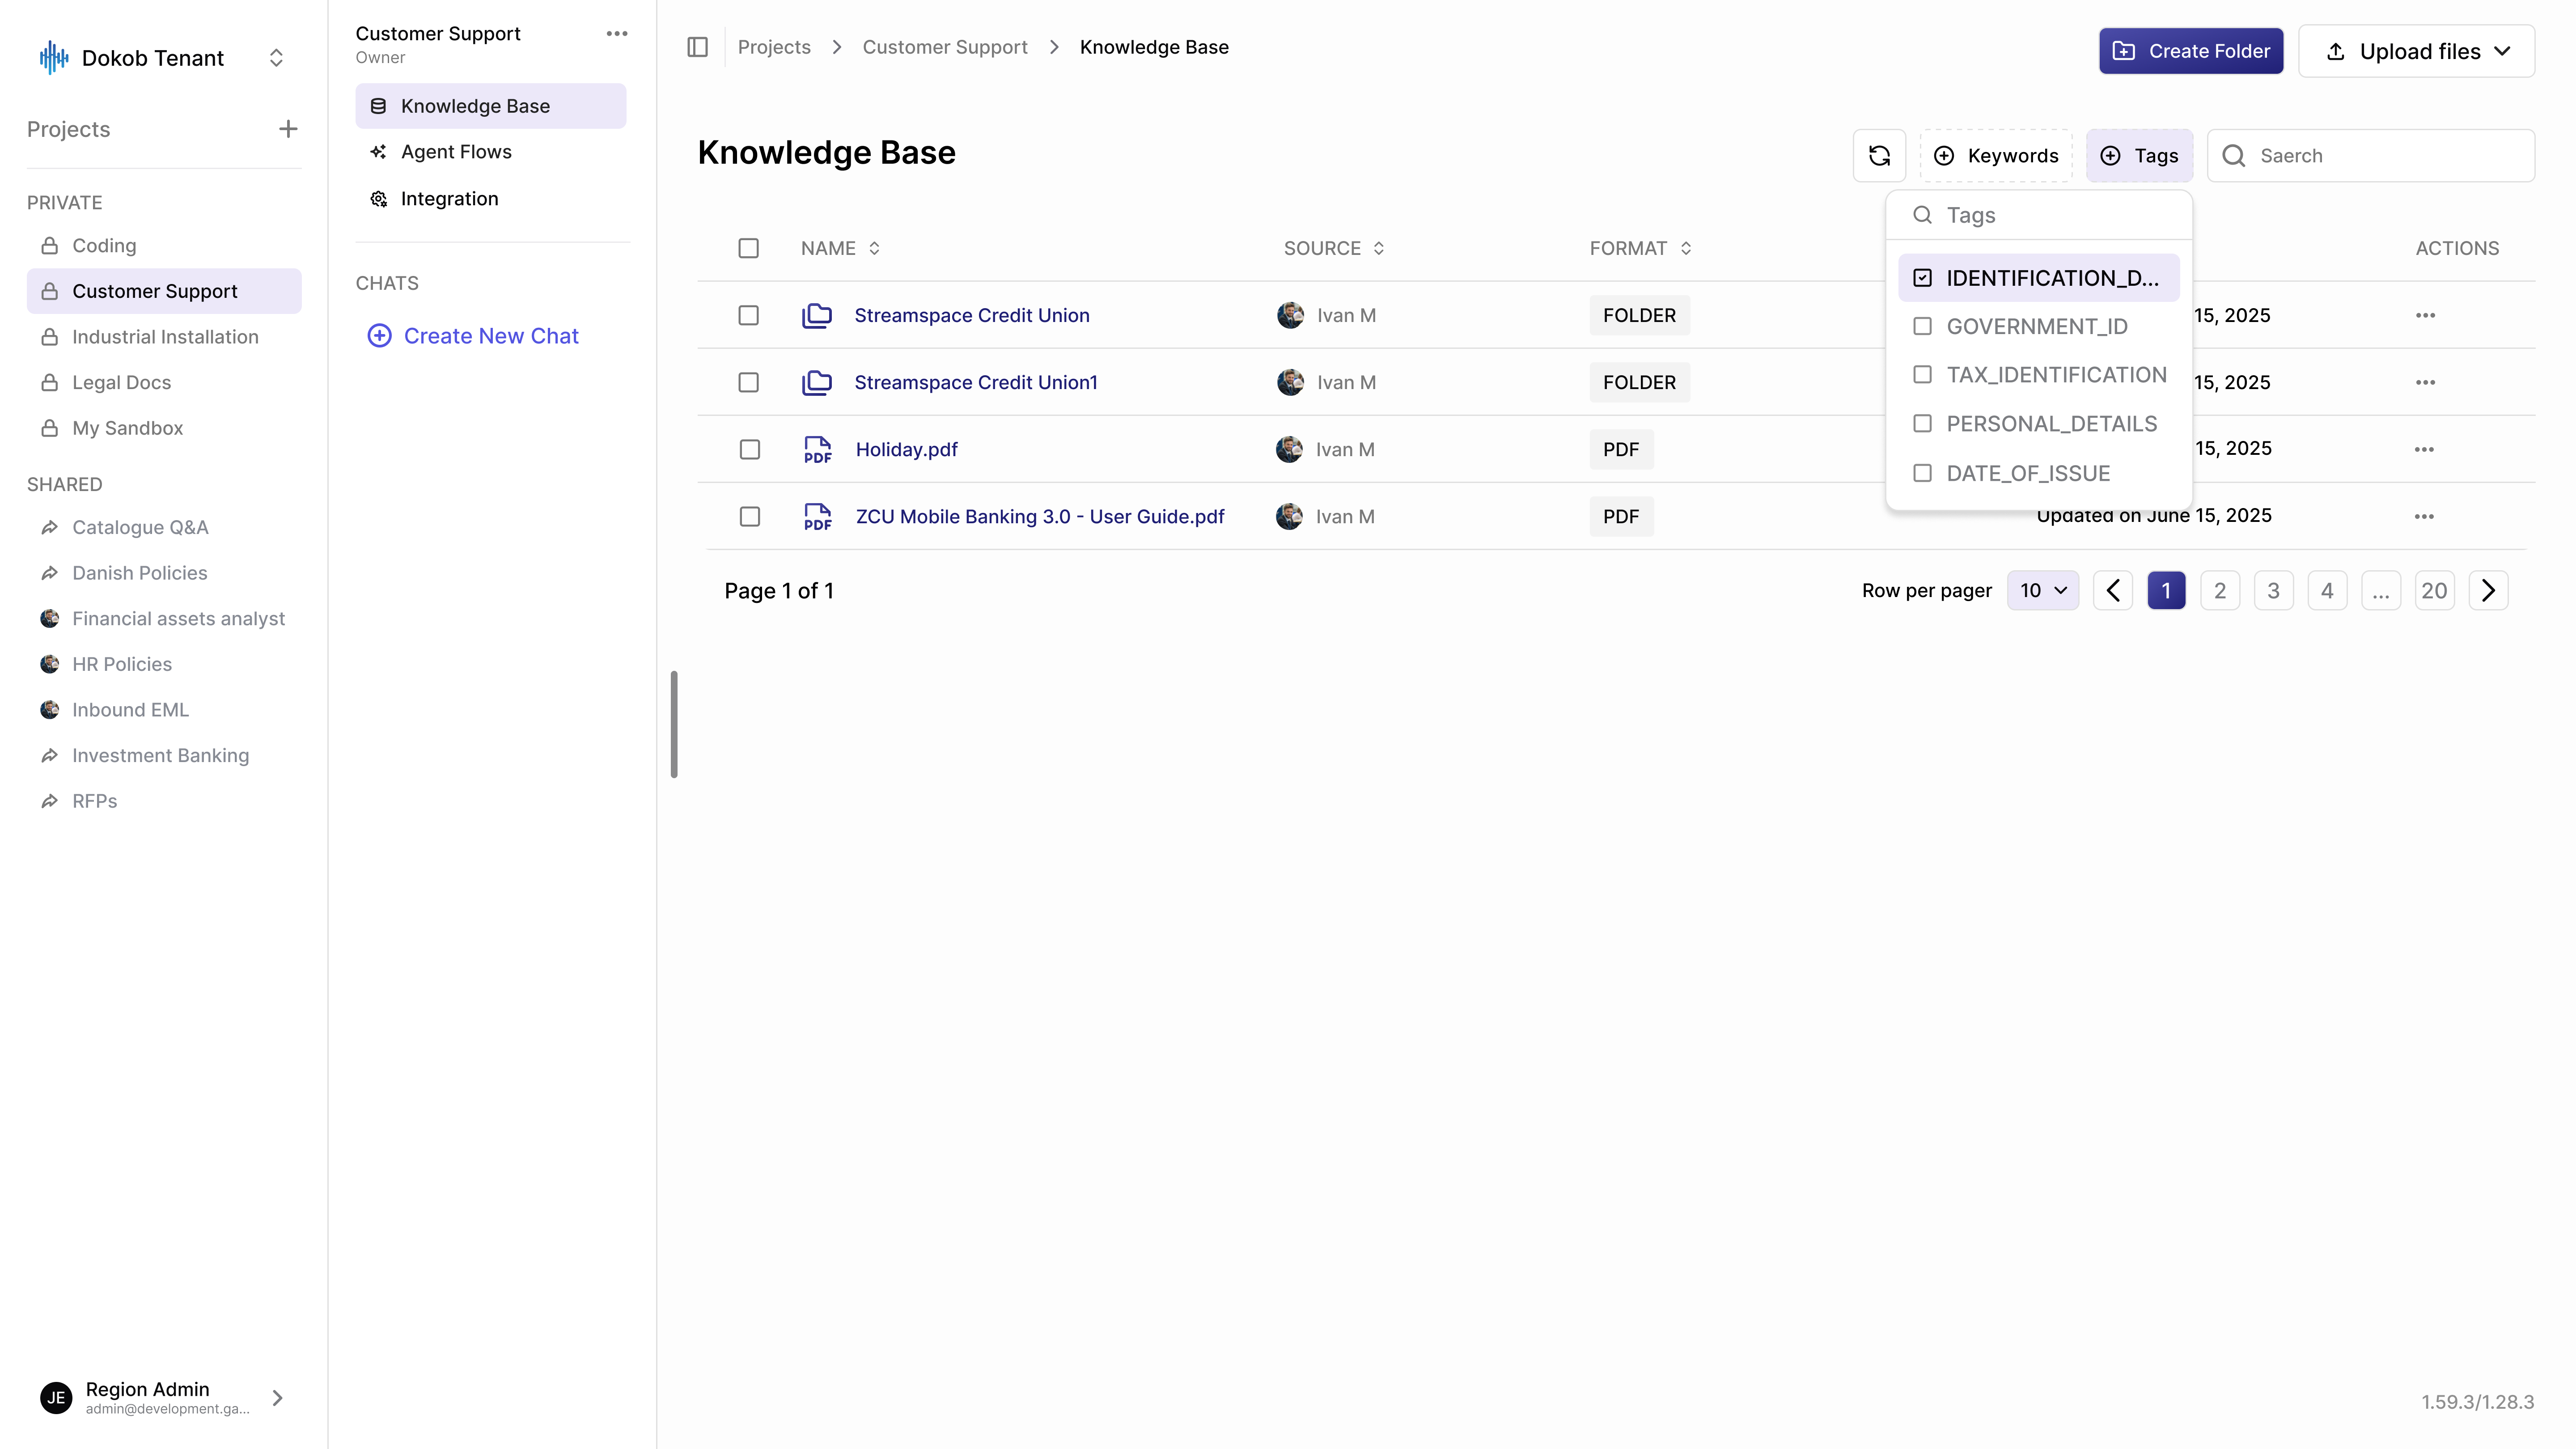
Tags are labels that AI automatically generates based on document analysis and categorization.
| Aspect | Keywords | Tags |
|---|---|---|
| Creation | AI-generated | AI-generated |
| Source | Document content | Document analysis & categorization |
| Purpose | Content discovery | Category organization |
| Updates | When document changes | When document is reprocessed |
The AI analyzes documents and automatically assigns tags based on document type identification, content categorization, structural analysis, and metadata extraction.
Example AI-Generated Tags:
- A contract might automatically receive:
IDENTIFICATION_DOCUMENT,GOVERNMENT_ID,TAX_IDENTIFICATION,PERSONAL_DETAILS. - An invoice might get:
INVOICE,FINANCIAL_DOCUMENT,PAYMENT_RECORD.
To Filter by Tags:
- Click the Tags button in the toolbar.
- Select one or more AI-generated tags.
- Results show only matching documents.
Advanced Folder Management
Editing Folders
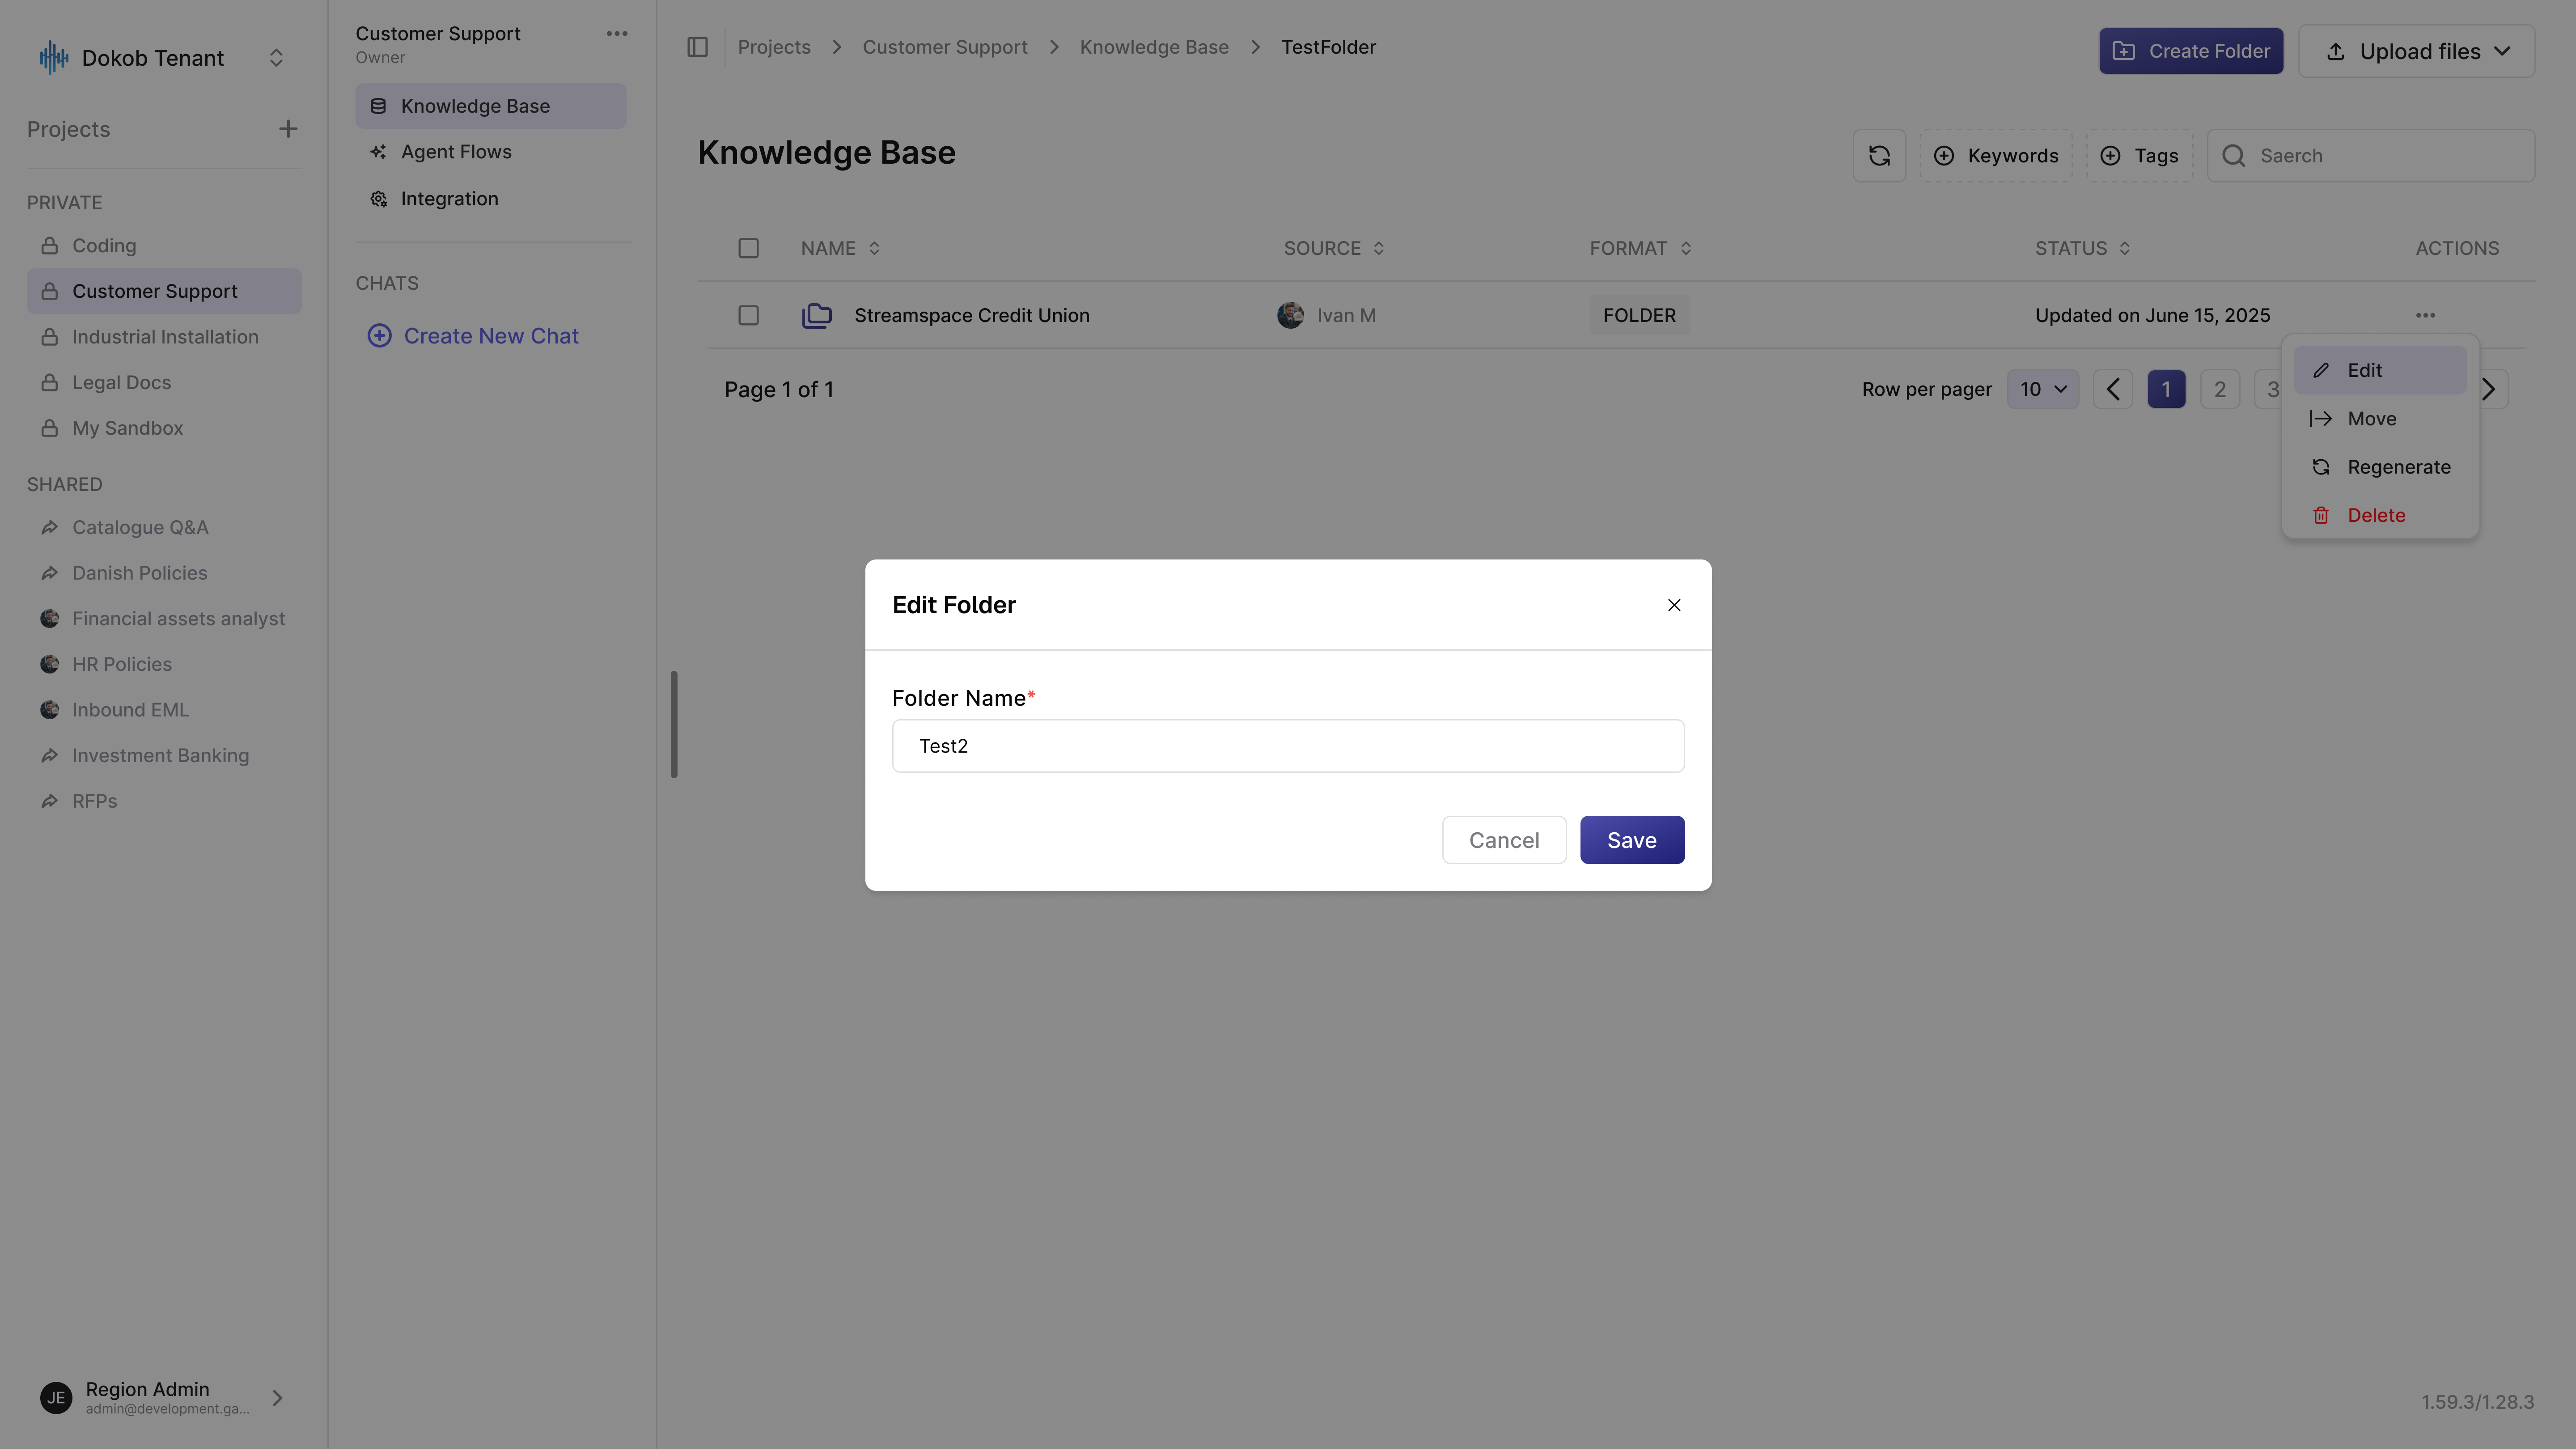
To rename a folder:
- Click the three-dot menu (⋮) next to the folder.
- Select Edit.
- Change the folder name.
- Click Save.
Moving Folders
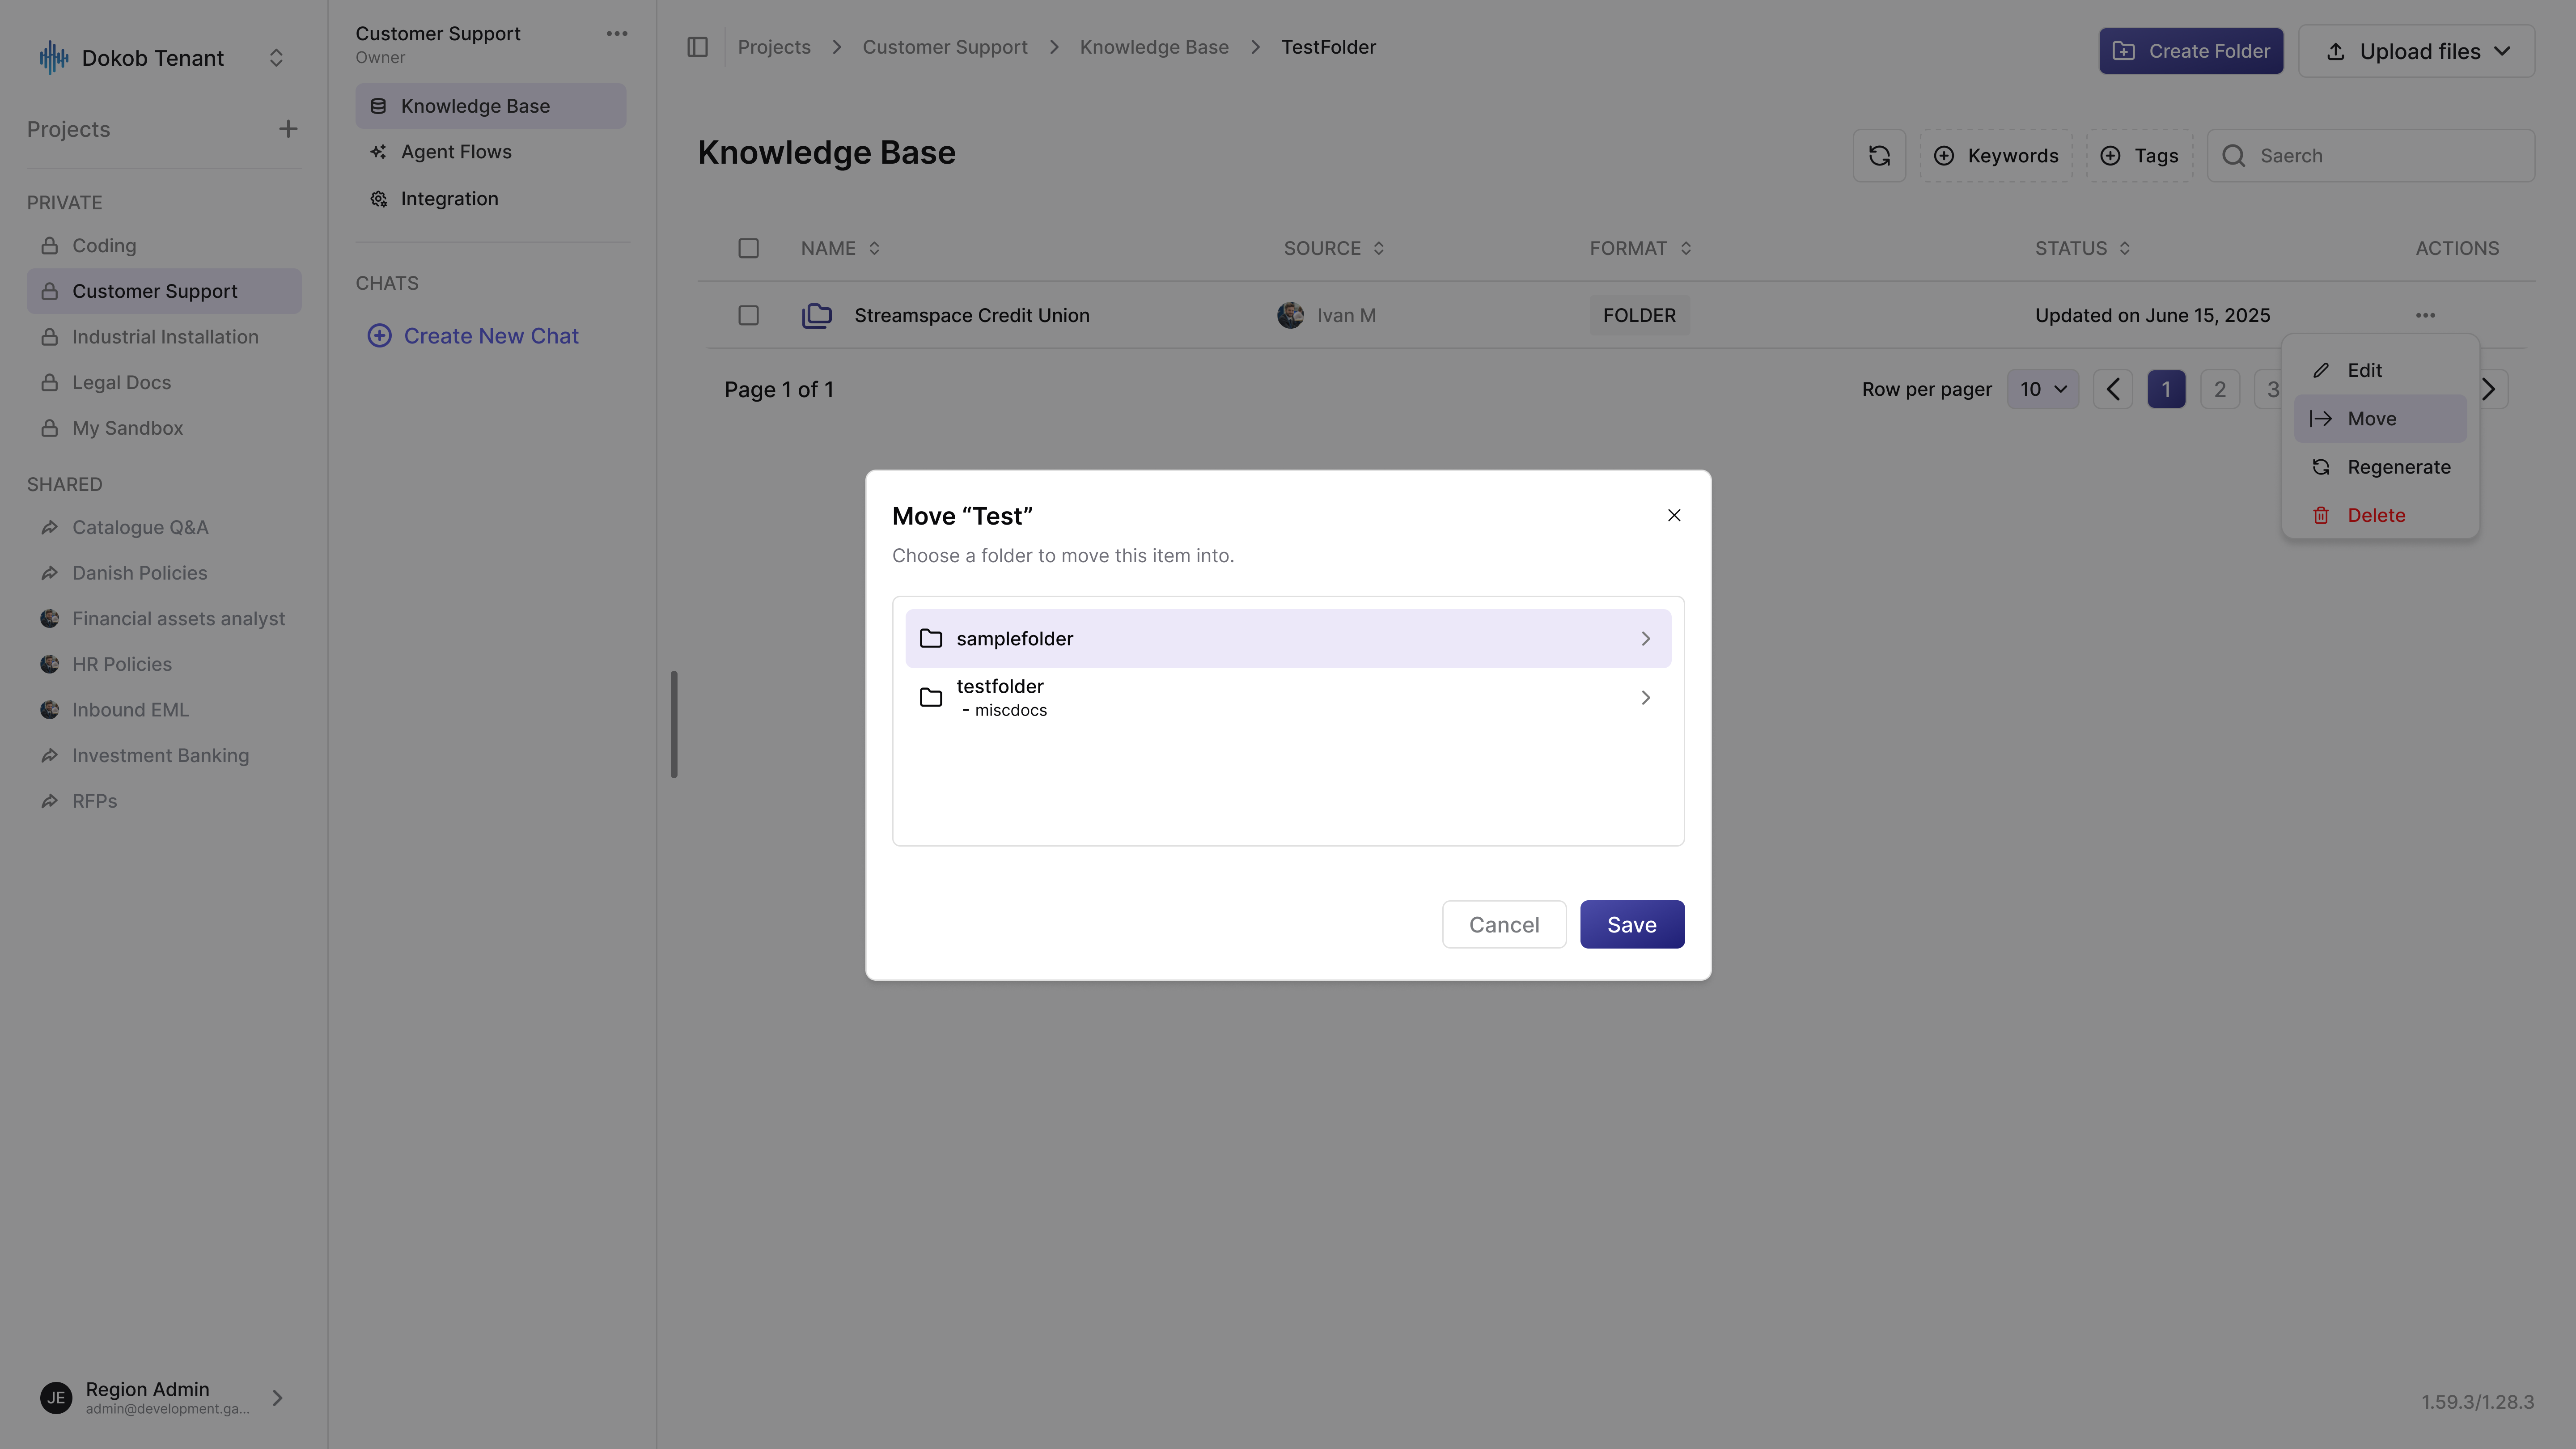
Moving folders lets you restructure your workspace without losing content.
To Move a Folder:
- Click the three-dot menu (⋮) next to the folder.
- Select Move.
- Use the → arrow to expand folders in the tree.
- Select the destination folder name.
- Click Save to complete the move.
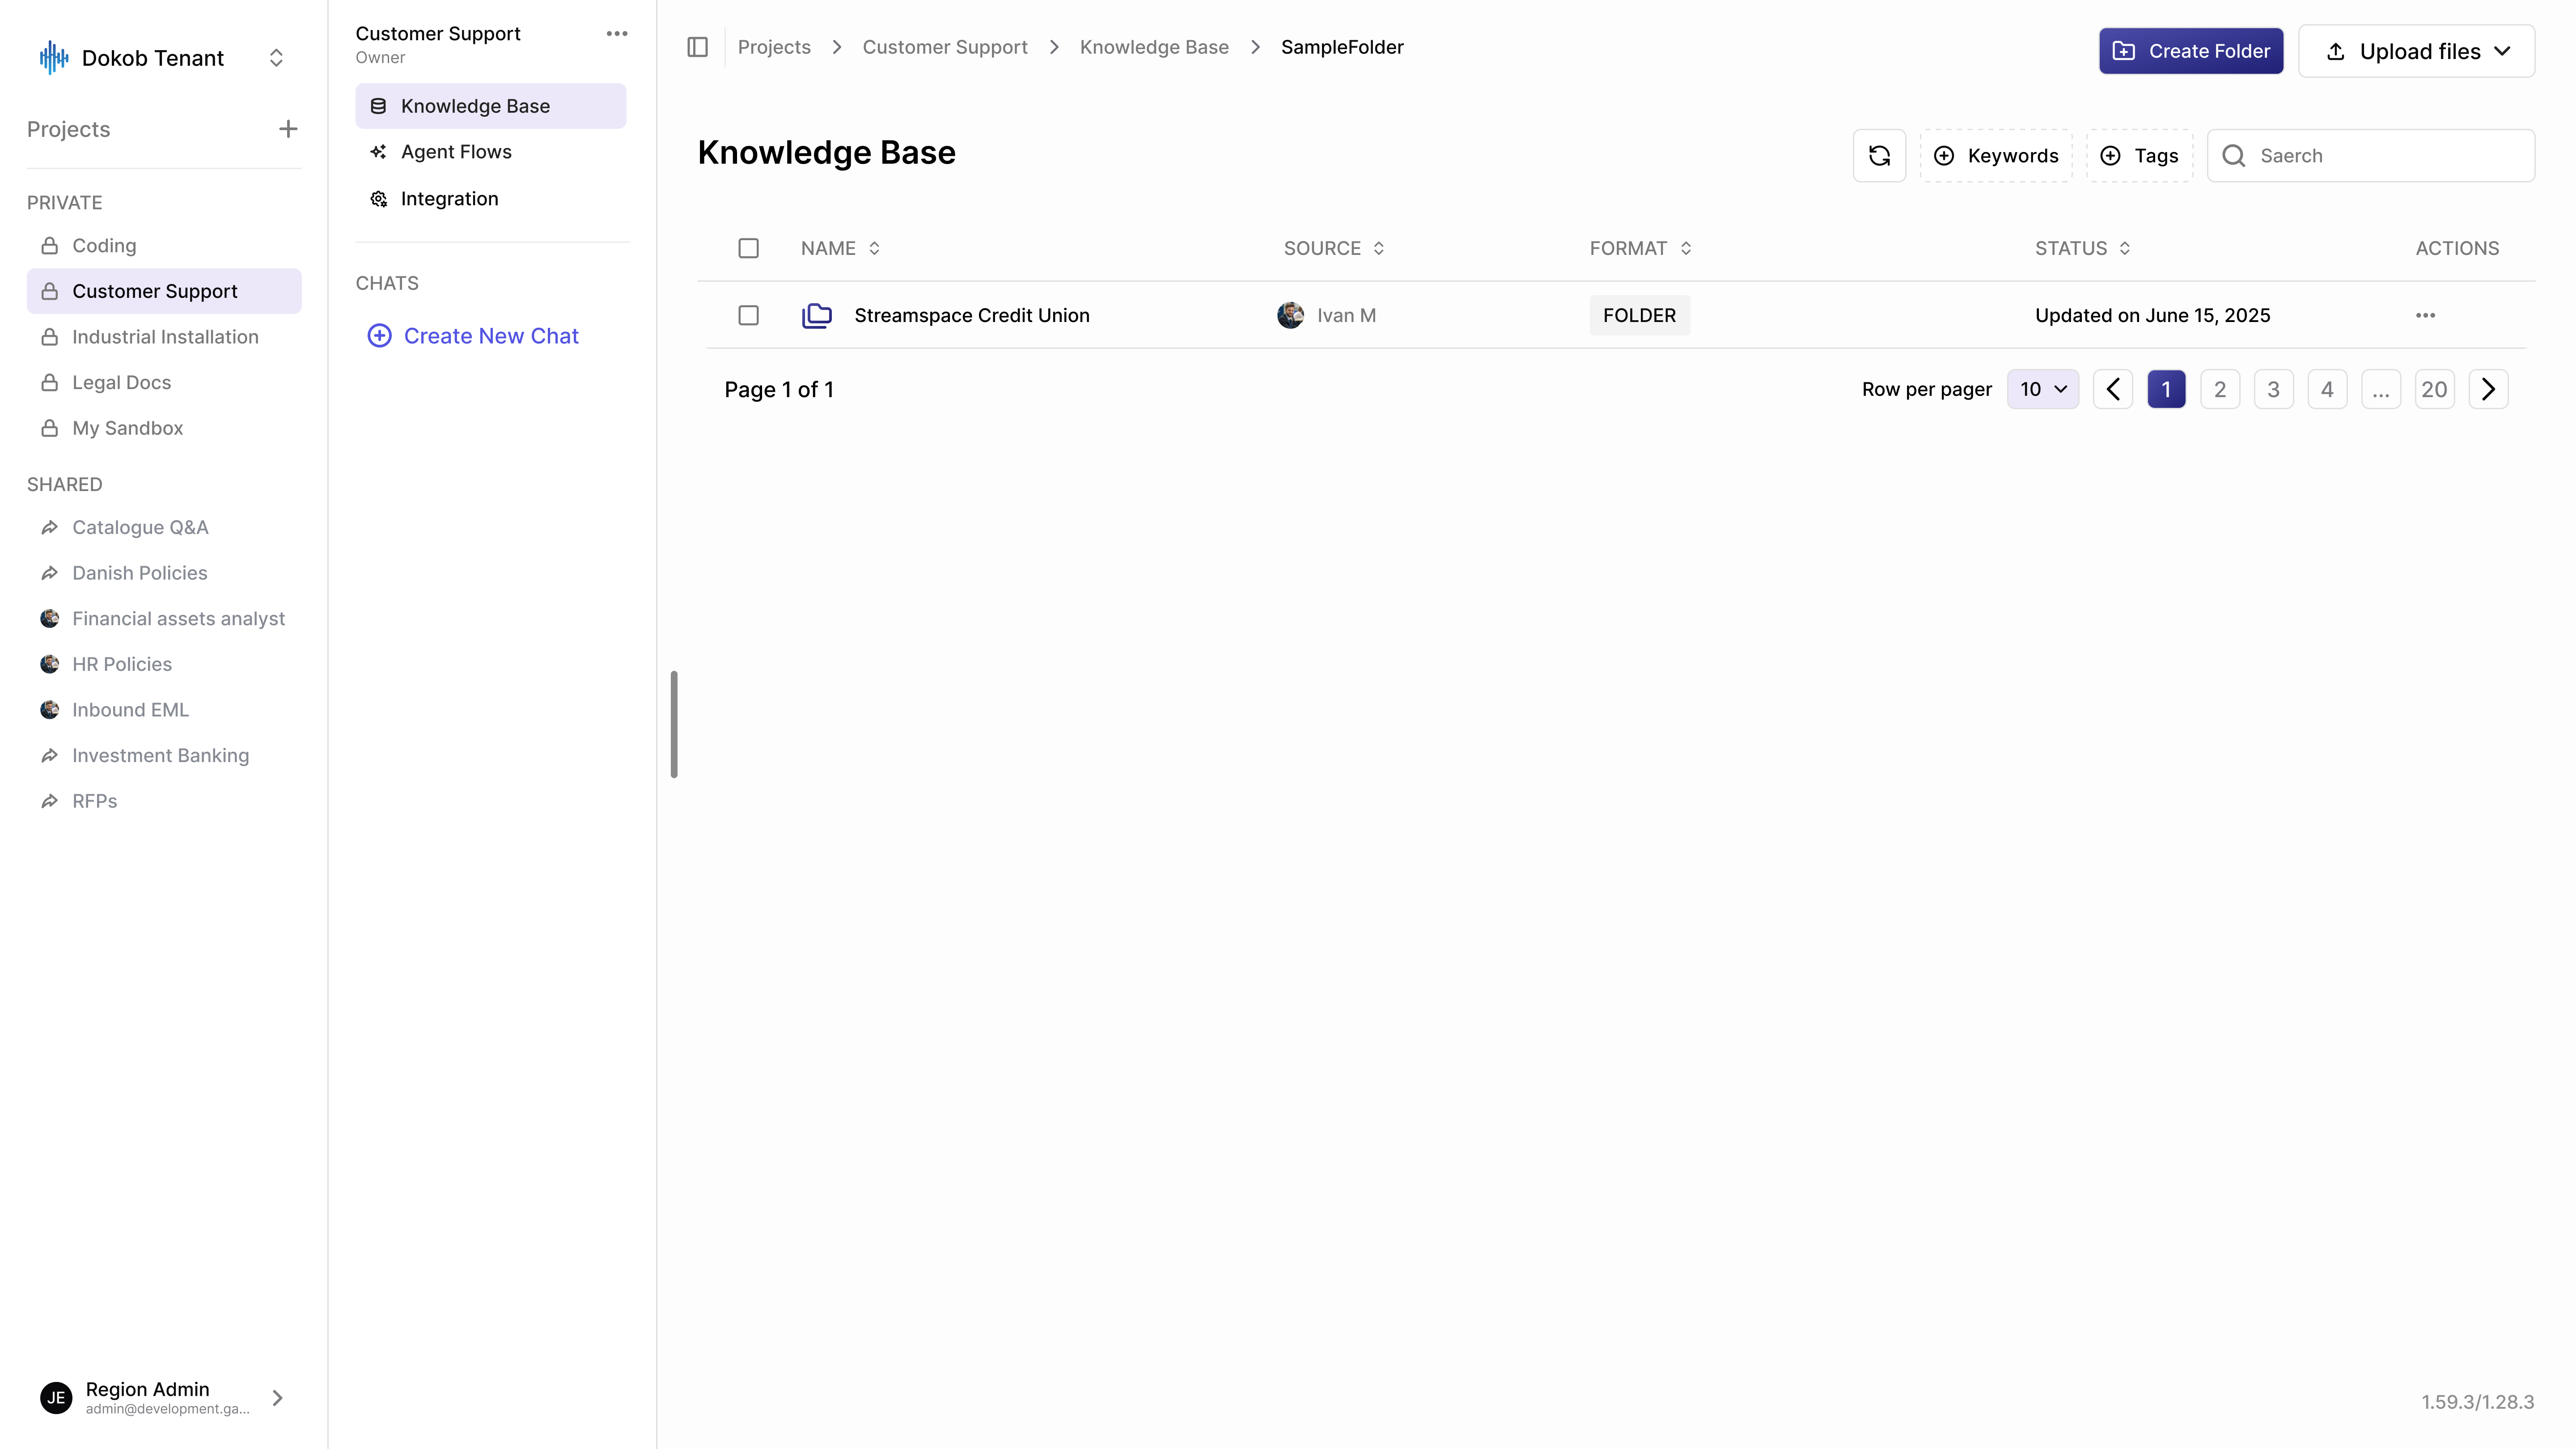
What Happens:
- Folder and all contents move to the new location.
- Subfolders and files remain intact.
- Breadcrumb navigation updates.
- File metadata (tags, keywords) is preserved.
Folder Actions Menu
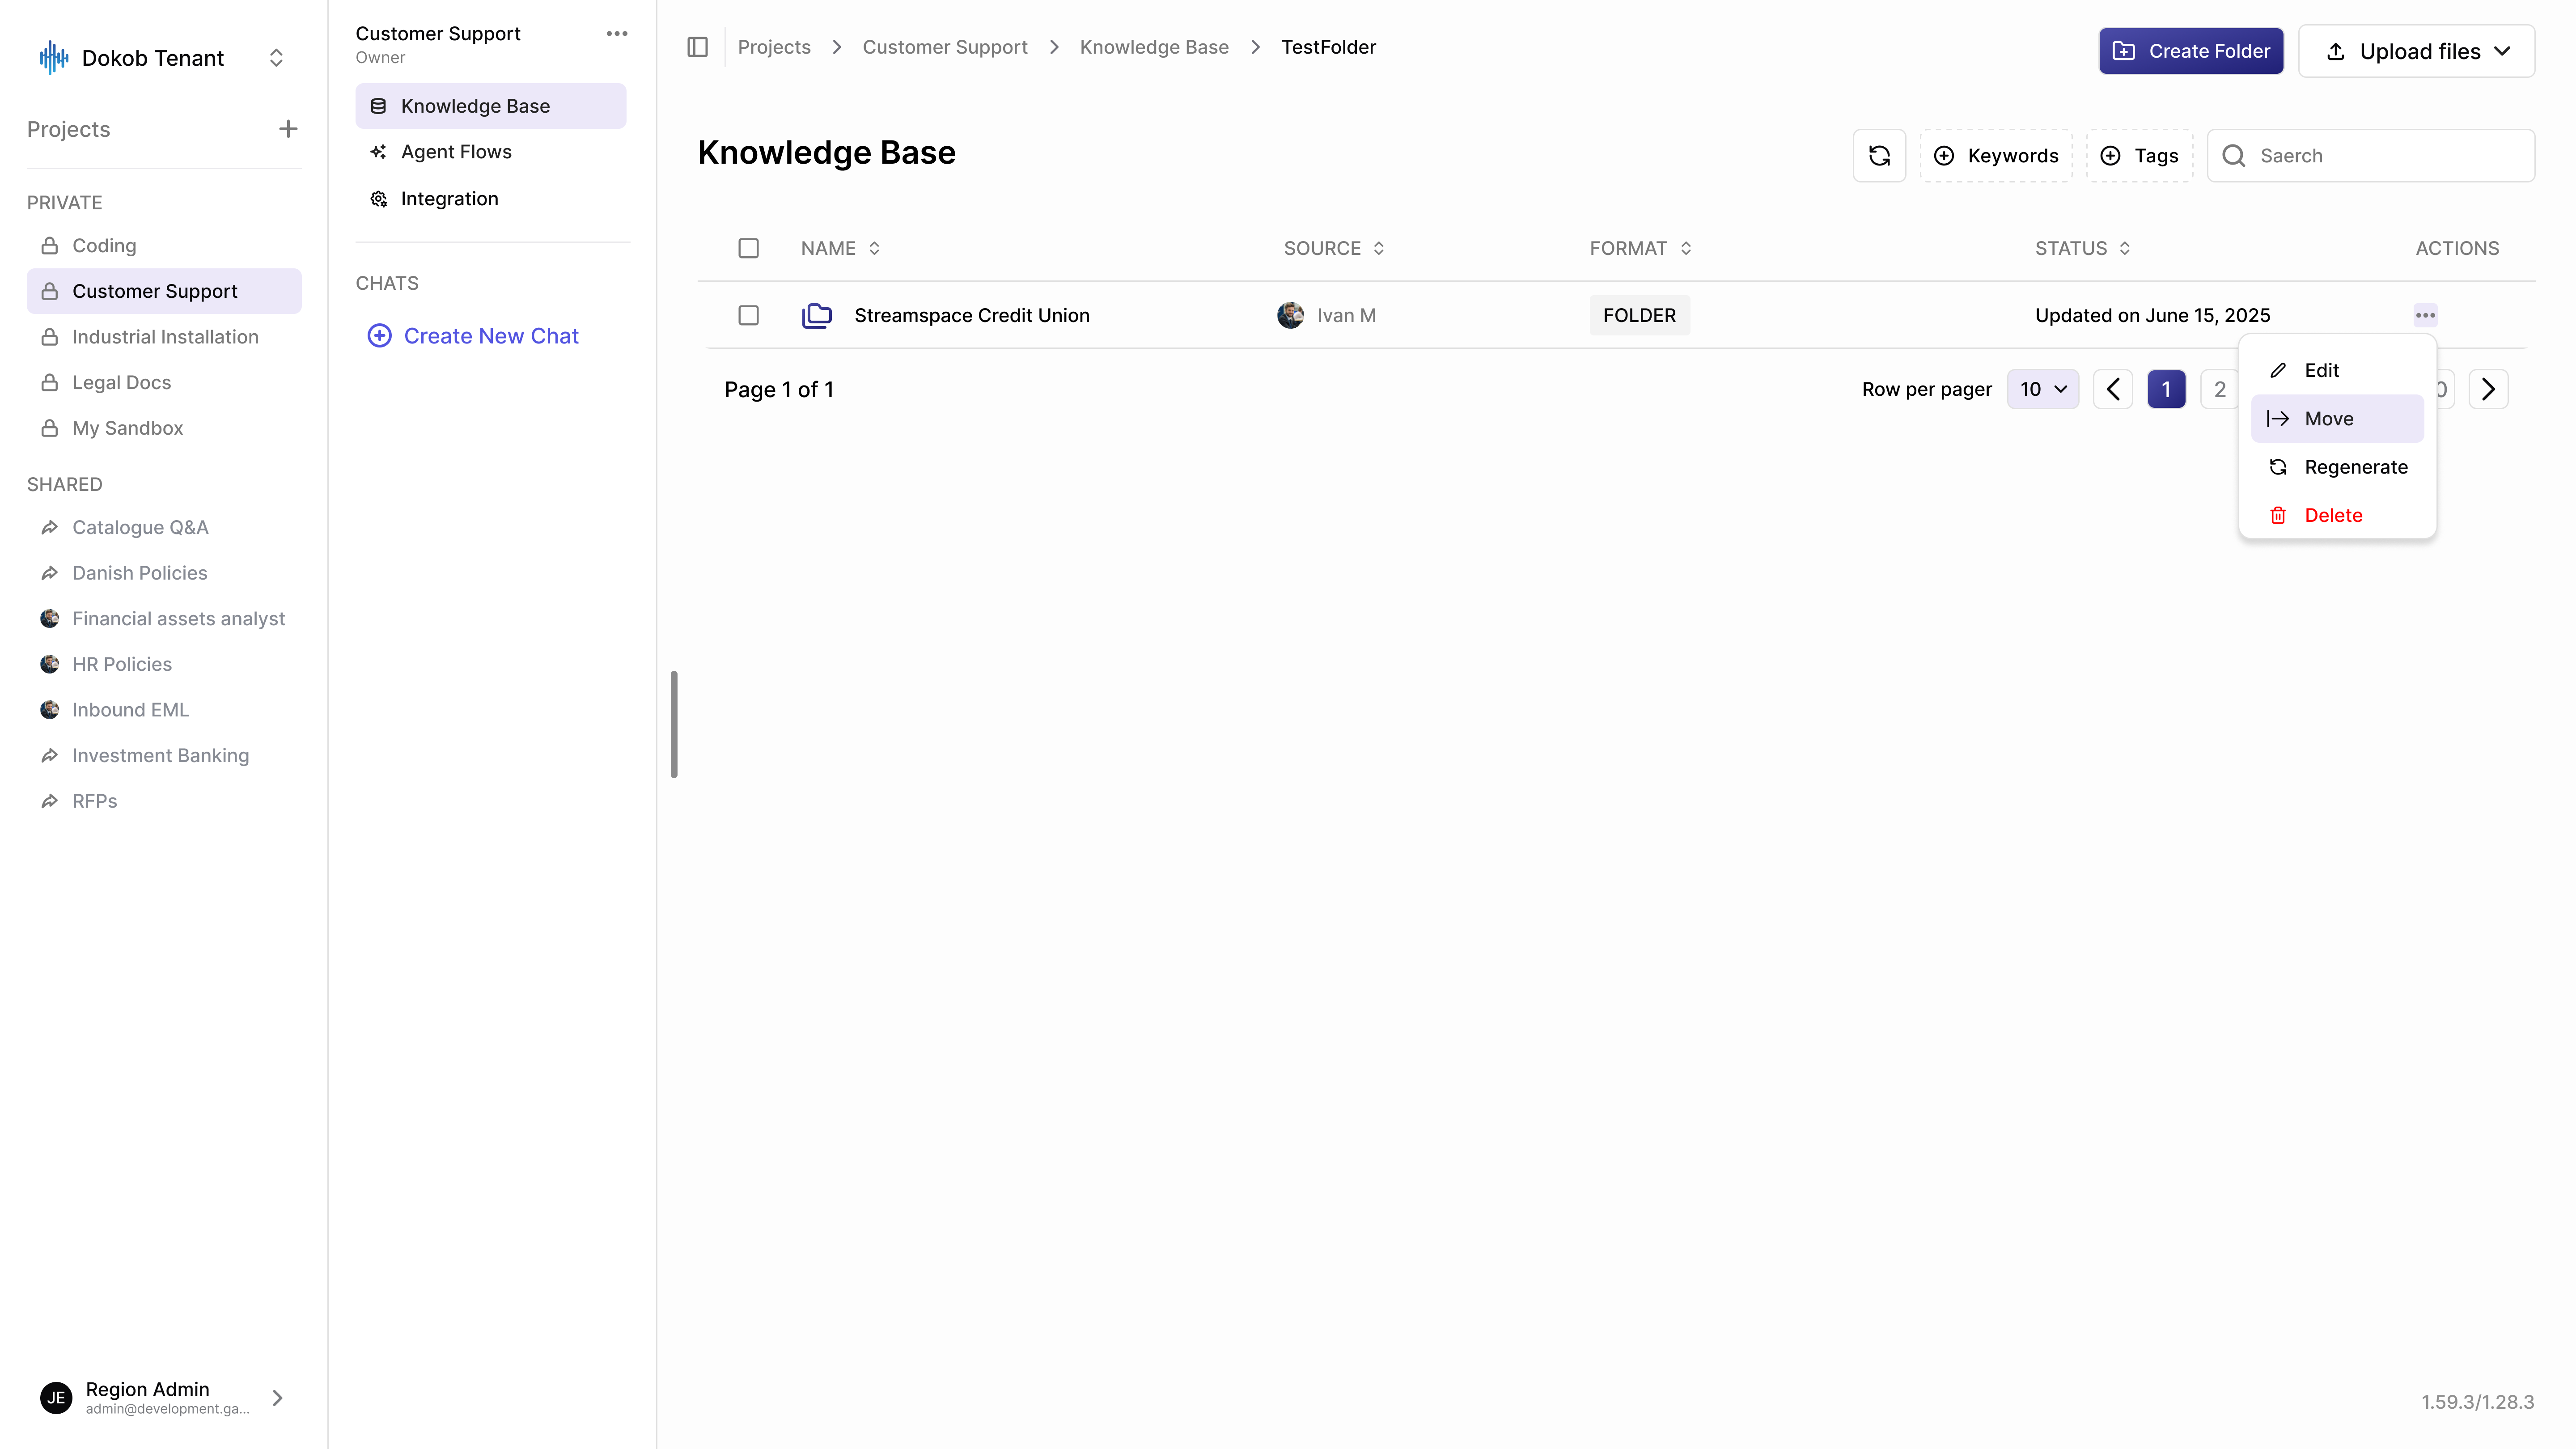
The three-dot menu (⋮) offers four actions:
- Edit: Rename or update folder properties.
- Move: Relocate to a different location in your hierarchy.
- Regenerate: Reprocess all documents in this folder with current AI models (e.g. for updated models or keyword extraction).
- Delete: Remove folder and all contents permanently.
Delete folders carefully. Once confirmed, all files and subfolders in that folder are deleted permanently and cannot be recovered.
Exploring Available Modules
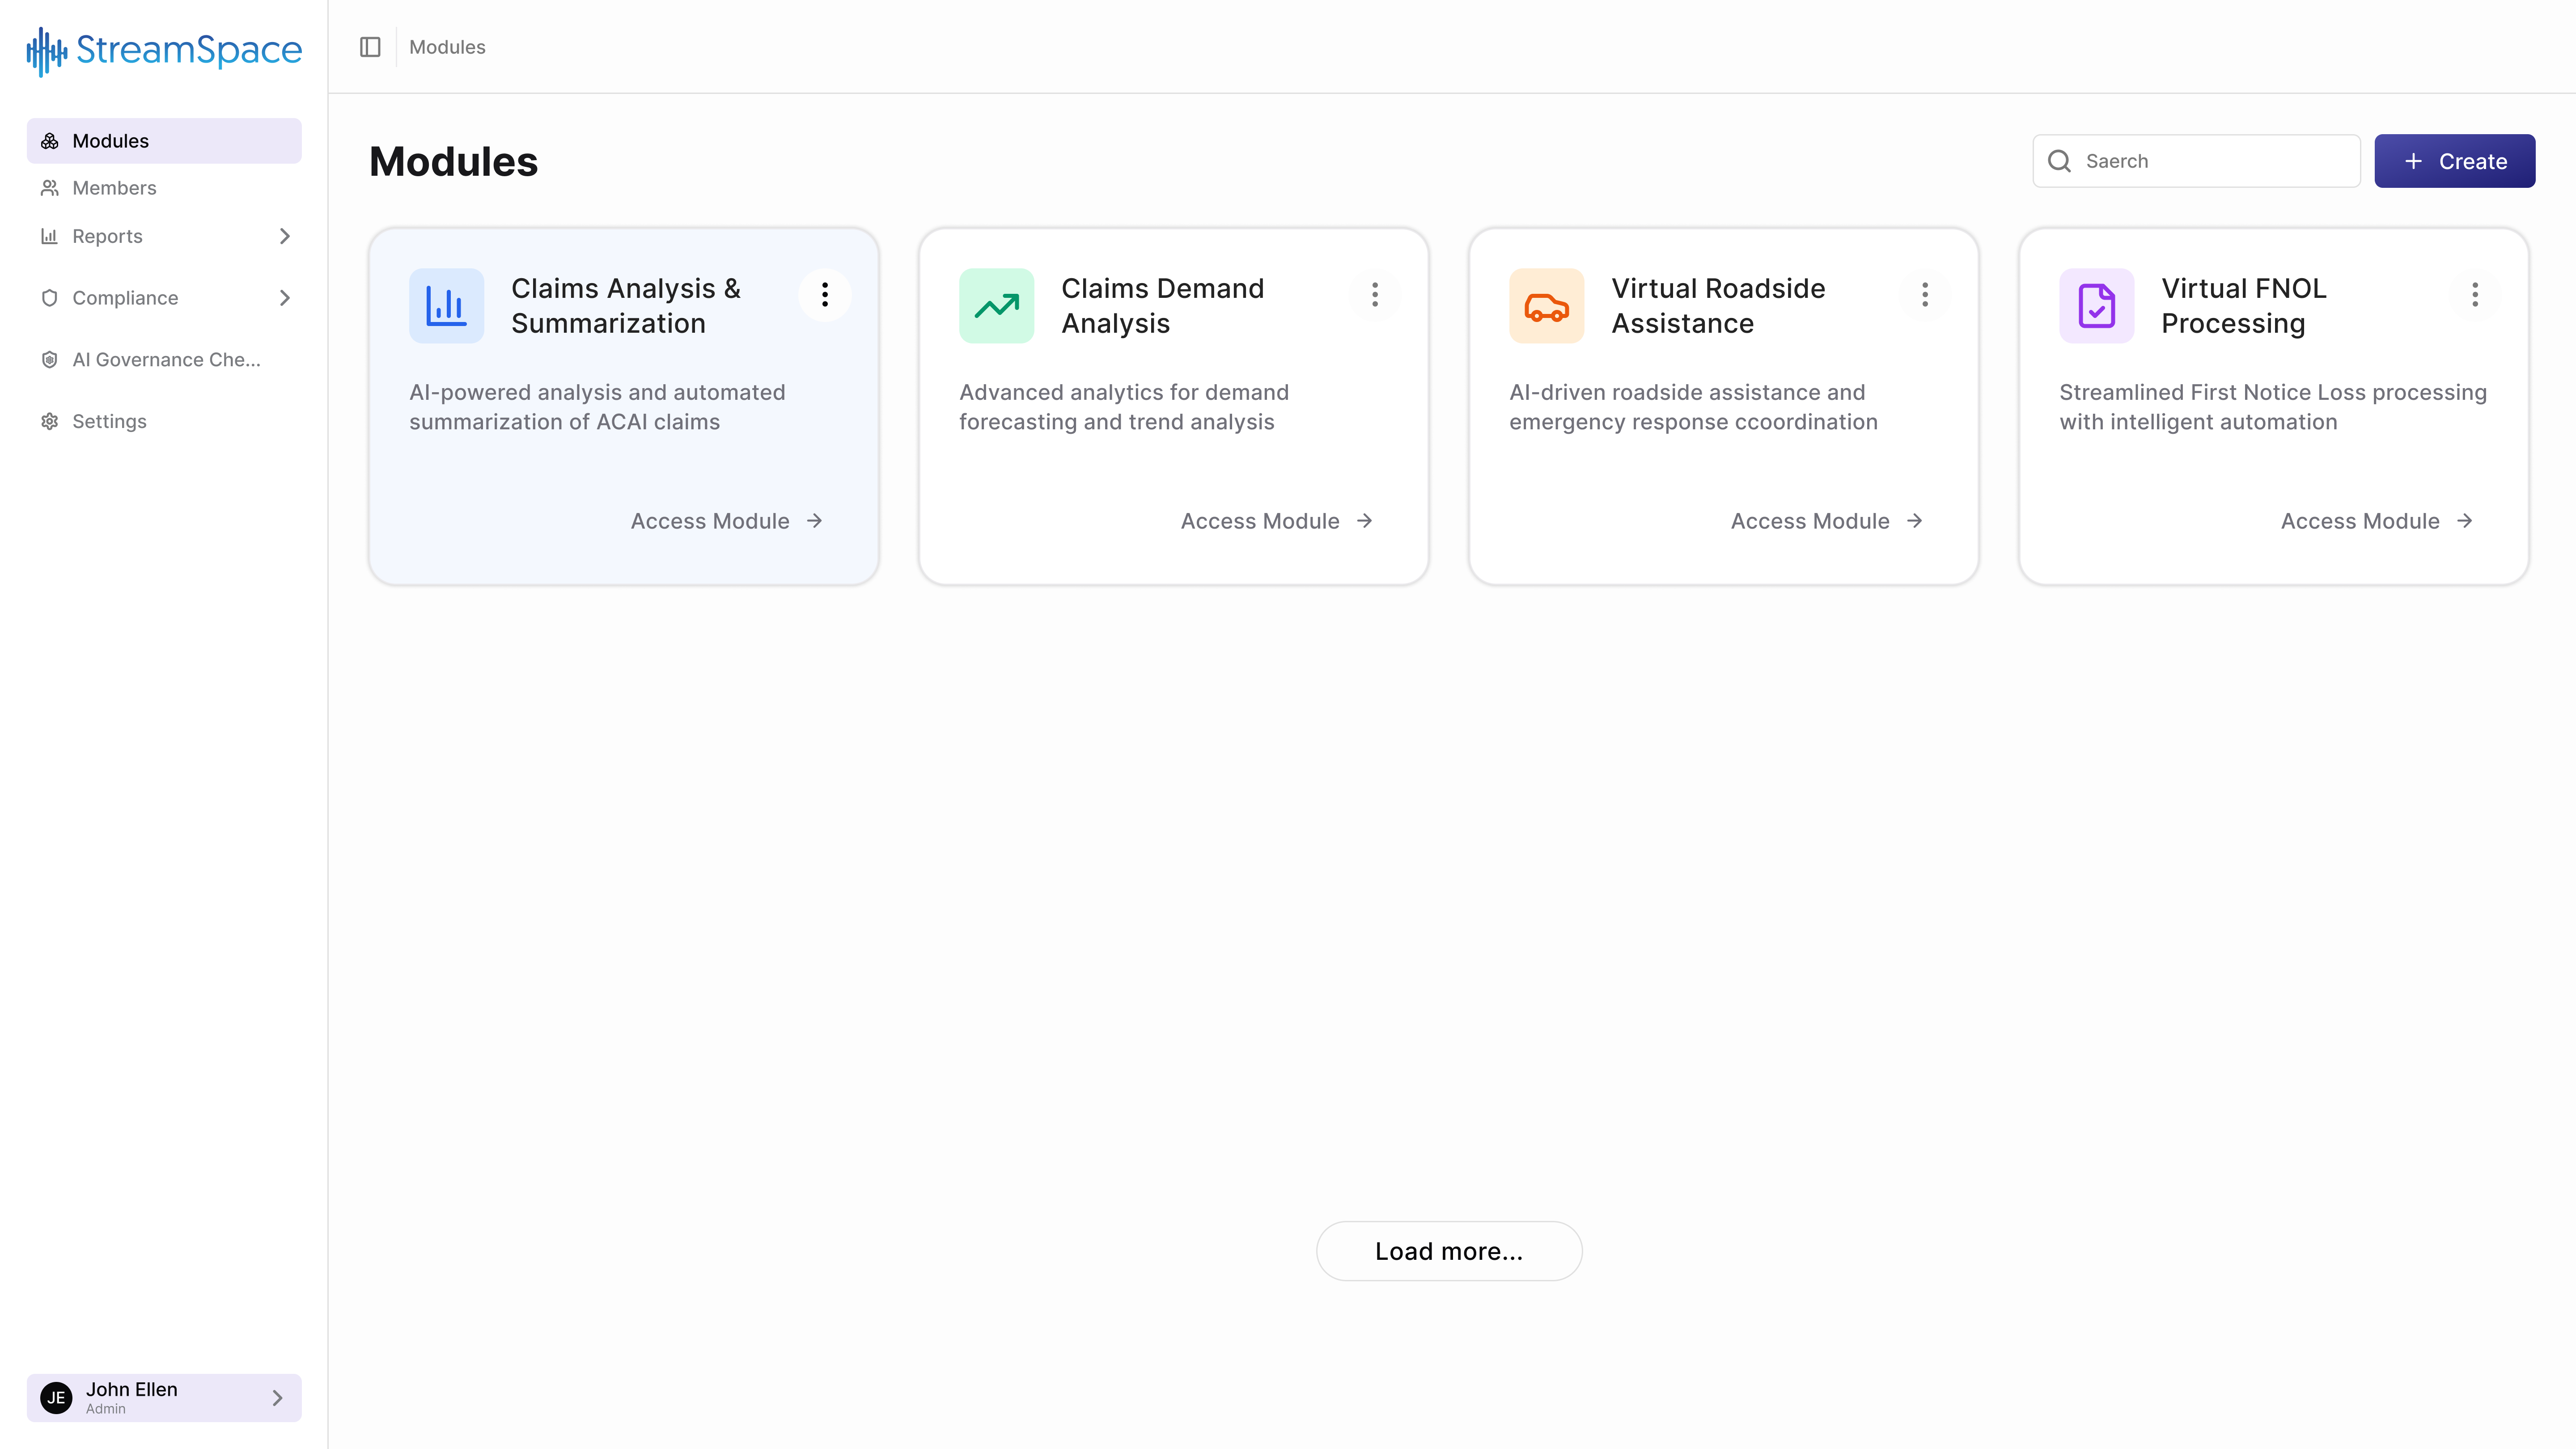
While Projects and Knowledge Base organize your documents, Modules are the AI-powered applications that work with that information.
The Modules Dashboard
The dashboard displays all available AI applications configured for your organization. Each module is a specialized tool designed to handle specific business processes.
Think of modules as apps within StreamSpace Hub—each one serves a distinct purpose and connects to your specific workflows. Learn more in the Modules Guide.
Your Available Modules
Pre-built and custom modules are customized for your organization:
- Industry-Specific Applications: Loan processing, claims analysis, and container tracking.
- Document Processing: Analysis, extraction, and insights modules.
- Custom Solutions: Specialized workflows matching department standards.
Your specific modules depend on your organization's subscription, industry, and configured workflows.
Complete Workflow Example
From Project Creation to AI Analysis
Let's walk through a complete workflow:
Scenario: Your team processes insurance claims and needs AI assistance.
- Create the Project: Create "Auto Claims Processing - 2025" with a clear description of ownership and scope.
- Organize Knowledge Base: Create folders: "Active Claims", "Completed Claims", "Templates".
- Upload Documents: Drag and drop claim forms, photos, and repair estimates into the "Active Claims" folder.
- AI Processing: During upload, AI automatically extracts keywords ("collision", "liability") and generates tags (
INSURANCE_CLAIM,AUTO_CLAIM). - Use AI Module: Open the "Claims Analysis & Summarization" module to analyze claims and generate summaries automatically.
- Maintain Organization: Move processed files to "Completed Claims" to keep the workspace clean.
Best Practices
For Project Organization
- Start Specific: Create projects for focused purposes rather than generic catch-all workspaces.
- Name Descriptively: Anyone should understand a project's purpose within 5 seconds of seeing its name.
- Control Access Carefully: Grant access only to team members who need it.
For Knowledge Base Management
- Create Folders Before Bulk Uploads: Plan your structure before adding files.
- Name Files Consistently: Use patterns like "YYYY-QQ-ClaimReport.pdf".
- Use Both Keywords and Tags: Keywords help AI search content; tags help humans organize categories.
For Search and Discovery
- Use Keywords for Content: Filter files based on specific topics mentioned in the text.
- Use Tags for Categories: Filter files based on document types (e.g.
INVOICE). - Combine Filters: Combine tags and keywords for precise searches.
Common Challenges and Solutions
"I Can't Find My Documents"
- Use keyword filters based on content, not just filenames.
- Check tags and folder structure.
- Try searching for specific terms in the search bar.
"AI Modules Don't Find Relevant Documents"
- Ensure documents are fully processed (check for green checkmarks).
- Check scan quality and resolution (use 300+ DPI scans).
- Structure folders logically so AI can trace source relationships.
"Knowledge Base Is Disorganized"
- Schedule periodic cleanup days to reorganize files.
- Establish consistent naming conventions.
"Too Many Projects"
- Archive completed projects.
- Consolidate similar projects.
- Establish clear criteria for when to create new projects.
Why This Matters
Most organizations struggle with document management. Files pile up in email attachments, and finding the right information takes longer than the actual work. StreamSpace Hub transforms this reality by offering:
- Content-level searching.
- Automated AI organization.
- Unified, secure team workspaces.
Every project you create, folder you structure, and tag you apply builds an AI-ready knowledge repository that makes your team faster, smarter, and more effective.
Related Articles
- Getting Started with StreamSpace Hub Modules
- Building Custom AI Workflows
- Workspace Settings & Team Management
- Document Viewer and AI Analysis
Summary
Projects and Knowledge Base are the foundation of intelligent document management. Every file you upload, folder you create, and tag you apply builds your organization's AI-ready knowledge repository. Start with one project, organize it well, and expand as your team sees the benefits.