Getting Started with StreamSpace Hub
Your workspace is ready. Start exploring AI-powered modules and create custom tools designed for your business needs.
Welcome to StreamSpace Hub
When you first sign into StreamSpace Hub, you'll land on the Modules dashboard—your central hub for accessing AI-powered tools and building new capabilities. This is where your team's work begins and where your organization's AI strategy comes to life.
Understanding Your Workspace
The Modules Dashboard
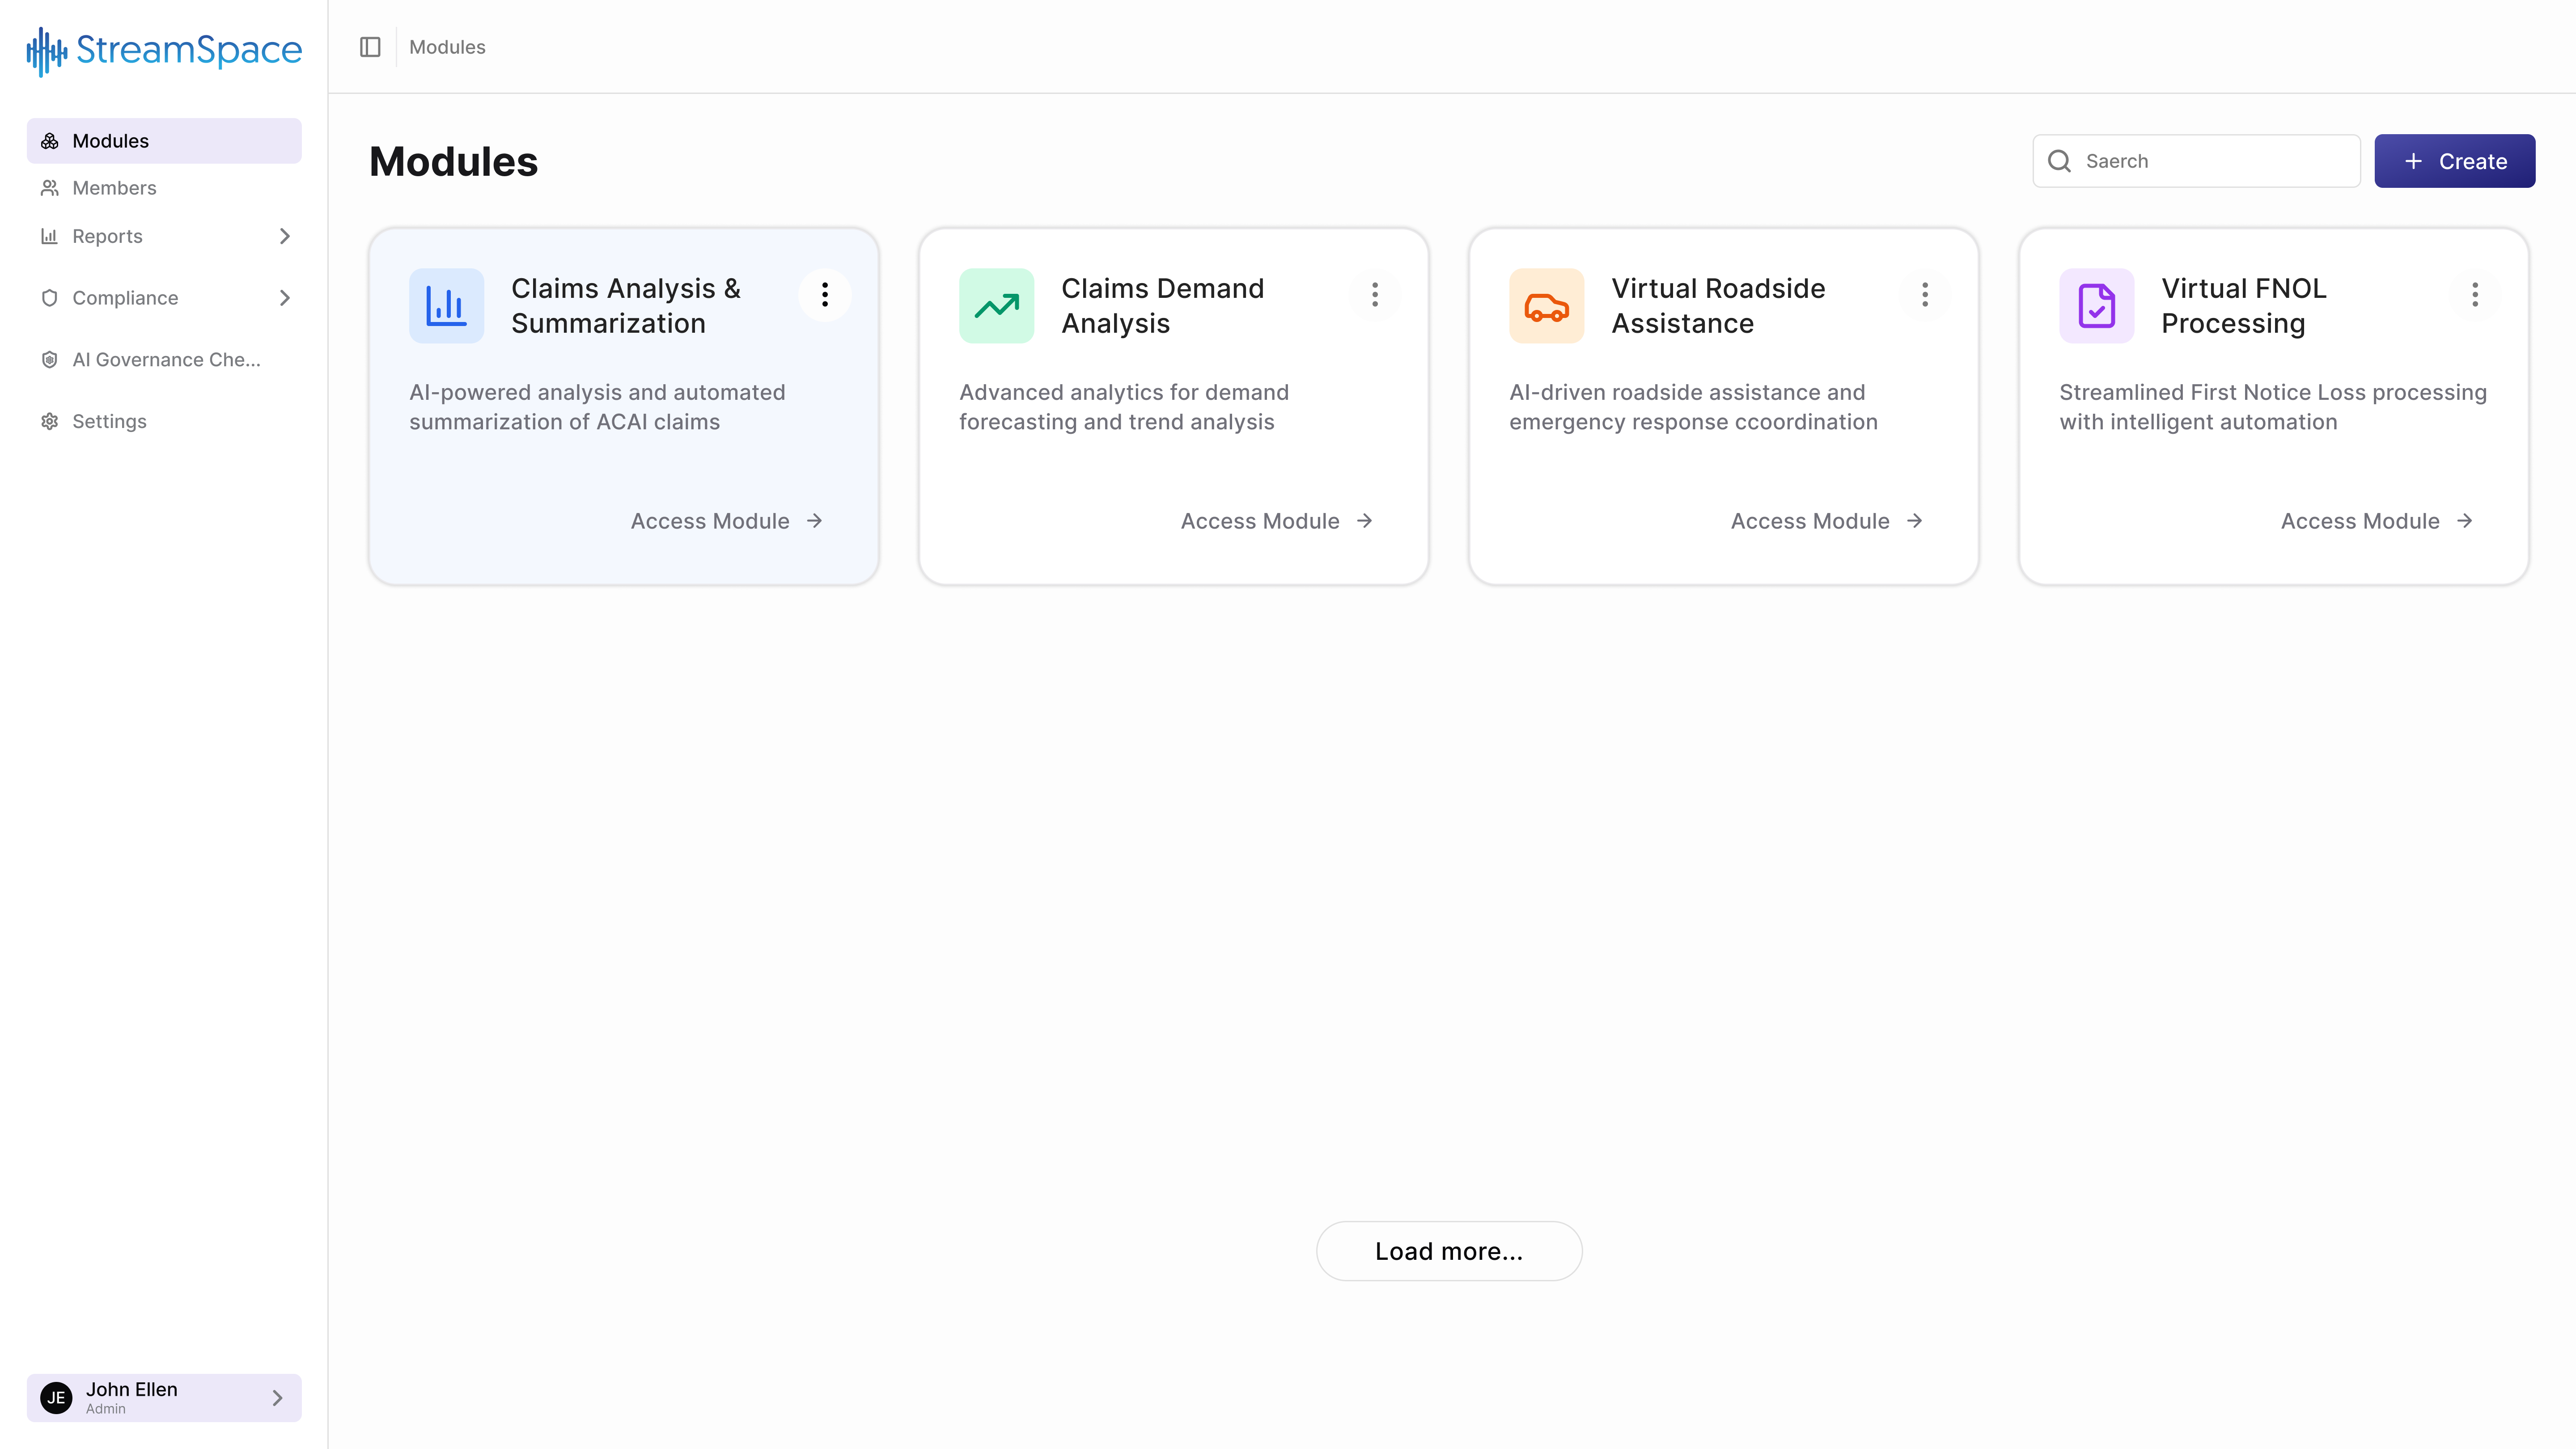
The dashboard displays all available AI applications configured for your organization. Each module is a specialized tool designed to handle specific business processes, from document analysis to customer service automation.
Think of modules as apps within StreamSpace Hub—each one serves a distinct purpose and connects to your specific workflows.
What You're Looking At
Module Cards: Each card represents a different AI-powered capability with a name, icon, description, and "Access Module" button.
Search and Create: Use the search bar to find specific modules quickly. Click "Create" to build custom modules for your unique needs.
Navigation Sidebar: Access Modules, Members, Reports, and Settings from the left sidebar.
User Profile: Switch themes (Light, Dark, System), access settings, or sign out from the bottom-left corner.
Your Available Modules
Pre-Built and Custom Modules
Your dashboard shows modules customized for your organization—both pre-built solutions and custom-created tools:
Industry-Specific Applications: Organizations in financial services use modules for loan processing and underwriting. Insurance companies leverage claims analysis and demand forecasting. Logistics businesses use container tracking and route optimization.
Document Processing: Any organization handling documents benefits from analysis, extraction, and insights modules.
Custom Solutions: Build modules for your unique workflows—department-specific tools, workflow automation, or integration points with existing systems.
Your specific modules depend on your organization's subscription, industry, and configured workflows.
How Modules Work
AI-Powered Automation
Each module combines artificial intelligence with your business processes to:
Automate Repetitive Tasks: Handle routine work automatically, freeing your team for higher-value activities.
Extract Insights: Analyze documents and data to surface key information and patterns.
Accelerate Decisions: Provide instant analysis and recommendations based on your data.
Ensure Consistency: Apply the same quality standards across all work, reducing errors.
Why Custom Modules Matter
While pre-built modules offer general functionality, custom modules deliver:
Exact Business Logic: Implement your organization's specific rules, criteria, and decision-making processes.
Industry Terminology: Use your sector's language, acronyms, and concepts that AI understands in context.
Company Standards: Apply your quality standards, formatting requirements, and output specifications.
Competitive Advantage: Build capabilities your competitors don't have, turning AI into a strategic differentiator.
Starting Your Work
Using Existing Modules
Select a module based on the task you need to accomplish:
- Read the module description to understand its purpose.
- Click "Access Module" to open the tool.
- Follow the module's workflow to complete your task.
- Return to dashboard to switch to a different module.
Finding Modules Quickly
Search Function: Use the search bar at the top to find specific modules by name.
Browse by Category: Scroll through the dashboard to discover available tools.
Load More: Click "Load more..." at the bottom if you have additional modules.
Creating Custom Modules
When to Build Custom Modules
Create custom modules when:
- Your workflow doesn't match any existing module.
- You need industry-specific terminology and logic.
- Department-level customization is required.
- You want to integrate with existing systems uniquely.
Prerequisites
Before creating a module:
Administrator Access: Module creation requires admin permissions. If you don't see the "Create" button, contact your administrator.
Clear Purpose: Define exactly what problem this module will solve.
Team Identification: Know which users need access and who will lead implementation.
Workflow Design: Map out the process the AI will follow.
The Module Creation Process
Step 1: Initiate Creation
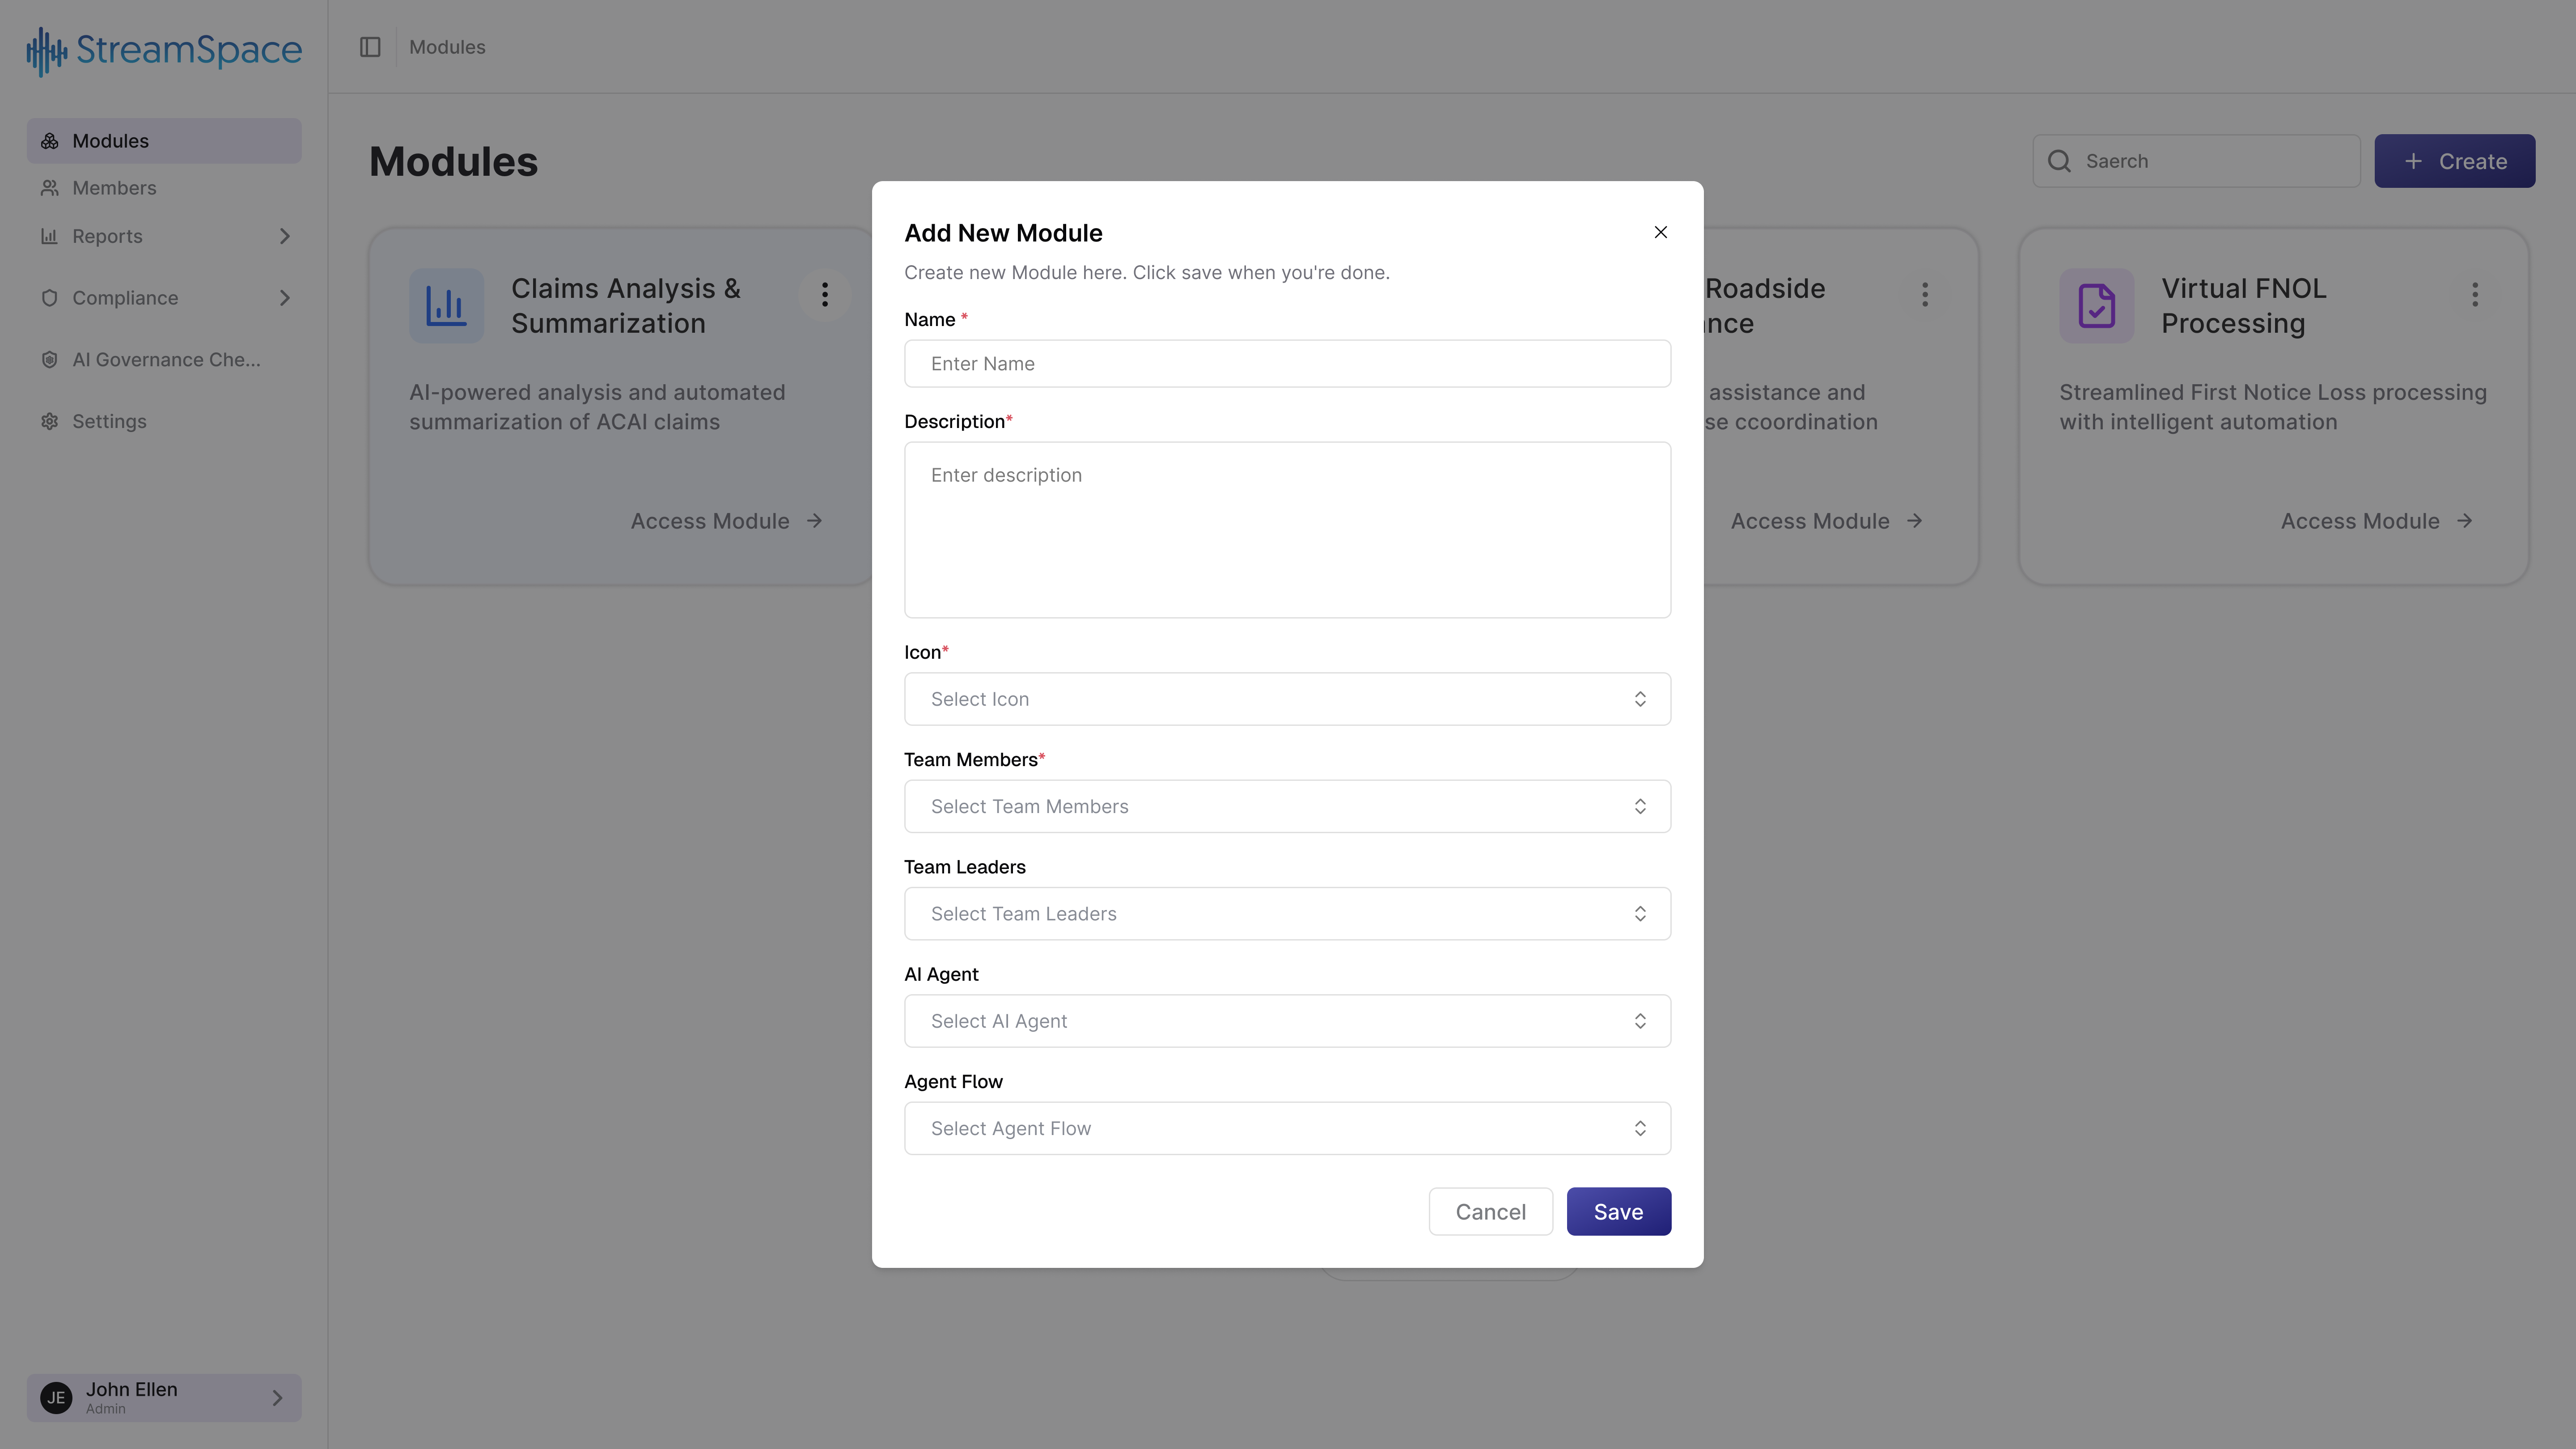
Click the Create button in the top-right corner of the dashboard. This opens the module configuration dialog.
Step 2: Define Module Identity
Name Your Module*
Choose a clear, descriptive name that immediately communicates purpose:
Good Examples:
- "Medical Claims Review"
- "Loan Application Analyzer"
- "Customer Inquiry Router"
- "Contract Compliance Checker"
Avoid: Generic names like "Module 1" or overly technical jargon.
Write the Description*
Explain what the module does, when to use it, and what outcomes it delivers.
Example: "Analyzes customer service inquiries to extract key information, classify issue types, and route to appropriate departments. Use for all incoming support requests to ensure faster response times."
Step 3: Visual Design
Select an Icon*
Choose an icon that visually represents your module's function. Use recognizable symbols related to the task, ensuring icons are distinct from existing modules.
Step 4: Configure Access
Assign Team Members*
Select which users can access this module. Include users who need the tool for daily work, exclude others to keep dashboards clean.
Designate Team Leaders
Assign leaders who will manage the module, train team members, monitor effectiveness, and suggest improvements.
Step 5: AI Configuration
Choose AI Agent
Select the AI agent that powers this module. Different agents have different strengths:
- Some excel at document analysis.
- Others specialize in conversational interactions.
- Some focus on data extraction.
- Others handle complex reasoning.
Select Agent Flow
Choose the workflow that defines how AI processes tasks. Flows determine what questions the AI asks, what information it extracts, and what output it produces.
You can create custom agent flows in the Agent Flow section before building modules. Learn more in the Agent Flows Guide.
Step 6: Save and Deploy
Click Save to create your module. It appears immediately on the dashboard for all assigned team members.
After Module Creation
Testing and Rollout
Validate Functionality: Test the module yourself with typical use cases before team rollout.
Announce Availability: Inform team members about the new module—what it does, when to use it, and how it helps.
Provide Training: Demonstrate typical workflows, show example inputs and outputs, and explain best practices.
Monitor Usage: Watch how the team uses the module and gather feedback for improvements.
Iterative Improvement
Modules should evolve based on real usage:
Regular Reviews: Schedule periodic assessments—is it still serving its purpose? Has the business process changed?
User Feedback Loop: Create channels for team input on what's working and what needs improvement.
Performance Monitoring: Track usage frequency, user satisfaction, time savings, and quality improvements.
Common Module Types
Document Processing
Analyze, extract, and summarize information from documents like contracts, invoices, resumes, and reports.
Customer Interaction
Handle inquiries, requests, and conversations—customer support triage, HR inquiries, sales qualification, help desk automation.
Analysis and Insights
Generate insights, recommendations, and strategic analysis—market trends, risk assessment, performance evaluation.
Workflow Automation
Automate multi-step processes and routing—approval workflows, task assignment, quality checks, compliance verification.
Best Practices
For Using Modules
- Explore Your Modules: Take time to understand what each module does. Click through descriptions to learn capabilities.
- Start with Common Tasks: Begin using modules for frequent, well-defined tasks before tackling complex workflows.
- Leverage Search: As you add more modules, use search to quickly access tools you need most.
For Creating Modules
- Start Specific, Then Expand: Build modules for narrow, well-defined tasks first. Master one use case before attempting complex multi-purpose tools.
- Name and Describe Clearly: Any team member should understand a module's purpose within 5 seconds of seeing its card.
- Assign Ownership: Every module should have a designated owner who monitors effectiveness and gathers feedback.
- Iterate Based on Reality: Let real usage data inform improvements. Listen to users and adapt quickly.
Getting Help
Learning Your Workspace
- Module Descriptions: Read the description on each card to understand purpose and use cases.
- Try It Out: The best way to learn is by using modules with real work.
- Documentation: Access detailed guides for specific modules through Help or Support.
- Ask Your Team: Team leaders and colleagues can share tips on making the most of each module.
Technical Support
- Contact Administrator: Your workspace administrator can help with access issues, module additions, or configuration questions.
- Submit Feedback: Report issues or suggest improvements to help enhance your workspace.
Maximizing Your Workspace
Integration Strategy
- Connect to Knowledge Base: Ensure modules have access to relevant documents and data. AI performs better with context. Learn more in the Knowledge Base Guide.
- Link Related Modules: Create workflows that span multiple modules for seamless complex processes.
- System Integration: Work with your administrator to integrate modules with other business systems.
Scaling Success
- Expand Access: Add more team members who could benefit.
- Create Variations: Build similar modules for related use cases.
- Share Best Practices: Document what makes successful modules work so you can replicate the approach.
Your Journey Ahead
Getting Started Checklist
After landing on your dashboard:
- Review all available modules and their descriptions.
- Identify which modules apply to your daily work.
- Access and explore one module to see how it works.
- Upload relevant documents to your Knowledge Base.
- Try using a module with your actual business data.
- Set your preferred theme for comfortable viewing.
Next Steps for Module Creation
If you have administrator access:
- Identify one time-consuming manual task.
- Design a module specifically for that task.
- Test thoroughly before team rollout.
- Gather feedback and iterate.
- Build the next module based on lessons learned.
Why This Matters
Your Modules dashboard isn't just a menu—it's your gateway to AI-powered productivity. Each module represents hours of manual work automated, complex analysis simplified, and business insights made accessible.
Creating custom modules transforms StreamSpace Hub from a tool into a platform—one that grows with your business and adapts to your unique needs. Every module you build represents a business process enhanced by AI and an organization positioned for competitive advantage.
Start with one module. Perfect it. Then build the next. Over time, you'll create an ecosystem of AI-powered tools that define how your organization works.